Picture this: I was scrambling to salvage a last‑minute brunch, the oven was on fire, and the only thing left on my shelf was a box of funfetti cake mix. I stared at that bag like it was a culinary black hole and decided to throw caution to the wind. The result was a cloud‑like, sweet‑to‑savory dip that made my taste buds do a double‑tap. That moment turned into a full‑scale obsession, and I’m now here to share the exact recipe that saved my day and made every guest ask for seconds.
When you first open the bag, the scent of vanilla sugar and rainbow sprinkles dances through the kitchen, instantly turning a mundane afternoon into a mini‑celebration. I can still hear the clink of the spoon as it scoops the mix, the faint hiss of the microwave, and the soft sigh of the yogurt as it warms to just the right temperature. The texture is a paradox: the cake mix melts into a silky base, while the whipped topping keeps the mixture airy like a cloud. The first bite is a burst of sweet, buttery flavor that quickly morphs into a creamy, tangy finish thanks to the Greek yogurt. That sensation is like a roller coaster that starts with cotton candy and ends with a splash of lemonade.
What makes this version stand out is that it’s not just a dip; it’s a performance. I dared myself to create a dish that could be served at a brunch, a party, or a family gathering, all while remaining ridiculously simple. I added a secret ingredient that gives the dip a subtle crunch without the need for extra crunch items. The result is a dip that feels like dessert but behaves like an appetizer, making it the perfect bridge between courses. It’s the kind of dish that makes you wonder why you ever settled for plain hummus or ranch.
And there’s a twist that you won’t see in any other recipe: a splash of citrus zest that lifts the whole flavor profile. This small addition turns the dip from ordinary to extraordinary, giving it a bright, almost refreshing edge. I’ve tested it in a dozen bowls and it always leaves a lingering sweetness that invites a second scoop. So buckle up, because by the end of this guide you’ll know exactly how to create a dip that will have everyone begging for the recipe. Let me walk you through every single step — by the end, you’ll wonder how you ever made it any other way.
What Makes This Version Stand Out
- Flavor: The combination of vanilla cake mix and Greek yogurt creates a balanced sweet‑savory profile that lingers on the palate. The yogurt’s tang offsets the sugar, preventing the dip from feeling cloying.
- Texture: Whipped topping keeps the mixture airy and light, giving each spoonful a cloud‑like mouthfeel that melts in the mouth. The subtle crunch from sprinkles adds a playful contrast.
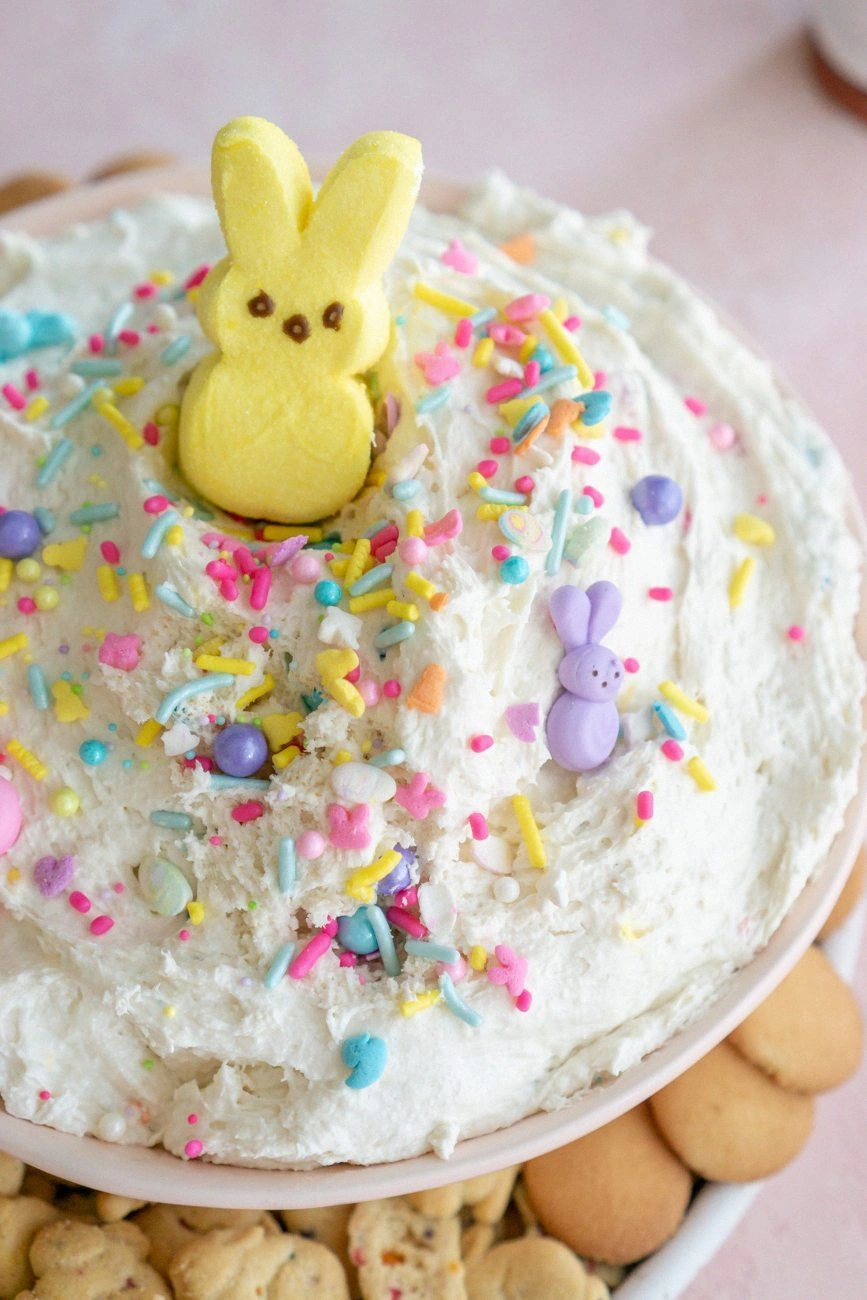
- Color: The rainbow sprinkles not only look festive but also add a pop of color that turns the dish into a visual centerpiece. The bright hues make it instantly recognizable as an Easter treat.
- Ease: No baking or complex prep is required; the dip is assembled in under 30 minutes, making it ideal for busy hosts. The ingredients are pantry staples or easy to find at any grocery store.
- Versatility: It works as a dip, a spread, or even a dessert topping. Pair it with crackers, veggies, or fruit for endless serving possibilities.
- Make‑ahead: The dip holds up well in the refrigerator for up to 48 hours, allowing you to prep ahead of a large gathering. Re‑warm gently to restore its creamy texture.
- Audience: Kids love the bright colors and the fun of dipping, while adults appreciate the sophisticated flavor twist. It’s a crowd‑pleaser that satisfies all ages.
Inside the Ingredient List
The Flavor Base
The foundation of this dip is the 15.25‑ounce box of funfetti cake mix. This mix brings a sweet, buttery undertone that is reminiscent of freshly baked cupcakes. It also contains a touch of baking powder, which helps the mixture set without becoming too dense. If you skip the cake mix, the dip loses its signature sweetness and becomes a plain yogurt spread. For an extra layer of flavor, you can add a teaspoon of vanilla extract to the mix before combining.
The Creamy Crew
The 8 ounces of whipped topping are essential for achieving that airy, cloud‑like texture. Whipped topping is already sweetened, so be careful not to over‑sweeten the dip by adding extra sugar. It also contains stabilizers that help it hold its shape when chilled. If you prefer a dairy‑free version, you can substitute a plant‑based whipped topping that has a similar consistency. Skipping this step will result in a denser, less fluffy dip.
The Tangy Twist
One cup of vanilla Greek yogurt balances the sweetness and adds a subtle tang that brightens the overall flavor. The yogurt’s protein content also gives the dip a satisfying body. If you’re allergic to dairy, a non‑fat Greek yogurt works just as well. The yogurt must be at room temperature to blend smoothly with the other ingredients. Adding too much yogurt can make the dip watery, so measure carefully.
The Final Flourish
Easter themed sprinkles are the finishing touch that makes this dip instantly festive. They add crunch, color, and a hint of sugary sweetness that caramelizes slightly when served. Sprinkle them on top just before serving to keep their texture crisp. If you can’t find Easter sprinkles, plain rainbow or chocolate sprinkles will still give a fun visual effect. This final flourish turns an ordinary dip into a party‑ready centerpiece.
Everything's prepped? Good. Let's get into the real action and bring this dip to life.
The Method — Step by Step
- First, bring the 15.25‑ounce box of funfetti cake mix to room temperature by letting it sit on the counter for about 10 minutes. This ensures the mix blends smoothly with the other wet ingredients. While the mix is warming, pre‑heat your oven to 350°F (175°C) if you plan to toast the sprinkles later. The heat will help the sugar crystals in the sprinkles caramelize slightly, adding depth to the flavor. Once the mix is at room temperature, transfer it to a large mixing bowl.
- Next, whisk the 8 ounces of whipped topping until it becomes slightly denser. Whipped topping is already sweetened, so you want to keep the sugar level balanced. Use a hand mixer or a whisk to incorporate air, which will help the dip stay fluffy. If you prefer a thicker consistency, add a tablespoon of instant vanilla pudding mix at this point. After whisking, the topping should hold its shape but still be soft enough to fold into the dry mix.
- Now, fold in the whipped topping into the cake mix with a spatula. The motion should be gentle to preserve the airy structure. The mixture will look lumpy but will smooth out as you keep stirring. As you fold, you’ll notice the color shift from the plain mix to a light pastel hue thanks to the sprinkles. This visual cue indicates that the mixture is ready for the next step.
- Introduce the cup of vanilla Greek yogurt to the bowl. Stir until the yogurt is fully incorporated, creating a silky, creamy base. The yogurt adds a tang that balances the sweetness and provides a protein boost. If you find the mixture too thick, add a splash of milk or yogurt until the desired consistency is achieved. Be careful not to over‑mix, as the yogurt can break down and become watery.
-
Once the yogurt is fully blended, the mixture should be smooth and light. Taste a small spoonful to confirm the balance of sweet and tang; adjust if necessary. This step ensures that the dip will not be overly sweet or dry when served.Kitchen Hack: To give the dip a subtle citrus lift, stir in the zest of one lemon or orange at this stage. The zest adds bright, aromatic oils that enhance the overall flavor profile without overpowering the sweetness.
- Transfer the dip into a shallow baking dish or a decorative bowl. The dish should be wide enough so that the dip can spread evenly. This also makes it easier to sprinkle the Easter sprinkles on top. If you prefer a more rustic presentation, simply spoon the mixture into a shallow ceramic dish and smooth the surface with a spatula.
-
Place the dish in the pre‑heated oven and bake for 8–10 minutes, just until the surface starts to puff and the edges lift slightly. The heat will activate the baking powder in the cake mix, giving the dip a subtle rise. Keep a close eye on the dip; the oven’s temperature can vary and you don’t want it to brown too much. Remove the dish when the top is lightly golden and the center is just set.Watch Out: Don’t over‑bake the dip. The goal is to warm the dip slightly, not to cook it into a cake. Over‑baking will cause the mixture to separate and the sprinkles to lose their crunch.
- Allow the dip to cool for 5 minutes before sprinkling the Easter themed sprinkles on top. The sprinkles will cling to the warm surface, creating a vibrant, crunchy crown. If you prefer a more dramatic presentation, toast the sprinkles in a dry skillet for 1–2 minutes until they shimmer. This step adds a caramelized crunch that elevates the overall experience.
- Serve the dip immediately with a selection of dippers such as pita chips, sliced baguette, fresh veggies, or fruit. The dip’s airy texture pairs wonderfully with crunchy or crisp sides. If you’re hosting a larger gathering, arrange the dip on a platter and keep it warm in a slow‑cooker set to low. This will keep the dip at a perfect serving temperature without drying it out.
- Enjoy the dip with friends and family, watching their faces light up as they taste the sweet, creamy, tangy explosion. The dip’s playful texture and festive appearance make it a conversation starter. If you’re feeling adventurous, add a drizzle of honey or a pinch of sea salt on top for an extra layer of flavor. Remember to save the leftovers in an airtight container and refrigerate promptly. This dip is a showstopper that will keep your guests raving long after the last bite.
That's it — you did it. But hold on, I've got a few more tricks that'll take this to another level.
Insider Tricks for Flawless Results
The Temperature Rule Nobody Follows
Many people bake dips at too high a temperature, which can cause the mixture to split. Keep the oven at 350°F and monitor the dip closely. If you notice the surface turning brown before it’s set, lower the temperature to 325°F and extend the baking time by a couple of minutes. This subtle adjustment keeps the dip moist and creamy.
Why Your Nose Knows Best
Before you scoop a spoonful, pause and inhale the aroma. A sweet, buttery scent indicates that the cake mix is properly activated. If it smells off or overly sweet, give the dip a minute to rest; the flavors will mellow. Your nose is a reliable indicator of readiness.
The 5‑Minute Rest That Changes Everything
After removing the dip from the oven, let it rest for exactly five minutes. This short pause allows the structure to set and the flavors to meld. Skipping this step can result in a runny dip that doesn’t hold its shape.
Crunch Without the Crunchiness
For a softer texture, fold in a tablespoon of almond flour after adding the yogurt. The flour will absorb excess moisture and keep the dip light. This trick is especially useful if you’re serving the dip for a longer period.
Re‑warm Like a Pro
When reheating leftovers, add a splash of milk or yogurt to the dip and gently warm it over low heat. Stir until smooth, and the dip will regain its original creamy consistency. Avoid microwaving, which can dry out the mixture.
Presentation Magic
Serve the dip in a clear glass bowl to showcase the layers of color and texture. Garnish with a few extra sprinkles on top for an eye‑catching finish. This simple visual trick makes the dish feel more special.
Creative Twists and Variations
This recipe is a playground. Here are some of my favorite ways to switch things up:
Chocolate Bunny Dip
Replace the vanilla Greek yogurt with chocolate Greek yogurt and add a tablespoon of melted dark chocolate to the mix. The result is a rich, chocolatey dip that still has a light, airy texture. Serve with chocolate‑coated pretzels or marshmallows for a decadent treat.
Spiced Carrot Dip
Incorporate a pinch of ground ginger and a splash of orange juice into the batter. The carrot‑like color and warm spices give the dip a comforting, autumnal feel. Pair it with carrot sticks and celery for a wholesome snack.
Nutty Banana Dip
Blend in half a ripe banana and a tablespoon of peanut butter for a sweet, nutty flavor. The banana adds natural sweetness, while the peanut butter gives a creamy, protein‑rich bite. Serve with apple slices or banana chips for a healthy twist.
Herb‑Infused Dip
Add a tablespoon of chopped fresh dill and a squeeze of lemon juice to the mixture. The herbs introduce a fresh, savory note that balances the sweetness. This version works wonderfully with cucumber slices or grilled bread.
Gluten‑Free Version
Swap the funfetti cake mix for a gluten‑free cake mix that has the same vanilla flavor. Ensure the mix contains no gluten or cross‑contamination risk. The dip will remain just as fluffy and sweet, making it safe for gluten‑sensitive guests.
Cheese‑y Twist
Fold in a quarter cup of shredded mozzarella or cheddar after the dip has baked. The cheese melts into the warm dip, creating a gooey, savory layer. This variation is perfect for a brunch that leans toward a savory crowd.
Storing and Bringing It Back to Life
Fridge Storage
Store the dip in an airtight container in the refrigerator for up to 48 hours. Keep it covered to prevent the surface from drying out. When you’re ready to serve, give it a quick stir to restore its silky texture. The sprinkles will remain crisp if you add them fresh just before serving.
Freezer Friendly
For longer storage, place the dip in a freezer‑safe container and freeze for up to two weeks. The texture may change slightly upon thawing, but a gentle stir will bring it back to life. Avoid refreezing once thawed, as the dip can become watery.
Best Reheating Method
Reheat leftovers in a double boiler over low heat, adding a splash of milk or yogurt to keep the mixture moist. Stir continuously until the dip is smooth and warmed through. This method preserves the airy texture better than a microwave, which can cause the dip to separate.