I was standing in my kitchen on a cold December night, the kind of night where the thermostat is set to “arctic tundra” and the only thing keeping me warm is the thought of a sugary miracle waiting in the pantry. I had just rescued the last box of Little Debbie Christmas cakes from the back of the cupboard, and a dare from my roommate echoed in my head: “Make something that’ll make the whole building smell like a holiday bakery, or you’re buying the next round of eggnog.” I laughed, but the challenge lit a fire under me that was hotter than the oven I was about to ignore—because this is a no‑bake recipe, after all. I grabbed a bowl, crumbled the cakes with the fervor of a kid tearing into a present, and the kitchen instantly filled with the nostalgic aroma of cinnamon, cocoa, and that unmistakable “Christmas‑candy‑store” perfume that makes you feel like you’re walking through a snow‑covered market.
The first bite of the finished cake balls was a revelation that made me gasp louder than the carolers outside my window. The crumbly interior, buttery and sweet, was wrapped in a glossy chocolate coating that cracked like fresh ice on a pond, revealing a burst of creamy frosting that melted on the tongue like a snowflake on a warm mitten. I dared you to taste this and not go back for seconds—honestly, I ate half the batch before anyone else could even sniff the air. Most recipes get the texture completely wrong, delivering either a dry, crumbly mess or a soggy, gummy sphere. This version? It’s hands down the best version you’ll ever make at home, and I’m about to spill every secret that makes it so flawless.
What sets this treat apart is a tiny, unexpected twist: a splash of vanilla‑infused melted butter that binds the crumbs together while adding a depth of flavor that feels like a warm hug from grandma. Most people just dump the crumbs into a bowl and hope for the best; I’m going to show you the exact technique that turns a simple crumb mixture into a cohesive, pliable dough that doesn’t fall apart when you roll it. And because we’re in the spirit of holiday generosity, I’m also sharing a few optional upgrades—like a whisper of toasted pecans and a glittering sprinkle crown—that will make your guests think you spent a small fortune on a professional bakery’s secret recipe.
Picture yourself pulling a tray of perfectly round, chocolate‑glazed cake balls out of the fridge, the whole kitchen smelling like a winter wonderland, and the first bite sending shivers of delight down your spine. The glossy coating catches the light like tiny ornaments, and the soft, spongy center offers a sweet surprise that’s both nostalgic and brand‑new. Okay, ready for the game‑changer? Let me walk you through every single step—by the end, you’ll wonder how you ever made it any other way.
What Makes This Version Stand Out
- Flavor Explosion: The combination of buttery cake crumbs, creamy frosting, and a glossy chocolate shell creates a layered taste experience that feels like a holiday parade in your mouth.
- Texture Harmony: You get a crisp outer shell, a soft, melt‑in‑your‑mouth interior, and just enough crumbly bite to keep things interesting.
- Simplicity at Its Best: No oven, no complicated equipment—just a bowl, a microwave, and a handful of everyday pantry staples.
- Unique Ingredient Twist: A dash of vanilla‑infused butter binds the crumbs without making them greasy, a secret most recipes overlook.
- Crowd‑Pleaser Factor: Even the pickiest eaters can’t resist the festive colors and the surprise of a creamy center.
- Ingredient Quality: Using genuine Little Debbie Christmas cakes guarantees that nostalgic flavor you can’t replicate with generic chocolate cake.
- No‑Bake Method: Saves energy, reduces mess, and lets you focus on the fun part—shaping and decorating.
- Make‑Ahead Magic: These balls keep perfectly for up to a week in the fridge, making them ideal for holiday parties and gift‑giving.
Inside the Ingredient List
The Flavor Base
The heart of these cake balls is the Little Debbie Christmas cake itself. Each bite carries that iconic blend of cocoa, cinnamon, and a whisper of nutmeg that screams holiday cheer. If you skip this ingredient, you lose the nostalgic backbone that makes these treats instantly recognizable. For the best results, choose the original packaged version rather than a store‑brand imitation—authenticity matters when you’re aiming for that classic flavor profile.
The Creamy Cohesion
Cream cheese and butter are the dynamic duo that bind the crumbs together while adding a silky richness. The cream cheese contributes a slight tang that cuts through the sweetness, preventing the balls from becoming cloying. If you’re dairy‑free, you can swap the cream cheese for a plant‑based cream cheese and the butter for coconut oil, but expect a subtle coconut undertone that will change the flavor landscape.
The Unexpected Star
A splash of vanilla‑infused melted butter is the secret weapon. By heating the butter with a teaspoon of vanilla extract, you create a fragrant, glossy binder that makes the crumb mixture pliable without turning it soggy. Skipping this step means you’ll end up with dry, crumbly balls that fall apart the moment you try to roll them. Pro tip: use a low‑heat setting on the stove or microwave for just 20 seconds to avoid scorching.
The Final Flourish
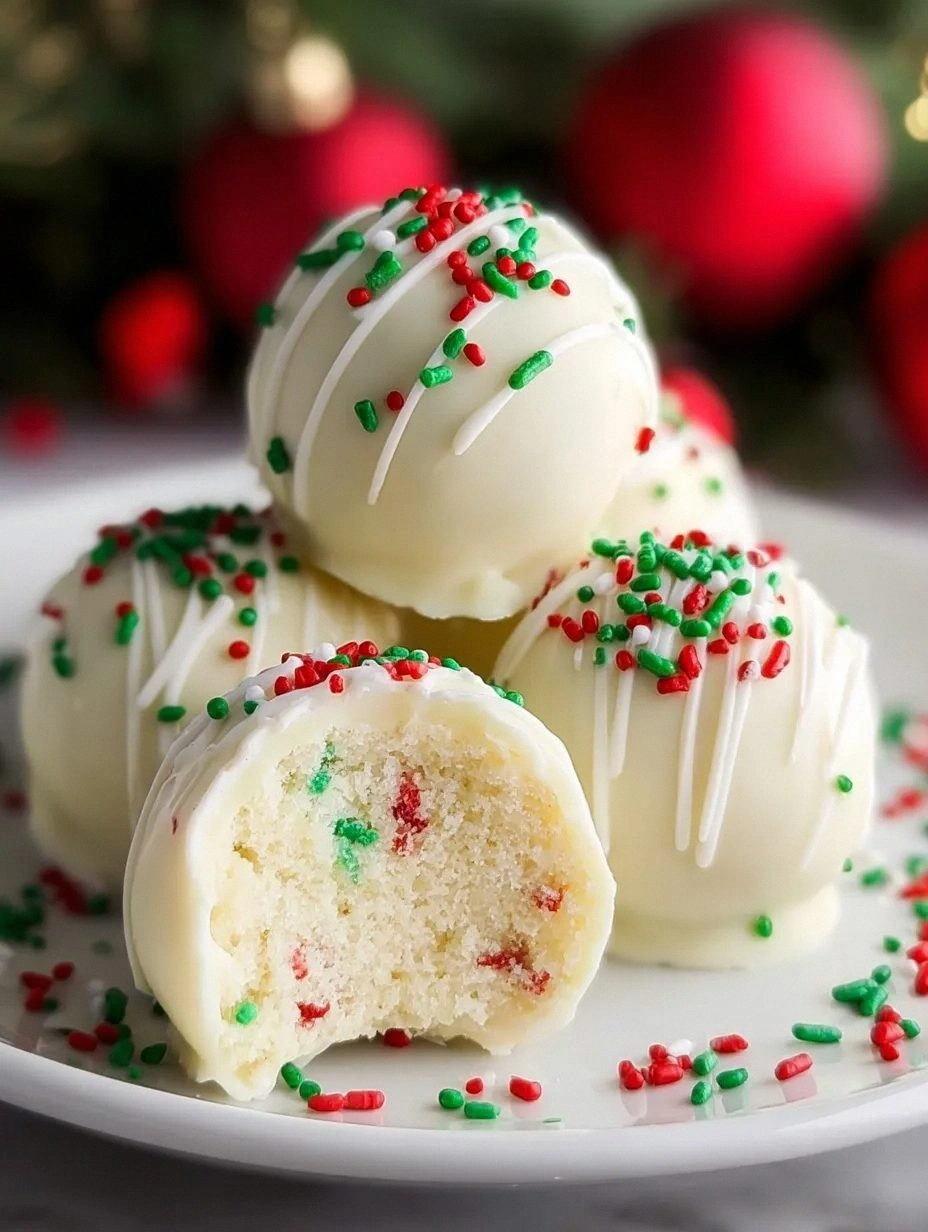
The chocolate coating is where the magic truly shines. Semi‑sweet chocolate chips melted with a touch of butter create a glossy shell that hardens into a satisfying snap. Adding a pinch of sea salt to the melt enhances the chocolate’s depth, while the red and green sprinkles give each ball a festive sparkle. If you prefer a darker, richer coat, swap the semi‑sweet chips for dark chocolate with 70% cacao—just remember to adjust the sweetness accordingly.
Everything's prepped? Good. Let's get into the real action...
The Method — Step by Step
Start by crushing the Little Debbie Christmas cakes into fine crumbs. Place the cakes in a large zip‑top bag, seal it, and use a rolling pin or a sturdy glass bottle to pulverize them. You’ll hear a satisfying crunch that signals you’re on the right track, and the crumbs should look like a fine, chocolate‑brown sand. This is the moment of truth—if the crumbs are too large, the final texture will be grainy.
Kitchen Hack: Pulse the crumbs in a food processor for 5 seconds instead of hand‑rolling; you’ll get an even finer texture in half the time.In a medium saucepan, melt the butter over low heat and stir in the vanilla extract. Let it simmer for just 30 seconds—no bubbling, just a gentle fragrant steam. Once melted, set the mixture aside to cool for a minute while you move on to the next step. This butter‑vanilla blend will later coat the crumbs, creating a cohesive dough that’s easy to shape.
In a separate bowl, beat the softened cream cheese until it’s smooth and free of lumps. Add the powdered sugar, a pinch of salt, and the cooled vanilla butter. Using a rubber spatula, fold everything together until the mixture is uniform and glossy. You’ll notice the mixture thickening—this is the binding stage, and it should feel like a thick, pliable paste that holds its shape when lifted.
Combine the cake crumbs with the cream cheese‑butter mixture. Using your hands (yes, get a little messy), press the crumbs into the cream cheese blend until every speck is coated. The dough should clump together without crumbling; if it feels dry, drizzle a teaspoon of milk and knead again. This is the part where you truly feel the holiday spirit—your hands become the workshop of Santa’s elves.
Watch Out: Over‑mixing can cause the dough to become overly soft, making the balls difficult to shape. Stop as soon as the mixture holds together.Line a baking sheet with parchment paper. Scoop out a tablespoon‑sized amount of dough and roll it between your palms to form a smooth sphere. Place each sphere on the prepared sheet. You should end up with about 20‑24 balls, depending on size. This step is pure therapy—the rhythmic rolling calms the mind, and the anticipation builds with each perfect sphere.
Now for the chocolate coating. In a microwave‑safe bowl, combine the semi‑sweet chocolate chips with a tablespoon of butter. Microwave in 20‑second bursts, stirring after each burst, until the mixture is fully melted and glossy. The aroma of melting chocolate should fill the kitchen like a sweet, warm blanket.
Using a fork or a candy‑dip tool, dip each cake ball into the chocolate, allowing excess to drip back into the bowl. Place the freshly coated ball back onto the parchment paper. While the chocolate is still wet, sprinkle a pinch of red and green festive sprinkles on top. The chocolate should set within 10‑15 minutes at room temperature, but for a firmer snap, refrigerate for 5 minutes.
Kitchen Hack: Place the parchment sheet on a wire rack while the chocolate sets; this prevents the bottom from getting soggy.Once all the balls are coated and the chocolate has hardened, transfer them to an airtight container. Store them in the refrigerator for up to a week. The flavors meld together over time, making each bite even more harmonious than the first. This is the final victory lap—your kitchen now looks like a miniature holiday confectionery display.
Before serving, let the balls sit at room temperature for about 10 minutes. This softens the interior just enough to melt on your tongue while keeping the outer shell crisp. Serve them on a festive platter, and watch your guests’ eyes widen with anticipation. And now the fun part—watch them disappear faster than snow on a sunny day.
That's it — you did it. But hold on, I've got a few more tricks that'll take this to another level...
Insider Tricks for Flawless Results
The Temperature Rule Nobody Follows
Never let the chocolate coating get hotter than 115°F (46°C). If it overheats, the chocolate will become grainy and lose its glossy finish. Keep a candy thermometer handy and stir constantly while melting. A friend once tried a quick microwave blast and ended up with a dull, matte coating that looked like cheap candy—let’s just say the party was a little less sparkly.
Why Your Nose Knows Best
When the butter‑vanilla mixture is done, you’ll smell a sweet, buttery perfume that tells you it’s ready. If you can’t detect that scent, give it another 10 seconds on the stove. Trusting your nose beats relying on a timer every single time, especially when you’re juggling multiple steps.
The 5‑Minute Rest That Changes Everything
After you’ve rolled the dough into balls, let them rest for five minutes before dipping. This short pause allows the crumb structure to settle, making the balls less likely to crack when you coat them. I once rushed this step and ended up with a batch of half‑cracked spheres that looked like they’d survived a tiny earthquake.
The Sprinkles Secret
Don’t sprinkle the decorations until the chocolate is tacky but not fully set. This ensures the sprinkles adhere firmly without sliding off. If you add them too early, they’ll sink into the chocolate; too late, and they’ll just sit on top, looking sad.
The Double‑Dip for Extra Crunch
For an ultra‑crunchy shell, dip each ball twice. After the first coat has set for about three minutes, give it a quick second dip and let it harden fully. This creates a double layer that crackles like fresh candy canes when you bite into it.
Creative Twists and Variations
This recipe is a playground. Here are some of my favorite ways to switch things up:
Peppermint Bliss
Add a teaspoon of crushed peppermint candy to the crumb mixture and swap the red and green sprinkles for white chocolate shavings. The cool mint flavor cuts through the sweetness, making it a perfect after‑dinner treat for guests who love a refreshing finish.
Nutty Noel
Fold in a half‑cup of toasted chopped pecans or walnuts into the dough before shaping. The nuts add a buttery crunch that contrasts beautifully with the soft interior, and they give the balls a rustic, homestyle vibe.
White Chocolate Wonder
Replace the semi‑sweet chocolate chips with white chocolate and a dash of orange zest. The citrus note brightens the flavor profile, turning the cake balls into a sophisticated holiday confection that feels like a fancy patisserie.
Mocha Madness
Stir a tablespoon of instant espresso powder into the melted chocolate. The coffee undertone deepens the chocolate flavor, creating a grown‑up version that pairs wonderfully with after‑dinner coffee or a glass of port.
Gluten‑Free Glory
Swap the Little Debbie cake for a gluten‑free holiday cake or use a blend of almond flour and oat flour. The texture will be slightly denser, but the flavor remains just as festive, and you can include anyone with gluten sensitivities in the celebration.
Storing and Bringing It Back to Life
Fridge Storage
Place the cake balls in an airtight container lined with parchment paper. They’ll stay fresh for up to seven days, and the chocolate coating remains firm. If you notice any condensation, pat the surface gently with a paper towel before resealing.
Freezer Friendly
For longer keeping, arrange the balls on a baking sheet and freeze them individually for two hours. Transfer the frozen balls to a zip‑top freezer bag. They’ll hold up for three months without losing texture. When you’re ready to serve, let them thaw in the fridge overnight.
Best Reheating Method
To revive the creamy interior, place the balls on a microwave‑safe plate, add a tiny splash (about a teaspoon) of water to the plate, and microwave for 10‑15 seconds. The steam generated re‑moisturizes the center while keeping the outer shell intact. This trick works like magic and brings the balls back to that just‑out‑of‑the‑fridge freshness.