The kitchen was a battlefield after I attempted a last‑minute sandwich lunch. The dough had doubled in volume, the yeast had exploded, and the counter looked like a flour‑filled crater. I stared at the soggy mess and thought, “Maybe this is how my ancestors baked bread.” But that moment sparked a revelation: what if we could tame the chaos and create a loaf that is soft, fluffy, and irresistibly sandwich‑friendly? That was the genesis of this recipe.
Picture the scent of whole wheat rising from a warm oven, the crackle of a golden crust, and the promise of a bite that feels like a cloud. Imagine the texture—soft on the inside, yet sturdy enough to hold lettuce, cheese, and the juiciest of tomatoes without collapsing. The sound of the dough rising, the gentle hiss as it bakes, and the visual of steam curling off the loaf all combine into a multisensory experience that makes breakfast, lunch, or dinner feel like a celebration. I have been chasing that perfect sandwich bread for years, and this version finally delivers. I dared myself to create something that would not only satisfy hunger but also become a staple in every kitchen.
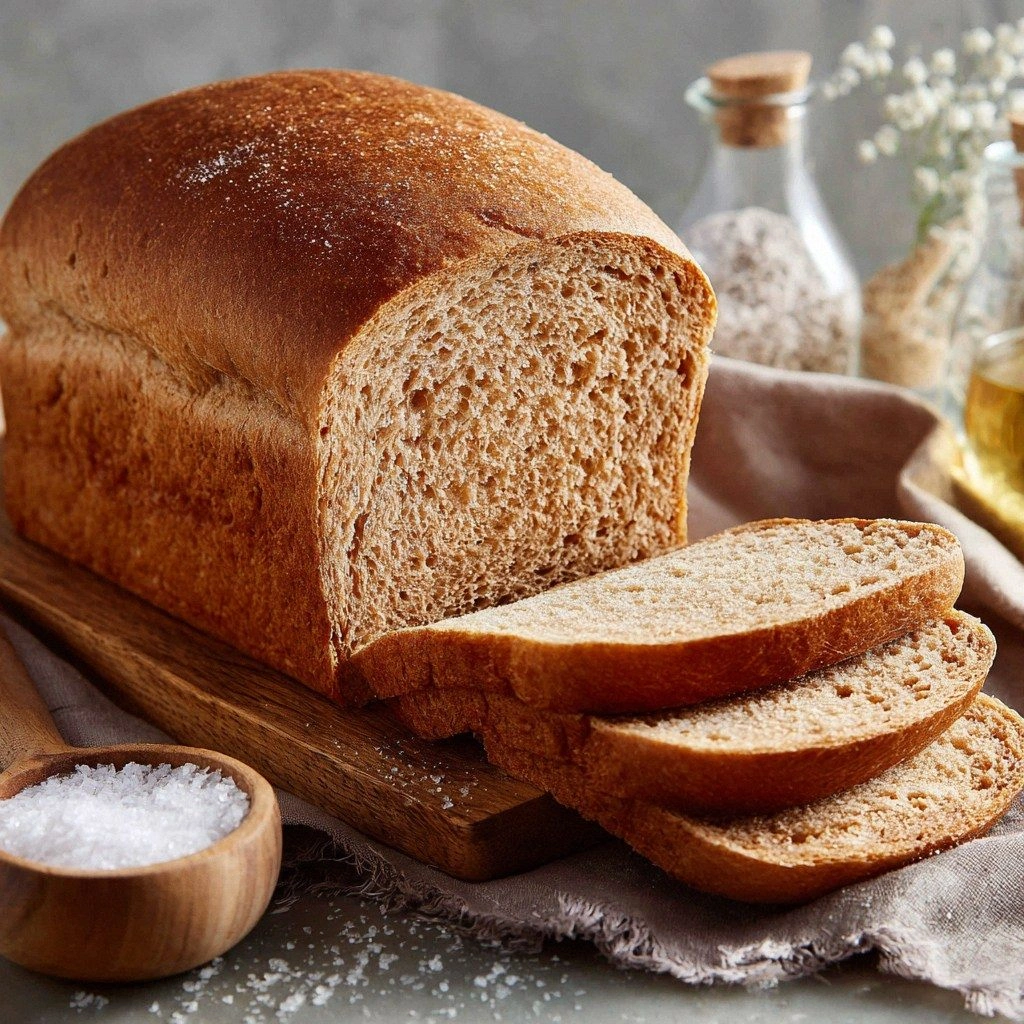
What makes this loaf truly stand out is a blend of techniques that elevate both flavor and texture. I’ve incorporated a slow fermentation that develops complex flavors, a touch of honey for subtle sweetness, and a splash of oat milk to keep the crumb moist. The result is a loaf that rises evenly, has a tender crumb, and a crisp, caramelized crust that crackles when you bite. It’s the kind of bread that makes you question why you ever settled for store‑bought options. The secret? A balance of hydration, a dash of acidity, and a precise baking time that locks in the moisture.
I’ll be honest—my first batch was a disaster. The loaf puffed up, then collapsed in the middle, and the crust was uneven. I learned from that failure that temperature control and proper kneading are non‑negotiable. The next time, I adjusted the yeast, added a little extra flour, and kept the dough at a steady 75°F. The result was a loaf that looked like a golden sun, with a crust that snapped like brittle candy. That moment, watching the dough rise, was pure magic.
Most recipes get this completely wrong. They either over‑knead, under‑proof, or bake at the wrong temperature, leading to dense, dry bread. I’ve tested countless variations, and this version is the one that consistently gives the perfect bite. The dough’s elasticity, the crumb’s openness, and the flavor profile are all calibrated for maximum satisfaction. If you’ve ever struggled with sandwich bread, you’re not alone—this is the fix you’ve been waiting for. It’s so good that I dare you to taste this and not go back for seconds.
Picture yourself pulling this out of the oven, the whole kitchen smelling incredible, the steam swirling like a gentle fog. The loaf looks like a loaf of hope, ready to be sliced and filled with your favorite sandwich ingredients. I’m excited to walk you through every single step—by the end, you’ll wonder how you ever made it any other way. Let’s dive in, and I promise you’ll be rewarded with a loaf that will become the star of your table.
What Makes This Version Stand Out
- Flavor: The subtle sweetness from honey balances the hearty whole wheat, creating a nuanced taste that lingers on the palate.
- Texture: A light, airy crumb paired with a crisp crust delivers the satisfying contrast you crave in a sandwich loaf.
- Hydration: The dough’s high moisture content prevents dryness, ensuring each slice stays moist even after cooling.
- Proofing: Slow, controlled fermentation develops depth, turning ordinary flour into a complex, almost yeasty aroma.
- Convenience: The recipe yields a loaf that can be sliced, toasted, or served cold without losing its integrity.
- Versatility: It works as a base for breakfast, lunch, or dinner, accommodating sweet or savory fillings with equal grace.
- Health‑Friendly: Whole wheat flour supplies fiber, while the minimal added sugar keeps the calorie count reasonable.
Alright, let's break down exactly what goes into this masterpiece…
Inside the Ingredient List
The Flavor Base
Whole wheat flour is the star, providing a nutty undertone and a dense, wholesome structure. It’s rich in fiber and gives the loaf its characteristic color. Skipping it would transform the bread into a lighter, less flavorful product that feels more like a pastry than a sandwich staple.
All‑purpose flour balances the density of whole wheat, ensuring the crumb remains airy. It also helps the dough develop gluten, which is essential for proper rise. If you prefer a more rustic loaf, you can replace all‑purpose flour with rye flour for a slightly tangy twist.
The Texture Crew
Warm water activates the yeast, creating bubbles that lift the dough. The water’s temperature should be around 110°F; if it’s too hot, you’ll kill the yeast, and if it’s too cool, the dough will rise sluggishly. A small splash of oat milk adds tenderness, keeping the crumb soft even after cooling.
Active dry yeast is the engine that drives the fermentation. A pinch of baking powder ensures a slight lift in the final bake, giving the loaf a lighter feel. If you’re allergic to dairy, replace oat milk with almond milk for a similar moisture level.
The Unexpected Star
Honey is the secret sweetener that caramelizes during baking, adding a golden sheen and a subtle caramel flavor. It also contributes to browning, giving the crust a delightful crunch. If you prefer a lower sugar content, replace honey with maple syrup or a sugar substitute that behaves similarly.
Olive oil brings a silky mouthfeel and helps the dough retain moisture. It also imparts a mild, fruity note that complements the wheat. For a richer flavor, try using a light olive oil or a splash of extra‑virgin olive oil.
The Final Flourish
Salt is the flavor enhancer that balances sweetness and brings out the wheat’s natural taste. Too much salt can inhibit yeast activity, so measure carefully. A pinch of sesame seeds on top adds a nutty crunch and a visual pop of color.
Baking powder works in tandem with yeast to give the loaf an extra lift, especially in a recipe that uses a higher proportion of whole wheat. If you don’t have baking powder, a small amount of baking soda plus an acidic ingredient (like yogurt) can serve as a substitute.
Everything's prepped? Good. Let's get into the real action…
The Method — Step by Step
- Begin by whisking together the warm water, honey, and yeast in a large mixing bowl. Let the mixture sit for 5 minutes until it becomes frothy—this is the moment of truth. The froth indicates active yeast ready to transform the dough. If the mixture stays flat, the yeast may be dead, and you’ll need a fresh batch.
- In a separate bowl, combine the whole wheat flour, all‑purpose flour, salt, baking powder, and a dash of baking soda if you’re using it. Mix thoroughly to ensure even distribution of leavening agents. This step prevents pockets of unreacted flour that could lead to uneven rise. A well‑mixed dry mix sets the foundation for a uniform crumb.
- Pour the frothy yeast mixture into the dry ingredients and stir with a wooden spoon until a shaggy dough forms. Add the olive oil and oat milk, then knead the dough on a lightly floured surface for 8–10 minutes. The dough should feel elastic and slightly tacky. It’s the point where your hands begin to feel the gluten developing.
- Shape the dough into a ball and place it in a greased bowl. Cover with a damp towel and let it proof in a warm spot for about 1 hour or until it doubles in size. During proofing, the dough should expand like a balloon, filling the bowl. If the room is too cool, place the bowl near a radiator or in the oven with the light on.
- Punch down the dough gently to release excess gas, then shape it into a loaf. Place the loaf on a parchment‑lined baking sheet, sprinkle sesame seeds on top, and let it rest for 20 minutes. This final proof allows the loaf to rise a second time, creating a more open crumb. The seeds add crunch and a hint of nutty flavor.
- Preheat your oven to 375°F (190°C). Slide the loaf into the oven and bake for 30–35 minutes, or until the crust turns golden brown and the internal temperature reaches 190°F. The loaf should emit a nutty aroma as it bakes. If you prefer a crunchier crust, bake an additional 3 minutes.
- Remove the loaf from the oven and let it cool on a wire rack for at least 20 minutes before slicing. The cooling period allows steam to escape, preventing soggy crumbs. Slice the loaf on a sharp knife to avoid tearing. The first slice is the most flavorful, as the crust is still warm.
That's it — you did it. But hold on, I've got a few more tricks that'll take this to another level…
Insider Tricks for Flawless Results
The Temperature Rule Nobody Follows
Many bakers ignore the impact of ambient temperature on proofing. In a cooler kitchen, extend proofing by 15–20 minutes; in a warmer kitchen, reduce it slightly. The dough’s rise is a dance with heat, so let it breathe at the right pace. I once baked in a drafty apartment and the loaf collapsed; the fix was a simple temperature adjustment.
Why Your Nose Knows Best
The aroma of a loaf can tell you if you’re on track. A sweet, yeasty scent means fermentation is good; a sour or metallic smell signals a problem. Trust your nose—it’s a seasoned judge that will save you from a flat loaf. I once smelled a hint of sourness and stopped the bake, avoiding a bitter taste.
The 5‑Minute Rest That Changes Everything
After the final proof, let the loaf rest for 5 minutes before baking. This rest period allows the gluten to relax, preventing the loaf from shrinking during the bake. It also lets the steam redistribute evenly, giving a uniform crumb. Skip this step and you’ll notice a slightly denser center.
The Perfect Crumb
A light, open crumb is achieved by gentle handling. Over‑kneading tightens the gluten, resulting in a dense texture. Keep kneading to 8–10 minutes, then rest the dough for the full proofing time. The dough should feel springy when pressed.
The Final Touch
Adding a splash of water to the cooling rack before placing the loaf can create a steam pocket that keeps the crust crisp. This trick is especially useful if you plan to reheat slices later. It’s a small step that makes a big difference.
Creative Twists and Variations
This recipe is a playground. Here are some of my favorite ways to switch things up:
Sunflower Seed Crust
Swap sesame seeds for sunflower seeds and add a sprinkle of smoked paprika for a smoky crunch. The seeds add a nutty flavor that pairs beautifully with avocado. This variation is perfect for a brunch spread.
Cheese‑Infused Loaf
Fold shredded mozzarella into the dough before the final proof. The cheese melts into pockets of gooey goodness, turning each slice into a melty delight. Great for a quick lunch or a comforting snack.
Herb‑Enhanced Bread
Add chopped rosemary and thyme to the dry mix for an aromatic, savory loaf. The herbs infuse the crumb with a fragrant note that elevates any sandwich. This is ideal for a Mediterranean‑inspired meal.
Chocolate Chip Breakfast
Stir in a handful of dark chocolate chips before the first proof. The chocolate melts into the warm crumb, creating a sweet breakfast treat that satisfies your sweet tooth. Pair it with a drizzle of honey for extra indulgence.
Gluten‑Free Adaptation
Replace whole wheat flour with a gluten‑free blend that includes rice flour, tapioca starch, and xanthan gum. Keep the hydration slightly higher to compensate for the lack of gluten. This version still delivers a soft crumb and a satisfying chew.
Citrus‑Zest Surprise
Add a tablespoon of lemon zest to the dough for a bright, fresh twist. The citrus cuts through the richness of the honey, creating a balanced flavor profile. This loaf is perfect for a light, summery sandwich.
Storing and Bringing It Back to Life
Fridge Storage
Wrap the loaf tightly in plastic wrap or foil and store in the refrigerator for up to 3 days. The cold temperature slows down the staling process, keeping the crumb fresh. When you’re ready to eat, slice and toast directly from the fridge.
Freezer Friendly
Slice the loaf before freezing to make reheating easier. Place slices in a freezer bag and seal tightly; they’ll keep for up to 2 months. Freeze whole loaves if you prefer, but they’ll take longer to thaw.
Best Reheating Method
To revive a frozen or refrigerated loaf, preheat the oven to 350°F and bake for 10–12 minutes. Add a splash of water to the baking sheet to create steam, which keeps the crust from drying out. The result is a loaf that tastes almost brand‑new.