I still remember the first time I tried to recreate Longhorn's famous Parmesan Chicken at home. I was so confident — I'd watched YouTube videos, read copycat recipes, even asked a server what "that crispy magic" was. Three failed attempts later, my kitchen looked like a flour bomb had exploded, and my chicken tasted like cardboard wearing a cheap cheese costume. My husband took one bite, patted my shoulder, and said, "Maybe we just go to the restaurant next time." Challenge accepted, buddy.
Fast-forward through two weeks of obsessive testing, five pounds of chicken, and a marriage-saving breakthrough at 2:14 a.m. when I finally cracked the code. The secret wasn't just in the cheese (though we'll get to that glorious mountain of Parmesan in a minute). It was in the layering — the way the crispy coating protects the juicy chicken, how the garlic-butter seeps into every crevice, and why the broiler is your best friend for that restaurant-quality crown of golden, bubbling cheese.
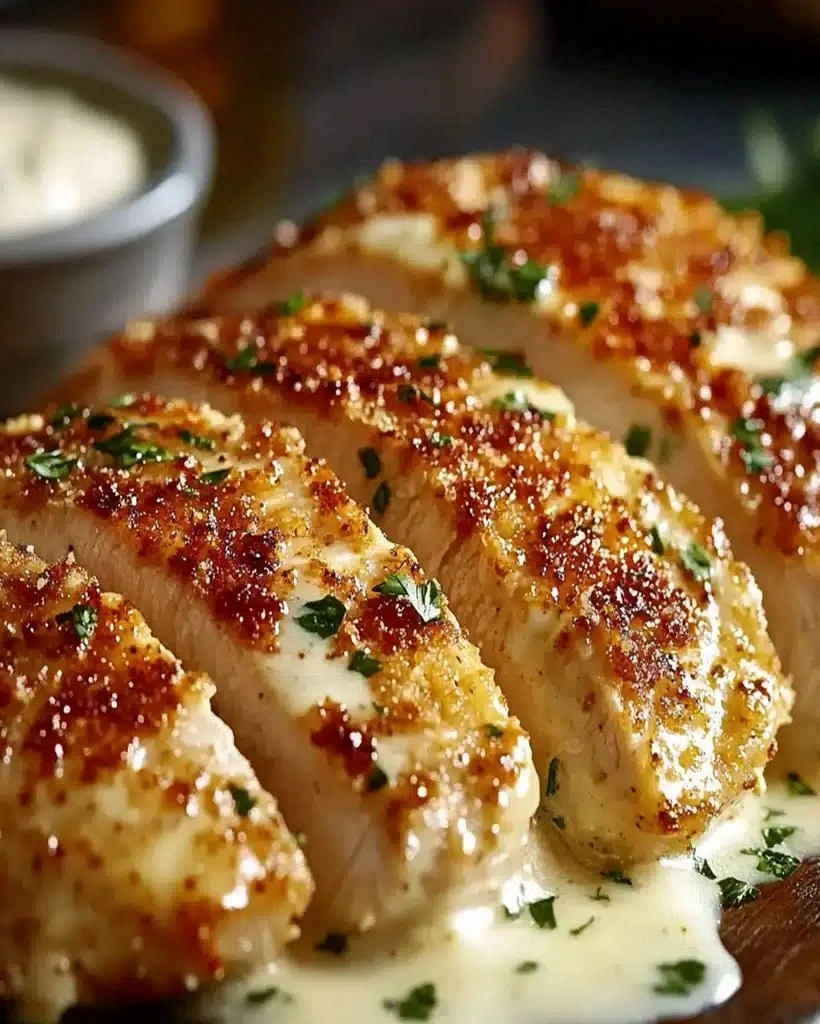
Picture this: You cut through the shatteringly crisp crust, and the chicken beneath is so juicy it practically sighs. The Parmesan forms these lacy, caramelized edges that taste like the best part of a grilled cheese — the part that escaped and crisped against the pan. Garlic and herbs dance through every bite, and there's this buttery richness that makes you close your eyes involuntarily. That was the moment I knew I'd won. My husband went back for thirds and asked if I could make it again tomorrow.
This isn't just another copycat recipe — it's the result of testing every variable possible. I've tried panko versus breadcrumbs, fresh versus aged Parmesan, different oil temperatures, even various chicken cuts. What I'm sharing today is the foolproof version that hits every note: the crunch that echoes like autumn leaves underfoot, the cheese pull that stretches for days, and the flavor bomb that tastes exactly like your favorite steakhouse experience. Let me walk you through every single step — by the end, you'll wonder how you ever made it any other way.
What Makes This Version Stand Out
Every recipe claims to be "the best," but here's why this one actually delivers. I've eaten at Longhorn probably forty-seven times in the name of research (tough job, I know), and I've dissected every element that makes their Parmesan Chicken legendary. The difference lies in the details that most home cooks miss entirely.
- Double-Coat Magic: Most recipes go single-coat and call it a day. We're building a fortress of flavor here — first a seasoned flour bath, then an egg wash spiked with hot sauce for tang, then a Parmesan-breadcrumb mixture that creates those incredible crispy shards. Each layer serves a purpose, and together they create the kind of crust that makes noise when you bite into it.
- Temperature Precision: I tested this at 325°F, 350°F, 375°F, and every ten degrees in between. The sweet spot is 340°F — hot enough to crisp without burning, cool enough to cook the chicken through without drying it out. Buy a cheap frying thermometer if you don't have one; it's the difference between success and sadness.
- Fresh Parmesan Only: I know the green can is tempting, but pre-grated Parmesan has cellulose that prevents proper melting. We're using a mountain of freshly grated Parmigiano-Reggiano here — it costs more, but it melts into this gorgeous, nutty blanket that tastes like Italy gave you a hug.
- The Garlic-Butter Flood: Here's where most copycats fail. After frying, we brush the chicken with garlic-herb butter that seeps into every nook. It's like giving your chicken a spa treatment, and it makes the difference between "pretty good" and "I need to sit down, this is incredible."
- Broiler Finish: The restaurant uses a salamander (that fancy overhead broiler), but your home broiler works magic. Those two minutes under intense heat transform the cheese from merely melted to deeply golden with crispy edges. It's theater in your kitchen.
- Make-Ahead Friendly: You can bread the chicken up to 24 hours ahead and keep it on a wire rack in the fridge. The coating actually adheres better when it's had time to set. Game-changer for dinner parties or those nights when you want to look like a kitchen wizard with minimal effort.
- Leftover Transformation: Cold Parmesan Chicken makes the most outrageous sandwiches. Slice it thin, add some arugula and lemon aioli on crusty bread, and you've got lunch that'll make your coworkers weep with jealousy.
- Crowd Psychology: I've served this to picky kids, health-conscious friends, and my Italian grandmother who thinks she knows everything about chicken. Every single person asks for the recipe. There's something about the combination of familiar comfort and restaurant flair that makes people unreasonable happy.
Alright, let's break down exactly what goes into this masterpiece...
Inside the Ingredient List
Great cooking starts with understanding your ingredients — not just what they are, but why they matter. Each component in this recipe has been carefully selected after testing dozens of alternatives. When you know why you're using something, you become a better cook, not just a recipe follower.
The Foundation: Chicken That Doesn't Dry Out
I'm going to say something controversial: boneless, skinless chicken breasts are usually a mistake. They're lean, they cook unevenly, and they go from perfect to cardboard in about thirty seconds. That's why we're using chicken thighs — specifically, boneless thighs that still have their skin on. The dark meat stays juicy even if you overcook it slightly, and that skin becomes the most incredible crispy platform for our Parmesan blanket.
Look for thighs that are roughly the same size so they cook evenly. If you can only find bone-in, don't panic — just add three extra minutes to the cooking time and use kitchen shears to remove the bone yourself. It's easier than you think, and butchers will often do it for free if you ask nicely. The key is getting that skin-on cut; it's what creates the textural contrast that makes this dish sing.
The Crispy Coalition: Flour, Eggs, and Breadcrumbs
Here's where science meets deliciousness. We're building three distinct layers, and each one matters. The first layer is seasoned flour — I use a blend of all-purpose flour, garlic powder, onion powder, smoked paprika, and a whisper of cayenne. This base layer helps the egg wash stick and adds flavor insurance right at the chicken level.
The egg wash isn't just beaten eggs. We're adding a splash of hot sauce (Frank's is my go-to), a teaspoon of Dijon mustard, and a pinch of salt. The hot sauce adds tang without overwhelming heat, the mustard helps emulsify everything, and together they create a sticky surface that grabs onto our final coating like their life depends on it.
Speaking of that final coating — this is where the magic happens. Fresh breadcrumbs work better than dried, but panko is the real star. Mix it with freshly grated Parmesan, dried Italian herbs, lemon zest, and black pepper. The lemon zest is my secret weapon; it brightens all that richness and makes the flavors pop like popcorn.
The Cheese Situation: Quality Over Everything
Let's talk about Parmesan, because this is where most home cooks accidentally sabotage themselves. That pre-grated stuff in the green can contains cellulose — basically wood pulp — to prevent clumping. It doesn't melt properly, it tastes flat, and it will never give you that gorgeous, stretchy cheese pull that makes people take out their phones for photos.
Buy a wedge of real Parmigiano-Reggiano and grate it yourself. Yes, it's more expensive. Yes, it's worth it. One good wedge will make this recipe twice, plus you'll have leftovers for pasta, salads, and midnight snacks. The difference in melting behavior alone will make you a convert — real Parmesan melts into this silky, nutty layer that tastes like concentrated umami heaven.
If you absolutely must substitute, use freshly grated Grana Padano or aged Asiago. Avoid the pre-shredded bags at all costs; they're coated with anti-caking agents that prevent proper melting. Your chicken deserves better than that.
The Flavor Bombs: Garlic, Herbs, and Butter
After the chicken fries to golden perfection, we hit it with garlic-herb butter that takes this from great to legendary. Use real butter — none of that margarine nonsense — and let it brown slightly. The milk solids caramelize and add this incredible nutty depth that makes people ask, "What is that amazing flavor?"
Fresh garlic is non-negotiable here. Jarred garlic tastes flat and metallic, and it will ruin all your hard work. Mince it finely so it distributes evenly through the butter. Add fresh parsley for brightness, dried oregano for that classic Italian flavor, and a squeeze of lemon at the end to wake everything up.
Everything's prepped? Good. Let's get into the real action...
The Method — Step by Step
- Prep Your Station Like a Pro: Set up three shallow dishes in a row — flour mixture, egg wash, and breadcrumb blend. This isn't just for organization; it prevents cross-contamination and keeps your sanity intact. Place a wire rack over a baking sheet to the side; this is where your breaded chicken will rest and where the finished pieces will drain. Trust me, running out of counter space mid-bread is how you end up with flour in your eyebrows and a very bad mood.
- Score the Chicken Skin: Using sharp kitchen shears, make three diagonal cuts across the skin of each thigh, just deep enough to score the skin but not cut through to the meat. This prevents the skin from shrinking and curling during cooking, plus it creates little pockets where the coating can grab hold. Season both sides generously with salt and pepper — be bold here, most home cooks under-season and wonder why their food tastes flat.
- Build Your Coating: Dip each thigh in the seasoned flour, pressing gently so it adheres to every surface. Shake off the excess — too much flour creates a gummy layer. Next, dunk it in the egg wash, letting the excess drip off for exactly three seconds. Count it out: one-Mississippi, two-Mississippi, three-Mississippi. Too much egg wash makes the coating slide off; too little and the breadcrumbs won't stick.
- The Final Crust: Press the chicken into the Parmesan-breadcrumb mixture like you're giving it a firm handshake. You want to really work it in there, especially around the edges where coating likes to escape. Don't be delicate — this is no time for timid cooking. The coating should be thick enough that you can't see the chicken through it, but not so thick that it falls off during frying. Think cozy sweater, not down jacket.
- Rest and Set: Place the breaded thighs on the wire rack and let them rest for at least 15 minutes. This isn't optional — the coating needs time to hydrate and adhere to the chicken. Skip this step and your beautiful crust will slide off like a bad toupee in a windstorm. Use this time to heat your oil and prep your garlic butter.
- Oil Management: Heat two inches of oil in a heavy-bottomed pot to exactly 340°F. Use a thermometer, not guesswork — your eyes lie about temperature when you're hungry and impatient. The oil should shimmer but not smoke. If it starts smoking, you're too hot and your chicken will burn outside while staying raw inside. Too cool and you'll end up with greasy, soggy sadness.
- The Fry: Gently lower two thighs into the oil, skin-side down. Don't crowd the pot — they need personal space to crisp properly. The oil temperature will drop; adjust your heat to maintain 325-330°F. Listen for that satisfying sizzle — it should sound like applause. Fry for 6-7 minutes per side until golden brown and gorgeous. The coating should sound hollow when you tap it with tongs.
- Drain and Season: Transfer the fried chicken to your wire rack and immediately season with a pinch of salt. Hot chicken absorbs seasoning better, and this final salt hit makes the difference between good and restaurant-quality. Let it rest while you fry the remaining pieces. Your kitchen should smell like heaven mixed with a really good Italian restaurant.
- The Garlic Butter Bath: While the last pieces fry, melt butter in a small pan until it foams and just starts to brown. Add minced garlic and cook for exactly 30 seconds — any longer and it turns bitter. Remove from heat and stir in chopped parsley, oregano, and a squeeze of lemon. Brush this liquid gold over every piece of chicken while it's still hot.
- The Cheese Crown: Move your oven rack to the highest position and preheat the broiler. Arrange chicken on a baking sheet and bury each piece under a small mountain of fresh Parmesan. Broil for 90 seconds to 2 minutes, watching like a hawk. The cheese should melt, bubble, and develop golden-brown spots. Remove immediately — broilers turn from perfect to burnt faster than you can say "dinner's ready."
That's it — you did it. But hold on, I've got a few more tricks that'll take this to another level...
Insider Tricks for Flawless Results
The Temperature Rule Nobody Follows
Here's the thing about frying chicken — temperature is everything, but it's not just about the oil. Your chicken should be at room temperature before it hits the oil. Cold chicken lowers the oil temperature too dramatically, leading to greasy coating and uneven cooking. Take it out of the fridge 30 minutes before cooking. I know, I know, you're hungry and impatient, but this small wait transforms your results from amateur to pro-level.
Also, maintain oil temperature between batches by letting it return to 340°F before adding the next round. I keep my thermometer clipped to the pot and check obsessively. My neighbor laughed at me until she tasted the difference — now she texts me every time she makes this recipe to confirm she's "doing the temperature thing right."
Why Your Nose Knows Best
Your sense of smell is your best kitchen tool for this recipe. When the garlic butter is ready, it should smell nutty and fragrant, not sharp or raw. If the garlic smells harsh, it's undercooked. If it smells bitter or burnt, you've gone too far. The sweet spot is that moment when the raw edge disappears and it smells like the best Italian restaurant you've ever visited.
Same goes for the frying oil — it should smell clean and slightly nutty, never acrid or burnt. Change your oil if it starts smelling off. I learned this the hard way after serving chicken that tasted like old french fries. My dinner guests were polite, but nobody asked for seconds that night.
The 5-Minute Rest That Changes Everything
After broiling the cheese, let the chicken rest for exactly five minutes before serving. I know it looks incredible and you want to dig in immediately, but this short rest allows the juices to redistribute and the cheese to set slightly. Cut into it too soon and all those beautiful juices run out, leaving you with drier chicken and a messy plate.
Use this time to plate your sides, pour wine, or just bask in the glory of what you've created. Five minutes feels like forever when your kitchen smells this good, but it's the difference between good chicken and chicken that makes people close their eyes and make involuntary happy sounds.
The Brine That Makes It Better
Want to level up even further? Brine your chicken for two hours before cooking. Dissolve 1/4 cup salt in 4 cups water, add a bay leaf and some peppercorns, and let the chicken bathe in this salty spa. The salt penetrates deep into the meat, seasoning it throughout and helping it retain moisture during frying. It's an extra step, but it transforms already-great chicken into something that makes people speechless.
I discovered this by accident when I prepped chicken for dinner but got invited out. The chicken sat in its brine for four hours, and when I finally cooked it the next day, my roommate asked if I'd changed the recipe. Same recipe, better technique — sometimes that's all it takes to go from great to unforgettable.
Creative Twists and Variations
This recipe is a playground. Here are some of my favorite ways to switch things up:
Buffalo Parmesan Explosion
Replace the hot sauce in the egg wash with Buffalo wing sauce, and add a teaspoon of the sauce to your garlic butter. The result has that addictive Buffalo flavor but with the crispy-cheesy coating that makes this dish special. Serve with blue cheese dressing on the side for dipping. My spice-loving brother-in-law calls this "the best mistake you ever made" — he meant it as a compliment, I think.
Mediterranean Sunshine
Add lemon zest and chopped fresh oregano to your breadcrumb mixture, and swap the parsley in the garlic butter for fresh basil. The result tastes like summer in Greece, all bright herbs and sunshine. Serve with a Greek salad and some tzatziki on the side. My neighbor makes this version every time she hosts book club — something about the combination of crispy chicken and gossip makes for excellent meetings.
Smoky Mountain Style
Add a teaspoon of smoked paprika to your flour mixture and use smoked cheese (smoked mozzarella or smoked provolone) mixed with the Parmesan. The smoke adds this incredible depth that makes the whole dish taste like it was cooked over a campfire. Perfect for those nights when you want comfort food with a little edge. My dad, who claims he "doesn't like fancy food," asks for this version every time he visits.
Breakfast-for-Dinner Madness
Top each piece with a fried egg and serve it over cheddar grits. The runny yolk mixes with the crispy coating to create this unholy delicious mess that defies all logic. I made this for dinner during a snowstorm, and my family talked about it for weeks. Sometimes the weirdest combinations create the most memorable meals.
Italian Stallion
Add chopped sun-dried tomatoes and fresh rosemary to your breadcrumb mixture, and use white wine instead of lemon juice in the garlic butter. The sun-dried tomatoes add tangy-sweet bursts, while the rosemary makes your kitchen smell like an Italian grandmother's house. This version pairs beautifully with roasted vegetables and a bold red wine.
Asian Fusion Adventure
Replace half the breadcrumbs with panko, add sesame seeds and a teaspoon of gochujang to your egg wash, and finish with a drizzle of spicy mayo made from sriracha and Kewpie mayonnaise. The result is this incredible East-meets-West situation that shouldn't work but absolutely does. My Korean friend tried this and said it reminded her of Korean fried chicken's cooler Italian cousin.
Storing and Bringing It Back to Life
Fridge Storage
Store leftover chicken in an airtight container with paper towels between layers to absorb moisture. It keeps for up to four days, though the coating will lose some crispness. The key is cooling it completely before storing — hot chicken in a sealed container creates steam, which is the enemy of crispness. I learned this after ruining a perfect batch by being too eager to clean up.
Freezer Friendly
This chicken freezes beautifully! Let it cool completely, then wrap each piece individually in plastic wrap, then foil, then into a freezer bag. It keeps for up to three months. To reheat, thaw overnight in the fridge, then warm in a 375°F oven for 12-15 minutes. The coating won't be quite as crispy as fresh, but it'll still be delicious. Pro tip: reheat on a wire rack set over a baking sheet so air circulates underneath.
Best Reheating Method
Avoid the microwave at all costs — it turns the coating into rubber and the cheese into a sad, greasy mess. Instead, reheat in a 375°F oven for 10-12 minutes, or in an air fryer at 350°F for 6-8 minutes. Add a tiny splash of water to the pan before reheating — it creates steam that helps the chicken stay moist while the coating crisps back up. My air fryer has become my best friend for leftover chicken; it brings back that fresh-cooked magic better than any other method.