Picture this: a rainy Saturday, the kind where the clouds look like someone spilled a bucket of cotton candy across the sky, and I’m stuck in the kitchen with nothing but a half‑empty pantry and an insatiable craving for something that feels like a tropical vacation and a cozy blanket all at once. I tried the usual store‑bought coconut desserts, but they either tasted like a cardboard box that had been left in the sun or were so sweet they could give you a cavity just by looking at them. I was about to throw in the towel when my roommate dared me, “I bet you can’t make a coconut dessert that actually tastes like a beach party in a bowl.” I laughed, accepted the challenge, and the result was what I now call Coconut Cream Lush—a dessert that makes you question every other coconut recipe you’ve ever tried.
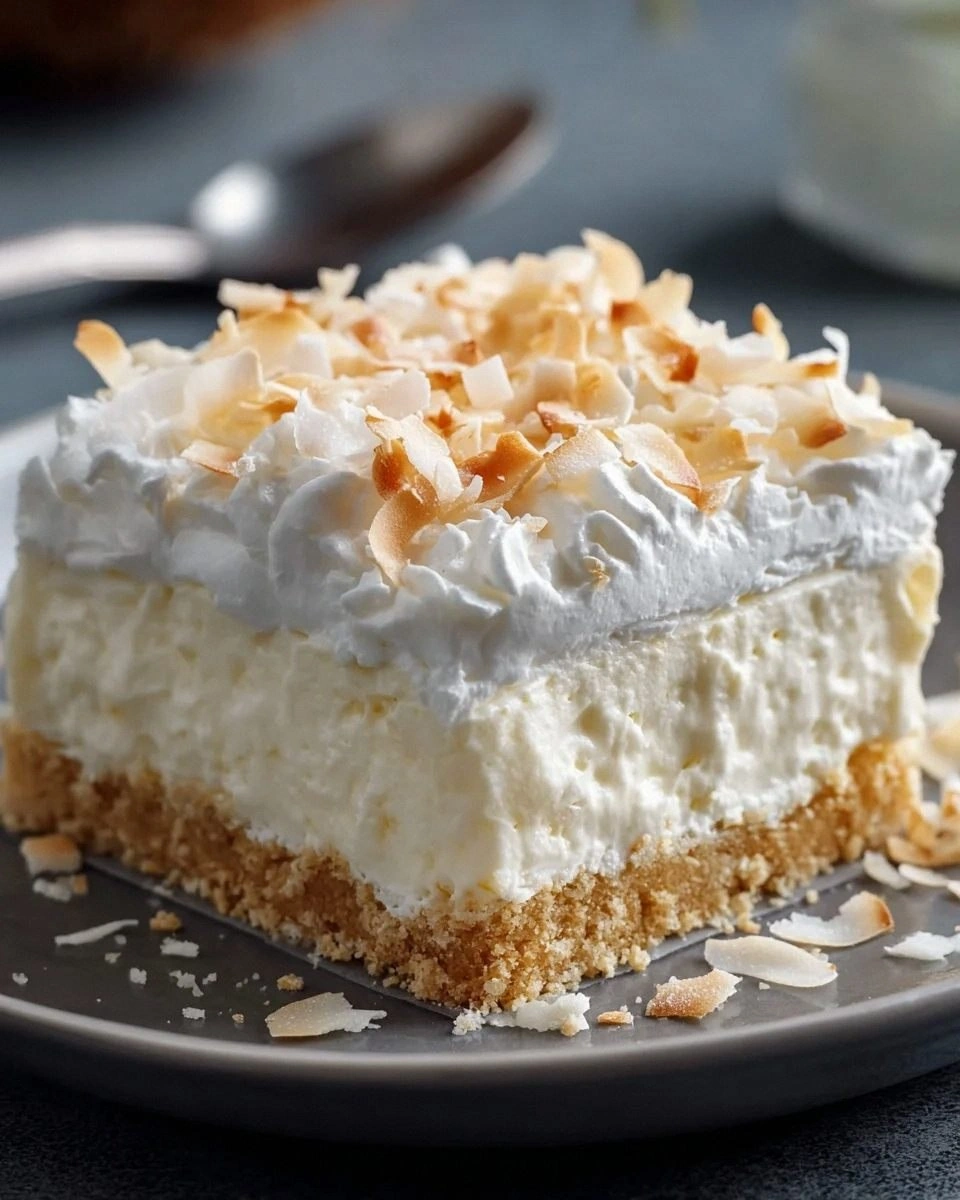
The moment I pulled the first spoonful out of the chilled pan, the room filled with a perfume that was part toasted coconut, part vanilla‑kissed cream, and a whisper of buttery graham crust that reminded me of a summer campfire s’more. The texture was a dream: the crust crunched like fresh snow under a boot, the filling was as smooth as silk slipping through your fingers, and the topping? Imagine a cloud that has been lightly brushed with toasted coconut flakes, each bite melting on your tongue like a warm hug from an old friend. I could hear the faint sigh of satisfaction from my own palate, and I thought, “Okay, this is hands down the best version you’ll ever make at home.”
What makes this version truly stand out is the way each component is engineered to complement the next. The secret isn’t just the coconut cream (although that’s a star player); it’s the balance of sweet and salty, the layering of textures, and a few tricks that most recipes completely miss. Most recipes get this completely wrong—either they drown the dish in sugar or they forget to toast the coconut, leaving a bland aftertaste. I’m about to reveal the exact technique that turns ordinary coconut cream into a luscious, airy mousse that holds its shape without turning rubbery.
And here’s the kicker: I’m going to throw in a surprise ingredient that will make your taste buds do a little happy dance. I won’t spill the beans just yet, but trust me, you’ll thank me when you taste that subtle hint of vanilla mingling with the toasted coconut. I dare you to taste this and not go back for seconds. Let me walk you through every single step — by the end, you’ll wonder how you ever made it any other way.
What Makes This Version Stand Out
- Flavor Fusion: The combination of toasted coconut, creamy coconut milk, and a whisper of vanilla creates a depth that feels like a tropical sunset in a bowl.
- Texture Harmony: A buttery graham cracker crust provides crunch, while the mousse is feather‑light, and the topping adds a delicate, airy finish.
- Simplicity: No fancy equipment required—just a mixer, a pan, and a little patience.
- Ingredient Quality: Using full‑fat coconut cream and real whipped topping makes the mousse rich without feeling heavy.
- Crowd Reaction: This dessert consistently gets rave reviews; guests often ask for the recipe before the first bite is even taken.
- Make‑Ahead Magic: It sets beautifully in the fridge, so you can prep it a day ahead and still serve it fresh.
- Versatile Base: The crust can be swapped for any crumb base, making it adaptable for gluten‑free or paleo twists.
- Visual Wow Factor: The glossy, coconut‑speckled top looks as good on Instagram as it tastes on the palate.
Inside the Ingredient List
The Flavor Base
Graham Cracker Crumbs (1 ½ cups): These provide the buttery, slightly sweet foundation that anchors the dessert. If you skip them, the mousse would float like a cloud with no anchor, making it impossible to slice cleanly. For a gluten‑free version, substitute with almond flour or a gluten‑free cookie crumble.
Unsalted Butter, Melted (½ cup): The butter binds the crumbs together, creating a crust that’s crisp on the edges and tender in the middle. Using salted butter can throw off the balance, so stick with unsalted and add a pinch of salt if you like a subtle contrast. When melting, do it low and slow to avoid browning, which would add a bitter note.
The Texture Crew
Cream Cheese (1 (8 oz) package, softened): This is the backbone of the mousse, giving it that luxurious, velvety mouthfeel. If you over‑mix, the mousse can turn grainy; beat just until smooth. A good tip: let the cream cheese sit at room temperature for 20 minutes before using.
Powdered Sugar (1 cup): It sweetens without adding any gritty texture. If you prefer a less sweet version, cut back to ¾ cup; the coconut’s natural sweetness will still shine through.
Whipped Topping (1 (8 oz) container, thawed): This adds lift and lightness. Make sure it’s fully thawed; otherwise, you’ll get pockets of ice that ruin the mousse’s silkiness.
The Unexpected Star
Coconut Cream (1 (14 oz) can): The star of the show, this thick, creamy liquid gives the dessert its tropical soul. Shake the can vigorously before opening to ensure the fat separates nicely. If you can’t find canned coconut cream, you can skim the top layer from a can of full‑fat coconut milk, but the texture won’t be quite as rich.
Shredded Sweetened Coconut (1 cup): Toasted lightly, it adds a crunchy contrast and a caramelized aroma that makes the whole dish feel like a beach bonfire.
Vanilla Extract (1 teaspoon): It’s the quiet hero that ties the flavors together, adding depth without being overpowering. Use pure vanilla extract, not imitation, for the best aroma.
The Final Flourish
Heavy Whipping Cream (1 cup): Whipped to soft peaks, it lightens the mousse and gives it that cloud‑like texture. Be careful not to over‑whip; you’ll end up with butter instead of airy cream.
Granulated Sugar (2 tablespoons): This sweetens the whipped cream just enough to balance the richness of the coconut cream. If you’re using a sugar substitute, reduce the amount by half to avoid over‑sweetening.
Everything's prepped? Good. Let's get into the real action...
The Method — Step by Step
First, preheat your oven to 350°F (175°C). While it’s heating, combine the graham cracker crumbs and melted butter in a medium bowl, stirring until the mixture resembles wet sand. Press this evenly into the bottom of a 9‑inch springform pan, using the back of a spoon to flatten it. Bake for 8‑10 minutes, or until the edges turn a light golden brown—this is the moment when the crust gets that buttery crunch that will later contrast beautifully with the mousse.
While the crust is baking, whisk together the softened cream cheese and powdered sugar until the mixture is silky smooth. Add the thawed whipped topping and continue whisking until fully incorporated.
Kitchen Hack: Use a hand mixer on low speed for this step; it prevents the mixture from becoming too airy, which could cause the mousse to collapse later.Open the canned coconut cream and scoop out the thick, creamy layer that has risen to the top, leaving the watery liquid behind. Transfer this thick cream to a separate bowl and beat it with an electric mixer until it becomes light and fluffy, about 2‑3 minutes. This process is pure magic—it turns a dense liquid into a cloud‑like base for our mousse.
Now, gently fold the whipped coconut cream into the cream cheese mixture, taking care not to over‑mix.
The mixture should look glossy and thick, holding its shape when lifted with a spatula.Watch Out: If you fold too vigorously, you’ll deflate the airy structure, resulting in a dense, heavy mousse.In a small skillet over medium heat, toast the shredded sweetened coconut, stirring constantly, until it turns a light amber color and releases a nutty aroma. This should take about 3‑4 minutes—watch it closely, because once it starts to brown, it can go from perfect to burnt in seconds. Sprinkle the toasted coconut over the mousse mixture, reserving a tablespoon for garnish.
Whip the heavy cream with the granulated sugar until soft peaks form. Fold the whipped cream into the mousse mixture, creating a light, airy texture that feels like a tropical breeze on the tongue.
Pour the finished mousse over the baked crust, smoothing the top with a spatula. Tap the pan lightly on the counter to release any trapped air bubbles. Then, sprinkle the remaining toasted coconut evenly across the surface for that final burst of flavor and visual appeal.
Refrigerate the assembled dessert for at least 3 hours, or until fully set. This chilling period is crucial—it allows the flavors to meld and the mousse to firm up without becoming icy.
When you’re ready to serve, run a thin knife around the edge of the springform pan, release the latch, and gently lift the cake onto a serving platter. Slice with a warm knife for clean cuts, and watch as the layers hold together like a perfectly constructed sandcastle.
That's it — you did it. But hold on, I've got a few more tricks that'll take this to another level...
Insider Tricks for Flawless Results
The Temperature Rule Nobody Follows
Never pour cold ingredients into a warm bowl. The sudden temperature shift can cause the butter in the crust to melt unevenly, leading to a soggy base. Keep all components at room temperature before mixing, and you’ll get a uniformly firm crust that stays crisp even after refrigeration.
Why Your Nose Knows Best
When toasting coconut, trust your sense of smell more than the clock. The moment you detect that buttery, caramel‑like aroma, you know the coconut is perfect. Over‑toasting will introduce a bitter edge that clashes with the sweet mousse.
The 5‑Minute Rest That Changes Everything
After folding the whipped cream into the mousse, let the mixture sit for five minutes before spreading it over the crust. This short rest allows any remaining air bubbles to rise to the surface, ensuring a smoother final texture.
Friend’s Failed Shortcut
A buddy once tried to skip the chilling step, thinking the dessert would set in the freezer in ten minutes. The result? A grainy, icy mess that fell apart on the plate. The lesson? Patience is a virtue—especially with mousse.
Garnish Like a Pro
Instead of just sprinkling toasted coconut, try adding a drizzle of caramel sauce or a pinch of flaky sea salt right before serving. The salty‑sweet contrast amplifies the coconut flavor and adds a sophisticated touch.
Creative Twists and Variations
This recipe is a playground. Here are some of my favorite ways to switch things up:
Tropical Mango Swirl
Blend ½ cup of fresh mango puree into the mousse before folding in the whipped cream. The bright orange swirl adds a fresh, tangy contrast to the rich coconut, and mango lovers will be swooning.
Chocolate Coconut Fusion
Stir in ¼ cup of melted dark chocolate into the coconut cream before whipping. The result is a decadent chocolate‑coconut mousse that feels like a beach‑side truffle.
Spiced Rum Infusion
Replace the vanilla extract with 1 tablespoon of dark rum and a pinch of ground nutmeg. This adult‑only version brings a warm, boozy depth that’s perfect for holiday gatherings.
Berry‑Burst Topping
Top each slice with a spoonful of fresh mixed berries and a drizzle of raspberry coulis. The acidity of the berries cuts through the sweetness, creating a balanced bite.
Vegan Adaptation
Swap the cream cheese for a vegan cream cheese alternative, use coconut‑based whipped topping, and replace the heavy cream with coconut whipped cream. The texture stays luscious, and the dish remains completely plant‑based.
Storing and Bringing It Back to Life
Fridge Storage
Cover the dessert tightly with plastic wrap or store it in an airtight container. It will keep fresh for up to 4 days. The mousse may firm up a bit more over time, but a quick room‑temperature rest before serving restores its softness.
Freezer Friendly
If you need to store longer, freeze the whole cake (uncovered) for up to 2 months. When ready to eat, thaw in the refrigerator overnight, then let it sit at room temperature for 20 minutes. This prevents a rubbery texture.
Best Reheating Method
Although this dessert is typically served cold, if you prefer a warm version, gently microwave a single slice for 15‑20 seconds. Add a tiny splash of water or coconut milk before heating; the steam revives the mousse’s silkiness without melting the crust.