Picture this: it’s a rainy Saturday, the kind that makes you want to curl up with a blanket, a good movie, and something sweet that feels like a hug from the inside. I was halfway through a marathon of “Friends” reruns when a sudden craving for chocolate‑peanut butter hit me like a tidal wave, and I realized my pantry was missing the one thing that could stop the quake – Reese’s Peanut Butter Cups. I tossed a box of chocolate cake mix onto the counter, grabbed the peanut butter, and thought, “What if I turned this disaster into a dessert that could literally shake the earth?” The result? A cake so moist, so nutty, and so decadently gooey that it makes even the most skeptical sweet tooth surrender.
The kitchen instantly turned into a symphony of sounds: the whisk clattering against the bowl, the sizzle of butter melting, and that unmistakable, buttery “whoosh” when I folded the peanut butter mixture into the batter. The air filled with the intoxicating perfume of cocoa and roasted peanuts, a scent that made my nose do a little happy dance. My fingertips felt the silky smoothness of the cream cheese and powdered sugar blend, while the batter itself felt like a thick, luxurious velvet that promised an epic crumb. When the oven timer finally chimed, the cake rose like a volcanic eruption, the edges pulling away just enough to hint at a soft, molten center.
This version of Reese’s Peanut Butter Earthquake Cake stands apart because it doesn’t just layer flavors – it fuses them at a molecular level. While most recipes settle for a simple swirl or a generic frosting, I’m using a peanut‑butter‑cream cheese frosting that’s as thick as a love‑letter and as bright as a sunrise, then topping it with a generous avalanche of chopped Reese’s cups that melt into pockets of pure bliss. The secret weapon? A dash of vanilla that ties the whole thing together like a maestro conducting an orchestra, and a precise balance of oil and butter that keeps the crumb moist without ever turning gummy.
And here’s the kicker: the technique I’m about to reveal is something you won’t find in any boxed mix’s back‑of‑the‑box instructions. It involves a brief “rest” period for the batter that lets the gluten relax, resulting in a texture that’s airy on the top yet dense enough to hold that gooey peanut‑butter core. I dare you to taste this and not go back for seconds – I’ll be honest — I ate half the batch before anyone else got to try it. Let me walk you through every single step — by the end, you’ll wonder how you ever made it any other way.
What Makes This Version Stand Out
- Flavor Fusion: The combination of rich chocolate cake mix with a peanut‑butter‑cream cheese frosting creates a taste explosion that’s both familiar and wildly new, making each bite unforgettable.
- Texture Contrast: A soft, almost cake‑like crumb meets a silky, melt‑in‑your‑mouth frosting, while crunchy Reese’s pieces add a satisfying snap.
- Simplicity Meets Sophistication: You only need a handful of pantry staples and a box of cake mix, yet the result feels like a bakery‑level masterpiece.
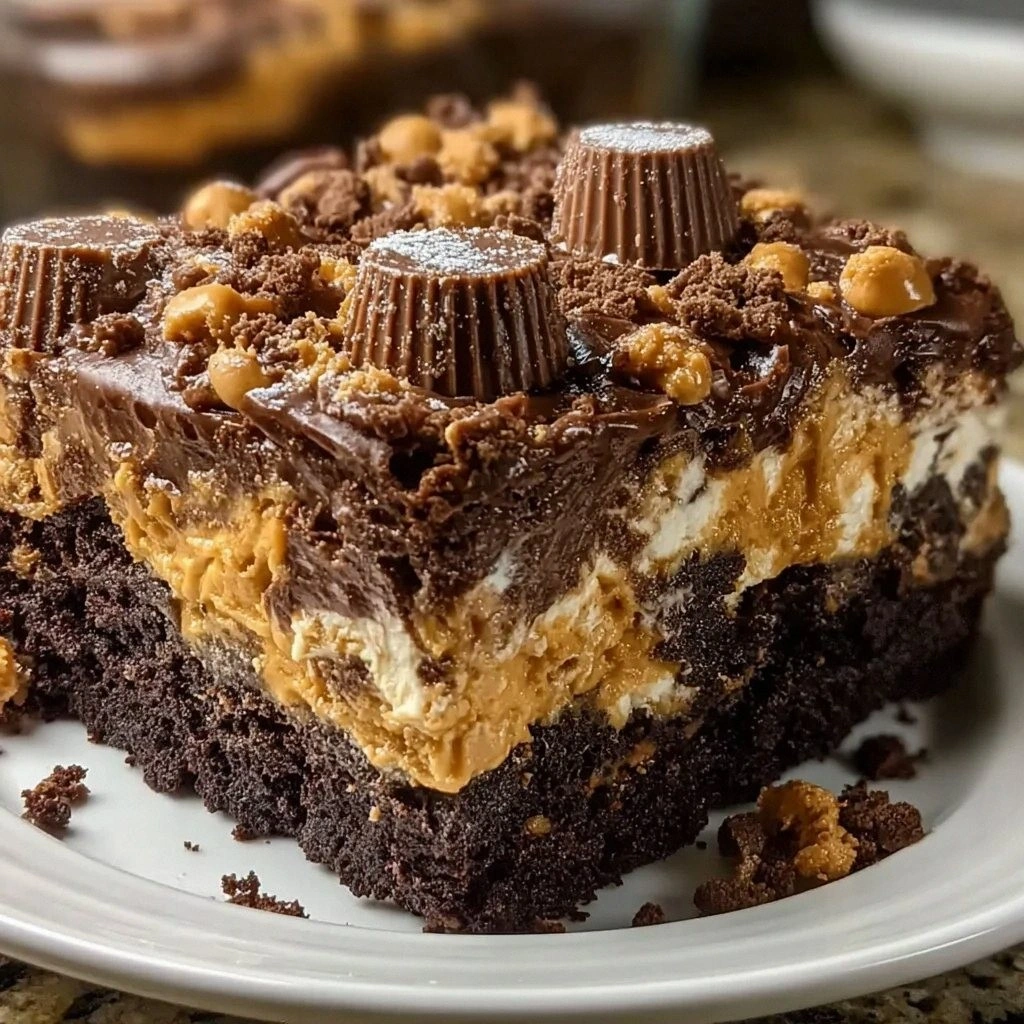
- Visual Drama: The top is speckled with chopped Reese’s cups that melt into glossy, chocolate‑brown flecks, turning the cake into a visual earthquake.
- Crowd‑Pleaser Power: Whether it’s a family dinner, a potluck, or a midnight snack, this cake gets rave reviews and often disappears before the first slice is even served.
- Ingredient Quality: Using creamy peanut butter and real cream cheese elevates the flavor profile far beyond the “processed” versions you see elsewhere.
- One‑Pan Efficiency: The entire cake bakes in a single 9‑inch springform pan, reducing cleanup and keeping the focus on flavor, not mess.
- Make‑Ahead Magic: The cake freezes beautifully, and the frosting stays creamy after thawing, so you can prep it days in advance.
Inside the Ingredient List
The Flavor Base
Chocolate cake mix: This is the backbone of the cake, providing that deep cocoa richness you expect from a classic dessert. I recommend a high‑quality mix with real cocoa powder; the better the mix, the richer the final flavor. Skipping the mix or substituting with a generic “flour‑only” blend will leave you with a bland, flat cake that lacks the chocolate punch.
The Moisture Crew
Water: Water activates the leavening agents in the cake mix, creating that airy lift. It also helps dissolve the cocoa and sugar evenly, ensuring no gritty pockets. If you’re feeling adventurous, replace half the water with strong coffee for an extra depth of flavor.
Vegetable oil: Oil adds moisture without making the crumb heavy. It keeps the cake tender and extends its shelf life. A common mistake is using butter alone, which can cause the cake to dry out faster.
Large eggs: Eggs act as binders and add structure, giving the cake its rise and fluffy interior. Using extra‑large eggs can make the batter too thick, while smaller eggs may result in a flatter cake.
The Unexpected Star
Creamy peanut butter: The true hero of this recipe, it brings a salty‑sweet nutty richness that pairs perfectly with chocolate. Choose a natural, unsweetened variety for a cleaner taste, or go for a sweetened version if you love that extra sugary punch. Skipping it would turn this into a regular chocolate cake – and we’re not here for that.
Cream cheese: Adds a tangy creaminess that cuts through the sweetness, balancing the overall flavor. It also contributes to the frosting’s smooth, spreadable texture. If you substitute with a non‑dairy cream cheese, make sure it’s well‑chilled before mixing.
The Final Flourish
Unsalted butter: Melted butter enriches the frosting, giving it a glossy finish and a buttery mouthfeel. If you’re watching calories, you can swap half the butter for applesauce, but expect a slightly less decadent result.
Powdered sugar: This fine sugar dissolves instantly into the frosting, creating a silky, sweet glaze without any grainy texture. Using granulated sugar would leave you with a gritty frosting that ruins the smoothness.
Vanilla extract: A splash of vanilla ties all the flavors together, enhancing both the chocolate and peanut butter notes. Real vanilla bean extract works best, but pure vanilla essence will do in a pinch.
Reese’s Peanut Butter Cups: Chopped and sprinkled on top, they provide bursts of creamy peanut butter and chocolate that melt into pockets of pure joy. Mini cups are ideal for an even distribution, while full‑size cups give larger, gooey pockets.
Everything's prepped? Good. Let's get into the real action…
The Method — Step by Step
Preheat your oven to 350°F (175°C) and grease a 9‑inch springform pan with a thin layer of butter, then dust it lightly with flour. This ensures the cake releases cleanly without sticking, and the flour creates a tiny barrier that prevents the bottom from getting soggy. While the oven warms, line the bottom with parchment paper for extra insurance. The moment the oven door shuts, you’ll hear that comforting hum that promises a perfect bake.
In a large mixing bowl, combine the chocolate cake mix, water, vegetable oil, and eggs. Beat on medium speed for about 2 minutes, just until the batter is smooth and glossy. Power tip: Over‑mixing can develop gluten, leading to a dense texture, so stop as soon as you see a uniform batter. The aroma of cocoa should start to waft, hinting at the richness to come.
Set the batter aside for a brief 5‑minute rest. This is the “rest” I mentioned earlier – it lets the flour fully absorb the liquids, resulting in a tender crumb. While you wait, grab a second bowl for the frosting.
For the frosting, beat the softened cream cheese until smooth, then add the melted butter, creamy peanut butter, and powdered sugar. Mix on low, then increase to medium until the frosting is light, fluffy, and holds soft peaks. Finally, stir in the vanilla extract. The frosting should look glossy, almost like a satin ribbon, and have a sweet‑nutty scent that makes your kitchen feel like a candy store.
Pour the rested batter into the prepared pan, smoothing the top with a spatula. Then, dollop generous spoonfuls of the peanut‑butter frosting over the batter. Using a butter knife, gently swirl the frosting into the batter, creating a marbled “earthquake” effect. The visual is key – you want streaks that look like fault lines ready to burst.
Slide the pan into the oven and bake for 30‑35 minutes. The cake is done when a toothpick inserted into the center comes out with just a few moist crumbs, and the edges start pulling away from the pan. Watch Out: Opening the oven door before the 20‑minute mark can cause the cake to sink; keep the door closed for the first two thirds of the bake.
While the cake cools in the pan (don’t rush this – the cooling process sets the crumb), chop the Reese’s Peanut Butter Cups into bite‑size pieces. Once the cake is completely cool, spread a thin layer of remaining frosting over the top, then generously sprinkle the chopped Reese’s pieces, pressing them gently so they adhere. The chocolate from the cups will melt slightly on the warm frosting, creating glossy pockets of peanut butter bliss.
Release the springform and transfer the cake to a serving platter. Let it sit for at least 15 minutes before slicing; this allows the frosting to firm up a bit, making clean cuts easier. When you finally slice, you’ll see a gorgeous, swirled interior with pockets of melted Reese’s – a true earthquake of flavor. Serve warm or at room temperature, and watch your guests’ faces light up.
That's it — you did it. But hold on, I've got a few more tricks that'll take this to another level…
Insider Tricks for Flawless Results
The Temperature Rule Nobody Follows
Always bring your butter, cream cheese, and peanut butter to room temperature before mixing. Cold fats create lumps, while warm ingredients blend seamlessly, giving you that ultra‑smooth frosting. I once tried to speed things up by using chilled butter straight from the fridge; the result was a grainy mess that never set properly. Letting them sit for 30 minutes on the counter is a small price to pay for perfection.
Why Your Nose Knows Best
Before you even taste the batter, trust the scent. When the chocolate aroma becomes rich and slightly toasted, you know the mix is fully hydrated. If you smell a raw flour note, give the batter another minute of rest. This sensory checkpoint saves you from a dry, crumbly cake that would otherwise ruin the whole experience.
The 5‑Minute Rest That Changes Everything
After mixing the batter, set it aside for exactly five minutes. This short pause lets the starches absorb liquid, resulting in a tender crumb that’s neither gummy nor dry. Skipping this step is the most common cause of a dense, heavy cake that feels more like a brick than a dessert.
Cold Water, Hot Oven
Using cold water in the batter might sound counterintuitive, but it actually helps keep the batter from over‑mixing. The cold temperature slows down gluten formation, keeping the cake light. When the batter hits the hot oven, the temperature shock creates an immediate rise, giving you that perfect, fluffy top.
Refrigerate the Frosting
After whipping the frosting, chill it for 10 minutes before spreading. This firming step makes the frosting easier to work with and prevents it from sliding off the warm cake. I once tried to frost a hot cake, and the frosting melted into a sad, runny puddle – a disaster I never repeat.
Creative Twists and Variations
This recipe is a playground. Here are some of my favorite ways to switch things up:
Salted Caramel Crunch
Swap half of the powdered sugar for caramel sauce, and sprinkle flaky sea salt on top of the Reese’s pieces. The salty‑sweet contrast adds depth, turning the cake into a sophisticated dessert for adult palates.
Double Chocolate Delight
Replace half of the chocolate cake mix with a dark chocolate brownie mix, and fold in mini chocolate chips into the batter. The result is a fudgier, richer cake that satisfies even the most intense chocolate cravings.
Banana Peanut Butter Fusion
Stir in two mashed ripe bananas into the batter and increase the peanut butter to 1 ½ cups. The banana adds natural sweetness and moisture, while the extra peanut butter intensifies the nutty flavor. This version is perfect for brunch or a post‑workout treat.
Vegan Velvet
Replace the eggs with a “flax egg” (1 tbsp ground flaxseed + 3 tbsp water per egg) and swap butter for coconut oil. Use a plant‑based cream cheese alternative and dairy‑free peanut butter. The cake stays just as moist, and you’ll have a vegan‑friendly crowd‑pleaser.
Spiced Autumn
Add a teaspoon of pumpkin spice and a half cup of canned pumpkin puree to the batter. Top with crushed pretzels for a salty crunch that mirrors the flavors of fall. This variation shines at Thanksgiving gatherings.
Mini Earthquake Bites
Divide the batter into a greased muffin tin, bake for 20 minutes, and top each mini with a dollop of frosting and a single Reese’s cup. These bite‑size versions are perfect for parties, potlucks, or a snack on the go.
Storing and Bringing It Back to Life
Fridge Storage
Cover the cake tightly with plastic wrap or store it in an airtight container. It will stay fresh for up to five days, with the frosting maintaining its creamy texture. For extra moisture, place a slice of bread on the plate beneath the cake – the bread will release just enough humidity to keep the crumb soft.
Freezer Friendly
Wrap the entire cake (or individual slices) in a double layer of freezer‑safe parchment, then a sheet of aluminum foil. Freeze for up to three months. When you’re ready to serve, let it thaw in the refrigerator overnight, then bring it to room temperature for 30 minutes before slicing.
Best Reheating Method
Preheat your oven to 300°F (150°C). Place a slice on a baking sheet, add a tiny splash of water (about a teaspoon) to the edge of the plate, and cover loosely with foil. Heat for 8‑10 minutes; the steam revives the cake’s moisture, and the frosting becomes luxuriously soft again. This trick works wonders for reviving that “just‑out‑of‑the‑oven” feel.