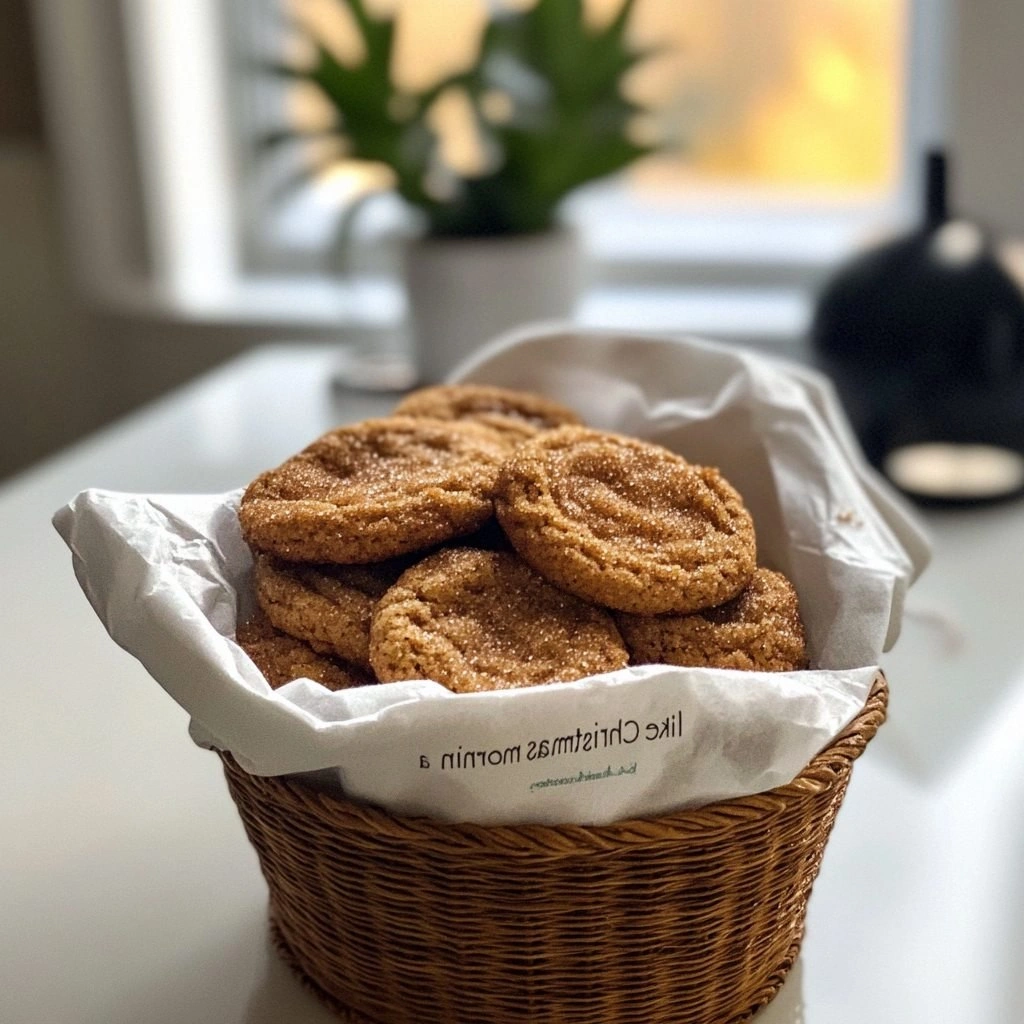
I still remember the night I almost burned the entire kitchen in a frantic attempt to rescue a batch of plain snickerdoodles that had gone flat and lifeless. The oven door was open, the timer was ticking, and the air was thick with the scent of raw butter and flour. I stared at the dough, realizing that if I could just give it a little extra depth—a buttery, nutty caramelization—those cookies would transform from mediocre to unforgettable. That moment sparked a daring experiment: brown butter, cinnamon, and a sprinkle of magic. I dared myself to taste this and not go back for seconds, and the result was a revelation that has been my secret weapon in every cookie gathering.
Picture yourself pulling a tray of golden, slightly cracked snickerdoodles from the oven, the kitchen filling with the warm, nutty aroma of browned butter mingling with the sweet whisper of cinnamon sugar. The first bite is a symphony: the outer shell crackles like thin ice, the center is a chewy, caramelized dream, and the buttery undertone lingers on the tongue like a velvet caress. The texture is a delicate balance between crisp and soft—just enough crunch to satisfy, yet tender enough to melt in your mouth. If you’ve ever struggled with cookies that are either too hard or too doughy, this is the solution you’ve been searching for. The secret sauce? A simple brown butter that coats the dough like a rich, toasted glaze.
What makes this version stand out is not just the brown butter, but the meticulous layering of flavor and technique. Each ingredient has been chosen to complement the others, creating a cookie that feels both familiar and adventurous. The result is a buttery, caramelized snickerdoodle that’s hands down the best version you’ll ever make at home. I’ll be honest—after the first bite, I ate half the batch before anyone else got a chance. The next time you bake these, you’ll find yourself reaching for the recipe again and again, because the flavor is simply addictive.
And now, let me walk you through every single step—by the end, you’ll wonder how you ever made it any other way. From browning the butter to rolling the dough into perfect circles, every moment is crafted for maximum flavor and texture. The technique is simple, yet the payoff is extraordinary. So, grab your apron, preheat that oven, and let’s dive into the world of brown butter snickerdoodles.
What Makes This Version Stand Out
- Flavor Depth: Brown butter adds a nutty, caramelized richness that elevates the classic snickerdoodle flavor profile. The butter’s golden hue signals the perfect balance of toasted notes without overpowering the delicate sweetness.
- Texture Perfection: The dough’s composition ensures a crisp edge that cracks like thin ice, while the interior remains soft and chewy—an ideal contrast that satisfies every palate.
- Visual Appeal: The golden-brown crust glistens with a slight sheen, making each cookie an edible work of art. The cinnamon‑sugar coating gives a subtle sparkle that’s impossible to resist.
- Ingredient Simplicity: Despite its sophisticated taste, the recipe uses only a handful of pantry staples—no exotic spices or hard-to-find items.
- Make‑Ahead Friendly: Once baked, the cookies keep wonderfully in an airtight container for up to a week. They also freeze well, allowing you to enjoy them anytime.
- Crowd‑Pleaser: Whether it’s a holiday gathering, a casual brunch, or a quiet evening, these cookies garner rave reviews. Guests often ask for the secret, and you can proudly share the brown butter technique.
- Seasonal Versatility: While they shine during the holidays, these cookies are perfect for any time of year, making them a reliable staple in your baking repertoire.
Inside the Ingredient List
The Flavor Base
All-purpose flour is the backbone of our dough, providing structure while remaining neutral enough to let the brown butter shine. A 2‑cup measure keeps the cookies from becoming overly dense, ensuring that the butter can coat every crumb. If you prefer a lighter texture, replace half the flour with cake flour, but be prepared for a slightly softer bite.
The Texture Crew
Baking soda and cream of tartar work together to give the cookies a subtle lift and a characteristic tang. The soda neutralizes the acidity from the tartar, creating a smooth rise that results in a chewy center. Salt, though only a teaspoon, balances the sweetness and enhances the overall flavor profile—don’t skip it, or the cookies will taste flat.
The Unexpected Star
Brown butter is the star of this recipe, turning ordinary butter into a golden, nutty sauce that coats the dough. The caramelization process releases deep, toasted flavors that elevate the cookie from simple to sophisticated. If you’re new to browning butter, keep a close eye on the color; it should reach a light amber hue before the butter is removed from heat.
The Final Flourish
The coating of ground cinnamon and brown sugar creates a crunchy, sweet exterior that snaps with each bite. The cinnamon’s warmth complements the butter’s nutty undertones, while the brown sugar adds a hint of molasses that deepens the flavor. A tablespoon of melted butter in the coating keeps the sugar from clumping and ensures a glossy finish.
Everything's prepped? Good. Let's get into the real action...
The Method — Step by Step
- First, melt 1 cup of unsalted butter in a heavy‑bottom saucepan over medium heat. Stir constantly until the milk solids settle and the butter turns a deep amber. The aroma should be nutty and toasted—this is the foundation of our flavor. Once browned, pour the butter into a heat‑proof bowl and let it cool slightly; the heat will carry over into the dough.
- In a medium bowl, whisk together 2 cups of all‑purpose flour, 1 teaspoon baking soda, 1 teaspoon cream of tartar, and 1 teaspoon salt. The dry mix ensures even distribution of leavening agents and prevents clumps. This step is critical for the cookie’s rise and texture.
- Combine the cooled brown butter with 1 cup of granulated sugar and 2 large eggs in a large mixing bowl. Beat on medium speed until the mixture is smooth and glossy—about 2 minutes. The eggs bind the dough and allow the butter to infuse fully.
- Add the dry flour mixture to the wet mixture, mixing on low speed until just combined. Over‑mixing can develop gluten, making the cookies tough. The dough should be soft but not sticky. This is the moment of truth—if you’re unsure, the dough should hold its shape when pressed between fingers.
- Cover the dough with plastic wrap and refrigerate for at least 30 minutes. Chilling firms the butter, making it easier to shape and preventing the cookies from spreading too much during baking. The cold dough also enhances the flavor as the butter continues to develop its nutty notes.
- Preheat your oven to 350°F (175°C) and line a baking sheet with parchment paper. While the oven heats, combine 1/2 cup brown sugar with 1 teaspoon ground cinnamon in a small bowl. This coating will give the cookies their signature crunch.
- Take the chilled dough out of the refrigerator and roll it into 1‑inch balls. Roll each ball in the cinnamon‑sugar mixture until fully coated. Place the coated balls on the prepared baking sheet, spacing them about 2 inches apart. Watch Out: If you roll the dough too thin, the cookies will spread too far; keep the dough firm.
- Bake for 12‑14 minutes, or until the edges are golden and the centers look set. The cookies will still be slightly soft; they’ll firm up as they cool. The aroma of toasted butter and cinnamon will fill the kitchen—absolute perfection.
- Remove the cookies from the oven and let them rest on the sheet for 5 minutes. This resting period allows the interior to finish setting while the exterior remains crisp. Then transfer them to a wire rack to cool completely.
- Once cooled, serve immediately or store in an airtight container at room temperature for up to a week. For an extra indulgence, drizzle a touch of melted butter over the warm cookies before serving.
That's it — you did it. But hold on, I've got a few more tricks that'll take this to another level...
Insider Tricks for Flawless Results
The Temperature Rule Nobody Follows
Many bakers bake snickerdoodles at 375°F, but that high heat can cause the cookies to spread too much and lose their signature chew. Lowering the temperature to 350°F gives the dough time to set while maintaining a crisp edge. I’ve baked at 325°F on one occasion and the cookies came out too soft; the 350°F sweet spot is where the magic happens.
Why Your Nose Knows Best
During the browning process, trust your nose more than your eyes. The butter will turn from white to golden to amber, and the scent will shift from buttery to nutty. If the butter smells like burnt popcorn, it’s overcooked. A faint nutty aroma is the signal that you’re ready to pour it into the dough.
The 5‑Minute Rest That Changes Everything
After baking, let the cookies rest on the sheet for exactly 5 minutes before moving them to a rack. This brief pause allows steam to escape, preventing the cookies from becoming soggy. I’ve seen people skip this step, and the result is a cookie that’s too soft and loses its crispness.
Use a Baking Stone for Even Heat
If you have a pizza stone, place it in the oven while it preheats. Baking the cookies on the stone distributes heat more evenly, producing a uniform golden crust. The stone also helps the cookies rise slightly, giving them a lighter interior.
Add a Dash of Sea Salt to the Coating
A pinch of flaky sea salt on top of the cinnamon‑sugar coating elevates the flavor profile, creating a delightful contrast between sweet and savory. The salt draws out the sweetness of the sugar and balances the buttery richness. I’ve found that a sprinkle of sea salt before baking turns a good cookie into a great one.
Creative Twists and Variations
This recipe is a playground. Here are some of my favorite ways to switch things up:
Coconut‑Crunch Snickerdoodles
Swap 1/4 cup of flour for shredded coconut and add 2 tablespoons of coconut sugar to the coating. The coconut adds a tropical crunch and a subtle sweetness that pairs wonderfully with the brown butter. These are perfect for a beach‑side brunch.
Chocolate‑Chili Fusion
Add 1/4 cup cocoa powder to the flour mix and a pinch of cayenne pepper to the coating. The dark chocolate depth and a hint of heat create a bold flavor profile that surprises and delights. Ideal for adventurous palates.
Maple‑Infused Delight
Replace the granulated sugar with an equal amount of pure maple syrup and drizzle a touch of maple on top after baking. The syrup’s caramel notes amplify the brown butter’s nuttiness, while the maple glaze adds a glossy finish. Great for a cozy fall gathering.
Almond‑Glazed Snickerdoodles
Use almond flour for half of the all‑purpose flour and add 1 tablespoon almond extract to the dough. The almond flavor complements the buttery base, creating a nutty, aromatic cookie. Serve with a dollop of whipped cream for an elegant touch.
Lavender‑Lemon Surprise
Stir in 1 teaspoon dried culinary lavender and a squeeze of lemon zest into the dough. The floral and citrus notes provide a refreshing contrast to the rich brown butter. These cookies are perfect for springtime celebrations.
Bacon‑Brown Butter Bites
Fold finely chopped, cooked bacon into the dough and add a pinch of smoked paprika to the coating. The savory bacon and smoky spice pair beautifully with the sweet, buttery base. These are a guaranteed hit at any gathering.
Storing and Bringing It Back to Life
Fridge Storage
Place the cooled cookies in an airtight container with a paper towel to absorb excess moisture. Store them in the refrigerator for up to 5 days. The cold environment helps maintain the chewy interior while preventing the butter from melting.
Freezer Friendly
Wrap individual cookies in plastic wrap, then place them in a freezer bag. Freeze for up to 3 months. When ready to enjoy, let them thaw at room temperature for 15 minutes before serving to restore their fresh texture.
Best Reheating Method
To revive the cookies, preheat your oven to 300°F (150°C) and place them on a parchment‑lined sheet for 5 minutes. Add a tiny splash of water to the bottom of the pan to create steam, which helps the cookies regain their soft center without drying out the crust. Serve warm for a decadent treat.