Picture this: a Saturday night, the kitchen lights are dim, your friends are snacking, and the last taco you made was a disaster—fluffy, soggy, and lacking that signature queso splash. I was staring at a bowl of melted cheese that looked like it had been through a war zone, and I thought, “I’m not going to let this happen again.” So I set out to create a version that would make every bite a triumph, a dish that feels like a hug in a tortilla, and that will have your taste buds shouting, “I dare you to taste this and not go back for seconds.”
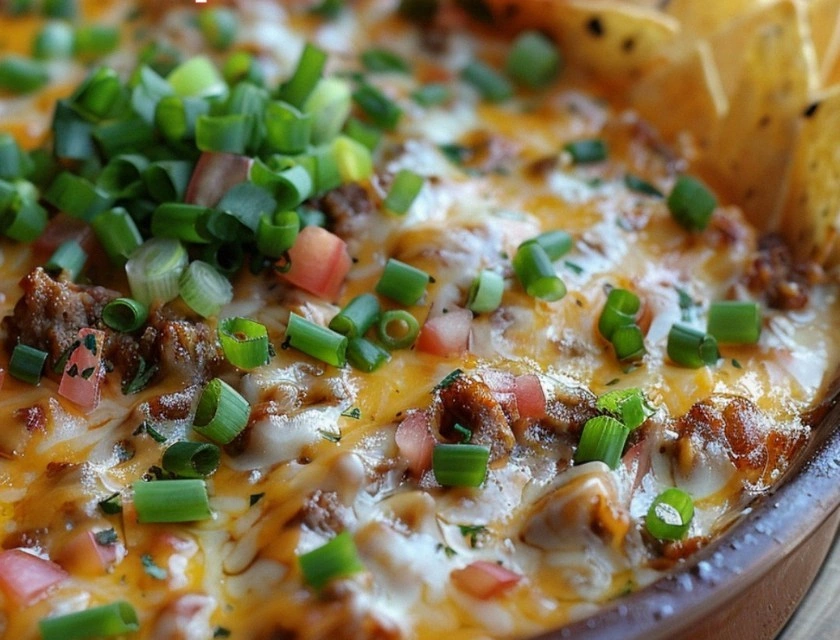
The aroma that fills the room is the first thing that tells you this isn’t ordinary. Warm, buttery tortillas, the sharp tang of cheddar, the subtle heat of cumin, and the faint whisper of garlic powder all mingle in a fragrant haze that makes even the most skeptical foodie swoon. When you take the first bite, the cheese melts into a silky coating that clings to the tortilla like velvet, while the seasoned beef provides a savory, slightly smoky backbone that keeps the pockets from feeling flat. The crunch from fresh bell pepper and the burst of salsa create a delightful contrast that keeps the mouth moving, and the final touch of cilantro adds a fresh, almost citrusy lift that balances the richness. Every element is carefully orchestrated to deliver a harmony of textures and flavors that feels both comforting and adventurous.
What makes this version stand out is the meticulous attention to each component. I’ve fine-tuned the ratio of cheese to meat so that the pockets hold their shape without becoming greasy, and I’ve added a splash of corn for that sweet, earthy crunch that takes the pockets from good to unforgettable. The seasoning blend is a secret family recipe that leans on smoked paprika for a subtle depth that most store-bought mixes lack. I even incorporate a dash of lime zest to brighten the overall profile and give it that modern twist you’re craving. The result is a dish that feels like a well-loved family recipe but with a contemporary edge that will impress at parties or make your weekday nights feel like a celebration.
If you’ve ever tried to make taco pockets and ended up with a soggy mess, you’re not alone. Most recipes get this completely wrong by overcooking the tortilla or using too much cheese. Here’s what actually works: use a mix of cheddar and Monterey Jack for a gooey texture, keep the tortilla warm before filling, and bake at a high temperature for a short time. Picture yourself pulling these pockets out of the oven, the whole kitchen smelling incredible, and watching the cheese bubble like a golden sunrise. And I promise, once you taste the first one, you’ll be convinced this is hands down the best version you’ll ever make at home.
What Makes This Version Stand Out
- Flavor: The blend of cheddar and Monterey Jack creates a melt that’s both creamy and slightly nutty, while the seasoned beef offers a smoky, savory backbone that keeps each bite balanced.
- Texture: The pockets have a crisp exterior that shatters like thin ice when you bite, and a molten interior that coats your tongue in a velvety cheese drizzle.
- Simplicity: With only a handful of pantry staples and a few fresh ingredients, you can whip up these pockets in under an hour.
- Uniqueness: The addition of corn kernels and lime zest elevates the classic taco pocket into a gourmet experience.
- Crowd Reaction: Friends always ask for the recipe after a single bite, and they keep coming back for seconds.
- Ingredient Quality: Using fresh, high‑grade cheese and ground beef ensures each pocket bursts with authentic flavor.
- Cooking Method: Baking at 425°F for 10 minutes locks in moisture while giving the tortilla a perfect golden crunch.
- Make‑Ahead Potential: These pockets can be assembled ahead of time, refrigerated, and baked when you’re ready—ideal for busy weeknights.
Inside the Ingredient List
The Flavor Base
Ground beef is the heart of these pockets. It should be lean enough to keep the pockets from becoming greasy but fatty enough to add depth. If you skip it, the pockets lose their savory punch, and the cheese becomes the only star. For a lighter version, you can substitute ground turkey or a plant‑based mince, but keep the seasoning blend the same to preserve flavor.
The Texture Crew
Flour tortillas provide the structural backbone. Choose a medium‑thickness tortilla that’s pliable yet sturdy; thin tortillas crack under pressure, while thick ones can be too doughy. Shredded cheese—cheddar and Monterey Jack—creates a gooey, melty interior that coats the tortilla like velvet. If you prefer a sharper bite, add a sprinkle of pepper jack or pepper jack for a subtle kick.
The Unexpected Star
Corn kernels bring a sweet, earthy crunch that contrasts the rich cheese and seasoned meat. They also add a pop of color and a subtle sweetness that keeps the pockets from feeling too heavy. If you’re on a low‑carb diet, you can omit the corn or replace it with diced zucchini for a fresh, crisp alternative.
The Final Flourish
Fresh cilantro, diced bell pepper, and a splash of lime zest finish the pockets with brightness and aroma. Cilantro adds a fresh, almost citrusy lift that balances the richness, while bell pepper offers a crisp bite that breaks the monotony of cheese and meat. Lime zest brightens the overall profile and adds a modern twist you’re craving. If you’re not a fan of cilantro, try fresh parsley or a pinch of oregano for a different herbal note.
Everything’s prepped? Good. Let’s get into the real action, and trust me, the anticipation will be worth the wait.

The Method — Step by Step
- Heat a large skillet over medium heat and add the ground beef, breaking it apart with a wooden spoon. Cook until the meat is no longer pink, about 5–6 minutes, and drain excess grease to keep the pockets from becoming soggy. Once cooked, stir in the taco seasoning, a splash of water, and let the mixture simmer for 2 minutes; this allows the flavors to meld. The aroma at this point should be intoxicating, like a warm hug from the kitchen. Set the skillet aside and let the mixture cool slightly; this will prevent the tortillas from steaming.
- While the meat is cooling, shred the cheese on a paper towel to release moisture. A dry cheese helps the pockets hold their shape and prevents them from becoming too greasy. Measure out 1 cup of shredded cheese for each pocket; you’ll need 2 cups for four servings. The cheese should feel dry to the touch, almost like a fine powder. If the cheese feels wet, let it sit for a few minutes on a towel.
- Dice the bell pepper and onion into bite‑sized cubes. The bell pepper adds a sweet crunch, while the onion provides a savory depth. If you prefer a milder flavor, sauté the onions until translucent before adding them to the meat. This step is optional but recommended for a smoother texture. Keep the diced veggies in a bowl to keep them ready for the next step.
- Warm the tortillas in a dry skillet or microwave for 10–15 seconds to make them pliable. This step is crucial; a cold tortilla will crack when you fold it. Place the warmed tortillas on a clean cutting board and spread a thin layer of the seasoned meat in the center. Don’t overload; the pockets should be stuffed but not stuffed to the brim. The meat should be warm but not hot, or it will melt the cheese prematurely.
- Sprinkle a handful of shredded cheese over the meat, then add a spoonful of diced bell pepper, onion, and corn kernels. The cheese acts as a glue, holding everything together while adding richness. Add a pinch of lime zest for brightness and a dash of cilantro for freshness. Fold the tortilla over the filling, tucking in the sides to seal. The pockets should look like small, golden triangles.
- Preheat your oven to 425°F (220°C). Arrange the pockets on a parchment‑lined baking sheet, spacing them evenly. Bake for 8–10 minutes, or until the tortillas are golden brown and the cheese is bubbling. Watch out: if you leave them too long, the cheese may burn, and the pockets could become too dry. The aroma at this stage will fill the kitchen with a savory, cheesy perfume.
- Remove the baking sheet from the oven and let the pockets rest for 2 minutes. This brief rest allows the cheese to set slightly, making the pockets easier to handle. While they’re resting, you can prepare a quick drizzle of sour cream or a sprinkle of extra cilantro for garnish. The pockets should feel warm, with a slightly soft interior and a crisp exterior.
- Serve immediately, accompanied by a side of salsa, guacamole, or a lime wedge. The combination of the crunchy tortilla, the melty cheese, and the fresh toppings creates a symphony of textures that will have everyone asking for seconds. If you’re feeling adventurous, top each pocket with a dollop of sour cream and a sprinkle of crushed tortilla chips for an extra crunch.
- Enjoy the moment of pure delight as the cheese melts and the flavors explode in your mouth. The pockets should be hot, slightly gooey, and bursting with savory goodness. Remember to take a photo—these pockets look as good as they taste. If you’re sharing with friends, keep a few extra pockets on hand for the inevitable second round.
That’s it—you did it. But hold on, I’ve got a few more tricks that will take this to another level.
Insider Tricks for Flawless Results
The Temperature Rule Nobody Follows
Many people bake at 375°F, but that’s too low and will leave the tortillas soggy. Baking at 425°F locks in moisture quickly, giving you a crisp exterior while keeping the interior molten. I’ve found that a preheated oven with a pizza stone or a cast‑iron skillet can further enhance the crispness. If you’re using a convection oven, lower the temperature by 25°F to avoid over‑browning.
Why Your Nose Knows Best
A good rule of thumb is to pause the oven when you smell the cheese bubbling and the tortillas turning golden. Your nose is your best indicator of doneness. If you’re still unsure, check the edges; they should be slightly browned and the cheese should be a deep amber. This sensory checkpoint ensures you never overcook.
The 5‑Minute Rest That Changes Everything
Letting the pockets rest for 5 minutes after baking allows the cheese to set, making the pockets easier to handle. During this rest, the steam inside the pockets condenses, creating a slightly softer interior that contrasts the crisp exterior. If you skip this step, you risk tearing the tortillas when you bite into them.
Use Fresh Cheese, Not Pre‑Shredded
Pre‑shredded cheese often contains anti‑caking agents that prevent melting. For the best melt, shred the cheese yourself or buy a block and grate it fresh. This small change can make the difference between a gooey pocket and a greasy one.
Keep the Tortilla Warm
Warm tortillas are pliable and less likely to crack when folded. If you’re making a large batch, wrap the tortillas in a clean kitchen towel and place them in a warm oven (low heat) for a few minutes before filling. This simple step saves you from a soggy, broken pocket.
Creative Twists and Variations
This recipe is a playground. Here are some of my favorite ways to switch things up:
Spicy Chipotle Twist
Swap the taco seasoning for chipotle seasoning and add a splash of adobo sauce. The smoky heat will transform the pockets into a fiery delight that pairs perfectly with a cool cucumber yogurt dip.
Veggie‑Rich Powerhouse
Replace the ground beef with a mix of sautéed mushrooms, spinach, and black beans. Add a sprinkle of nutritional yeast for a cheesy flavor without the dairy. This version is perfect for a plant‑based dinner.
Breakfast Burrito Pocket
Use scrambled eggs, chorizo, and cheddar cheese to create a breakfast version. Top with a drizzle of salsa verde and a handful of fresh cilantro. These pockets are a great grab‑and‑go for busy mornings.
Mexican Street Tacos Pocket
Add pickled jalapeños and a squeeze of lime to the filling for a tangy kick. Finish with a handful of fresh cilantro and a dollop of guacamole for an authentic street‑taco experience.
Cheese‑Loaded Indulgence
Double the amount of cheese and add a splash of heavy cream to the filling. The result is a decadent, gooey pocket that’s almost dessert‑like. Pair with a light salad to balance the richness.
Storing and Bringing It Back to Life
Fridge Storage
Cool the pockets completely before placing them in an airtight container. Store in the refrigerator for up to 3 days. When ready to eat, reheat in a toaster oven or skillet until the cheese is melted and the tortilla is crisp again.
Freezer Friendly
Wrap each pocket individually in parchment paper and place them in a freezer bag. Freeze for up to 2 months. Thaw overnight in the refrigerator before reheating. This method preserves the texture and flavor.
Best Reheating Method
Reheat in a skillet over medium heat, covering the pan for a few minutes to allow the cheese to melt. Add a splash of water or a tiny drizzle of milk before covering to create steam that keeps the cheese from drying out. Finish with a quick broil for a minute to crisp the tortilla again.