The kitchen was a battlefield that night. I had just pulled a bag of flour from the pantry, the smell of it still fresh on my fingertips, when I realized I had forgotten the starter. The starter, my trusty sourdough friend, sat dormant in the fridge, a quiet promise of rise and flavor. I stared at the empty bowl, the silence thickening into a kind of culinary dread. I whispered, “You’re going to be the hero of this loaf,” and decided to turn that panic into a masterpiece.
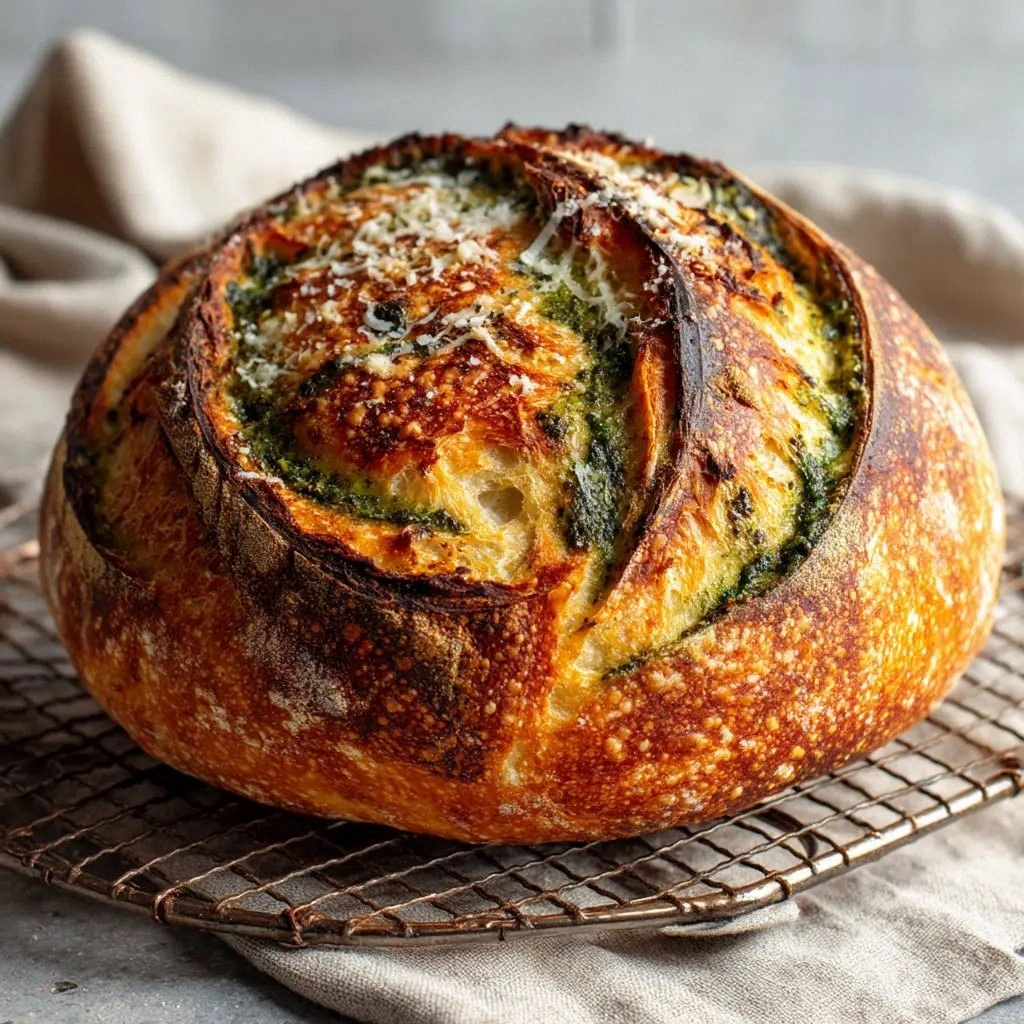
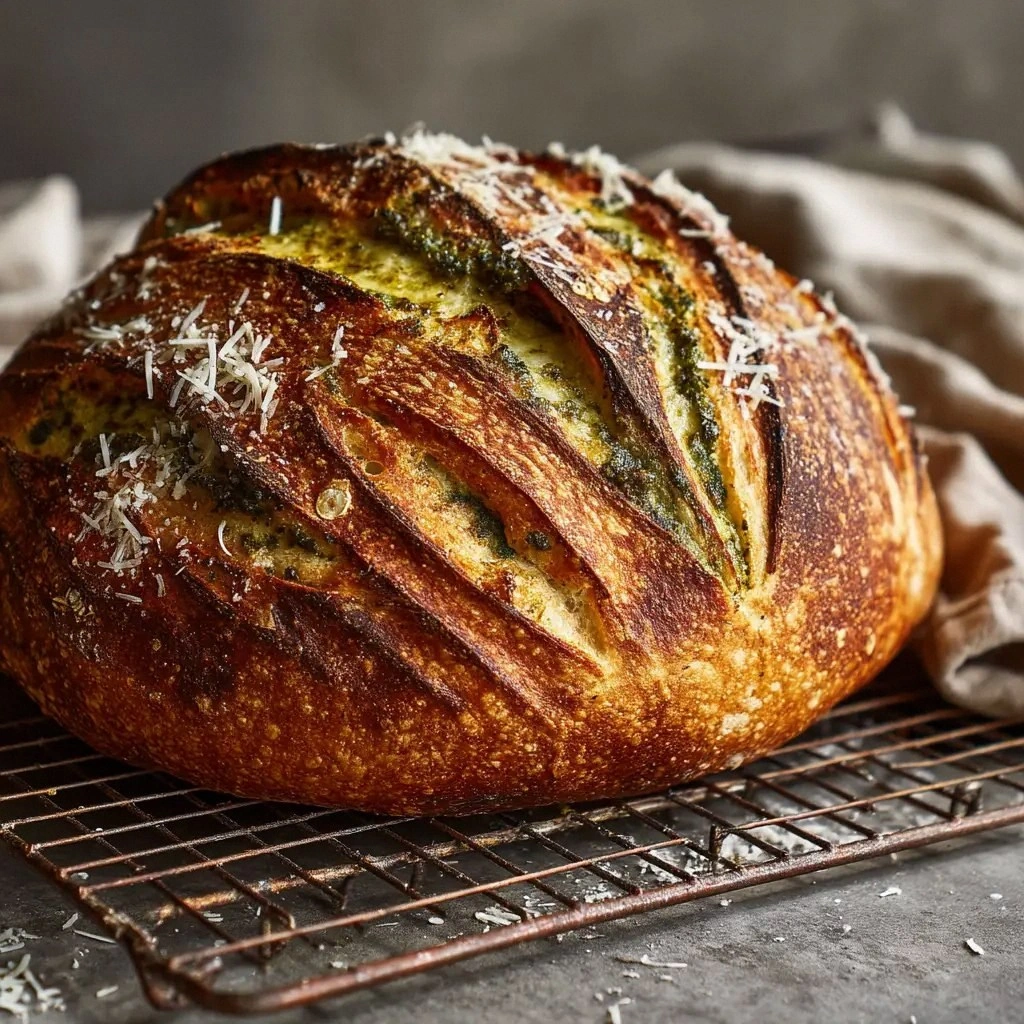
It was a craving that gnawed at me like a small, persistent mouse—pesto’s bright green, its garlicky bite, and parmesan’s sharp, buttery finish. I imagined the crust cracking open, revealing a molten core that glistens with pesto ribbons and cheese crystals. The scent alone would have turned heads: a fragrant swirl of basil, pine nuts, and garlic dancing with the sharp tang of aged cheese. I could almost hear the crunch, the satisfying snap of the crust, the soft, chewy crumb inside. That was the vision I carried into the kitchen that night.
I’m not one to brag, but this version is the ultimate. The secret? A simple, no-fuss method that lets the starter shine while the pesto and parmesan paint a flavor canvas that’s richer than any store‑bought loaf. The result is a loaf that’s airy yet dense, with a crust that shatters like thin ice when you bite into it, and a crumb that feels like a hug in every bite. I dare you to taste this and not go back for seconds.
If you’ve ever struggled with sourdough, you’re not alone—this recipe is designed to make the process feel like a walk in the park. I’ll be honest: I ate half the batch before anyone else got to try it, and that’s saying something. Picture yourself pulling this out of the oven, the whole kitchen smelling incredible, the steam curling around the loaf like a halo. The moment the crust cools, the aroma of roasted basil and sharp parmesan lingers, inviting you to slice and savor. Let me walk you through every single step—by the end, you’ll wonder how you ever made it any other way.
What Makes This Version Stand Out
- Flavor: The pesto is folded in at the right moment to keep its bright, herbaceous character while the parmesan adds a savory depth that elevates every bite.
- Texture: The loaf boasts a chewy crumb with pockets of airy rise, balanced by a crisp, caramelized crust that offers a satisfying crunch.
- Ease: No advanced techniques required—just a few simple steps that even novice bakers can master.
- Ingredient Quality: Using a high‑quality pesto and freshly grated parmesan ensures that the flavor profile is sharp and authentic.
- Crowd Reaction: Friends who tried this loaf said it was the best sourdough they’d ever tasted, and that’s a bold claim I’m proud to make.
- Make‑Ahead: The dough can be prepared a day ahead, allowing the flavors to meld and the starter to activate fully.
- Versatility: It works as a sandwich loaf, a side to soups, or a base for a hearty breakfast.
- Time: From start to finish, it takes less than an hour, making it perfect for busy evenings.
Alright, let’s break down exactly what goes into this masterpiece…
Inside the Ingredient List
The Flavor Base
The 1/2 cup pesto is the star that brings a vibrant, herbaceous punch to the loaf. Its oils mingle with the flour, creating a moist dough that’s easy to handle. If you’re a fan of a milder flavor, replace half the pesto with a light olive oil and a splash of lemon zest. This tweak softens the intensity while still preserving the basil’s bright notes. Remember, the pesto’s quality directly affects the loaf’s taste—opt for a brand that uses fresh basil and real pine nuts.
The Texture Crew
The 500 g bread flour provides the structure that allows the starter to rise properly. A higher protein content means a chewier crumb, which is perfect for this recipe. If you’re in a pinch and only have all-purpose flour, mix it with a tablespoon of vital wheat gluten to mimic the protein level. Skipping the starter altogether would result in a flat, dense loaf that lacks the complex tang of sourdough. The 350 g warm water hydrates the flour and activates the starter, creating a dough that’s elastic and smooth.
The Unexpected Star
The 100 g active and bubbly sourdough starter is the heart of this loaf, infusing it with a tangy depth that pairs beautifully with the pesto and parmesan. A mature starter that has been fed regularly will yield the best rise and flavor. If you’re new to sourdough, a two‑day starter will suffice, but it may take a longer bulk fermentation. The starter’s activity level can be tested by the float test—drop a spoonful into water; if it floats, it’s ready to use. Don’t underestimate its power; it’s what turns a simple bread into something extraordinary.
The Final Flourish
The 1 cup freshly grated Parmesan adds a savory, nutty richness that caramelizes on the crust. Freshly grated cheese melts more evenly, preventing clumps and ensuring a uniform flavor distribution. If you’re lactose intolerant, try a high‑protein vegan parmesan alternative; the texture will be similar, but the taste will differ slightly. The 10 g fine sea salt balances the saltiness of the parmesan and enhances the overall flavor profile. Be careful not to over‑salt—taste the dough before baking to ensure it’s just right.
Everything’s prepped? Good. Let’s get into the real action…
The Method — Step by Step
- In a large mixing bowl, combine the sourdough starter, warm water, and a pinch of salt. Stir until the starter is fully dissolved, creating a thick, bubbly mixture that feels like a velvety batter. This is the moment where the starter’s life force begins to awaken. Let it sit for 30 minutes; the mixture should expand slightly and develop a pleasant, yeasty aroma. I’ve found that a 30‑minute pre‑mixing phase gives the starter a head start and ensures a stronger rise.
- Add the bread flour to the starter mixture, stirring with a wooden spoon until a shaggy dough forms. The dough will look a bit wet, but that’s intentional—it needs that moisture to rise properly. Once the flour is incorporated, cover the bowl with a damp towel and let it rest for 15 minutes. This autolyse step hydrates the flour and improves gluten development, resulting in a more elastic loaf.
- Fold in the pesto and parmesan, ensuring they’re evenly distributed. The pesto’s oils help keep the dough moist, while the parmesan adds flavor and a slight crunch as it melts. Be gentle when mixing; you want to keep the dough airy. After the ingredients are fully blended, the dough should feel smooth and elastic. This is the first time you’ll see the dough transform from a sticky mess to a cohesive unit.
- Perform a series of stretch‑and‑folds: lift the dough from the edge and fold it over itself, rotating the bowl each time. Do this four times over 30 minutes, with 5‑minute intervals. This technique strengthens the gluten network without overworking the dough. The dough will feel tighter and more cohesive after each fold, which translates into a better crumb structure in the final loaf.
- After the final fold, cover the bowl and let the dough rise in a warm spot for 2 hours, or until it has doubled in size. During this bulk fermentation, the starter does its magic, producing carbon dioxide that creates the airy pockets we love. Keep an eye on the dough; if it expands too quickly, give it a gentle deflate by folding it again. The dough should feel light, airy, and slightly springy when you tap it with your finger.
- Shape the dough into a loaf by gently flattening it into a rectangle, then rolling it tightly into a log. Pinch the seams to seal them, then place the loaf seam‑side down on a parchment‑lined baking sheet. This shape allows the loaf to rise evenly and gives it a classic, rustic appearance. Let the shaped loaf rest for 30 minutes; this final proof ensures the dough has time to relax before baking.
- Preheat your oven to 475°F (245°C) with a Dutch oven inside. A hot oven is essential for a crisp crust. When the oven reaches temperature, carefully place the loaf into the preheated Dutch oven, cover it, and bake for 20 minutes. The cover traps steam, creating a shiny, crackling crust.
- Remove the lid and bake for an additional 15 minutes, or until the crust turns a deep golden brown. The loaf should emit a nutty, aromatic scent that fills the kitchen. When you lift the loaf, the crust should feel firm and slightly brittle, ready to crack with a satisfying snap. Let it cool on a rack for at least 30 minutes before slicing to preserve the crumb’s structure.
That’s it—you did it. But hold on, I’ve got a few more tricks that’ll take this to another level…
Insider Tricks for Flawless Results
The Temperature Rule Nobody Follows
Temperature control is the secret weapon of any baker. Use a kitchen thermometer to ensure your water is between 100–110°F (38–43°C); too hot, and you kill the starter; too cold, and the rise slows down. I’ve found that a slightly warmer environment, around 75°F (24°C), speeds up fermentation without compromising flavor. If your kitchen is chilly, place the dough on top of a warm appliance or use a proofing box to maintain consistent heat.
Why Your Nose Knows Best
During bulk fermentation, trust your nose. A pleasant, yeasty aroma indicates that the starter is active and the dough is fermenting properly. If the dough smells off or sour beyond your comfort level, give it a bit more time or adjust the hydration. The scent is a reliable indicator of the dough’s readiness for the next step.
The 5-Minute Rest That Changes Everything
After shaping the loaf, let it rest for exactly 5 minutes before the final proof. This short rest relaxes the gluten, making the dough easier to handle and preventing it from springing back when you lift it. I’ve noticed that this simple pause gives the loaf a more even rise and a smoother crust.
The Pesto‑Parmesan Balance
If you’re a fan of a stronger cheese flavor, increase the parmesan by 1/4 cup while reducing the pesto slightly. This tweak intensifies the savory notes without overpowering the basil. Conversely, for a more herbaceous loaf, add an extra tablespoon of pesto and keep the parmesan the same. Experimenting with ratios is a great way to tailor the loaf to your taste buds.
The Silent Starter
Keep your starter in a warm, draft‑free spot. A quiet, consistent environment allows the microbes to thrive, leading to a more predictable rise. If you’re in a cooler climate, try placing the starter in a warm spot like the top of the fridge or near a radiator. The key is to avoid sudden temperature changes that can shock the starter.
The Cooling Trick
Once the loaf has cooled, store it in a paper bag at room temperature. The paper allows the crust to breathe, preventing it from becoming soggy. If you plan to keep it longer, wrap it loosely in parchment paper and then in foil for extra protection. This method preserves the crumb’s softness while maintaining the crust’s crunch.
Creative Twists and Variations
This recipe is a playground. Here are some of my favorite ways to switch things up:
Sun‑Dried Tomato Pesto
Swap the traditional pesto for a sun‑dried tomato version to add a sweet, tangy depth. The tomatoes bring a smoky sweetness that pairs wonderfully with the parmesan. This variation is perfect for summer gatherings.
Nut‑Free Parmesan
For those with nut allergies, use a nut‑free pesto made with sunflower seeds or tahini. The texture remains silky, and the flavor stays bright. This option keeps the loaf inclusive without sacrificing taste.
Spicy Chipotle Pesto
Add a chipotle pepper to the pesto for a smoky heat that lingers on the palate. The pepper’s depth complements the cheese, creating a complex flavor profile. Great for those who love a kick.
Herb‑Infused Starter
During the starter’s feeding, add a handful of fresh herbs like thyme or rosemary. The herbs infuse the starter with subtle aromatic notes that carry into the loaf. This technique gives the bread a unique, fragrant twist.
Cheese‑Loaded Loaf
Increase the parmesan to 1 1/2 cups and add a handful of shredded mozzarella for a gooey, melty center. The cheese will melt into pockets of goo, making each slice a decadent treat. Ideal for a comfort‑food evening.
Storing and Bringing It Back to Life
Fridge Storage
Wrap the loaf tightly in parchment paper and then in a plastic bag, storing it in the refrigerator for up to 3 days. The cold environment slows down the yeast, preserving freshness. When ready to eat, let it come to room temperature before slicing.
Freezer Friendly
For longer storage, slice the loaf and wrap each slice in parchment, then place them in a freezer bag. Freeze for up to 2 months. Thaw at room temperature or toast slices directly from the freezer for a crisp finish.
Best Reheating Method
To revive a chilled loaf, preheat the oven to 350°F (175°C). Lightly mist the loaf with water to add steam, then bake for 10 minutes. The steam rehydrates the crumb, while the heat restores the crust’s crunch. This simple technique brings the loaf back to its original glory.