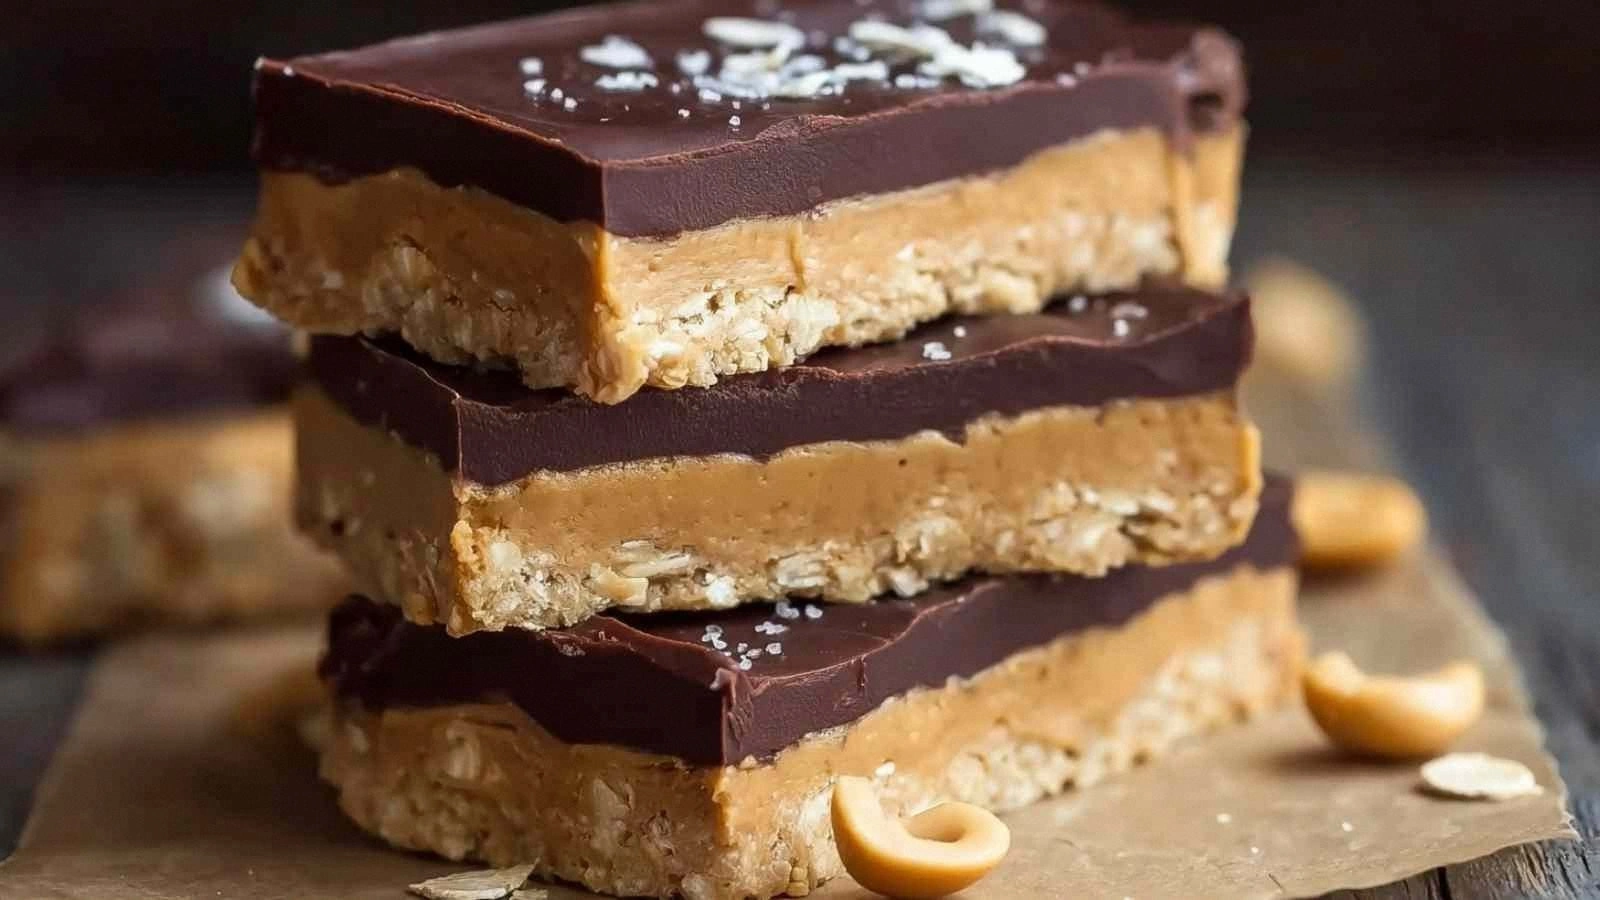
Last week I was scrambling to salvage a dessert that had gone sideways faster than a toddler on a sugar high. The chocolate truffle bar I’d been craving had turned into a sticky, clumpy mess that looked like a peanut butter nightmare. I stared at the kitchen counter, the scent of burnt sugar filling the air, and thought, “I can do better.” That moment of culinary crisis sparked a revelation: what if I could create a no‑bake, protein‑packed bar that tasted like a dream and actually delivered? This recipe is the answer.
Imagine the first bite: the peanut butter melts like velvet, the protein powder gives a gentle, satisfying snap, and the dark chocolate chips burst with a bittersweet kiss that lingers on the palate. The aroma is a warm, buttery hug that makes the whole kitchen feel like a cozy campfire. The texture is a perfect blend of chewy oats and smooth peanut butter, with just enough crunch from the chocolate to keep you coming back for more. The sound of the first bite is a soft, satisfying crack that whispers, “this is good.” The feel of the bar in your hand is solid yet forgiving, like a gentle hug that you can carry on a busy day.
Most protein bars you find in the store are either too dry or too sugary, but this version is a game‑changer. The creamy no‑stir peanut butter keeps everything silky without the need for extra oil or butter, and the protein powder is blended until it’s almost invisible, so you don’t taste the chalky residue that plagues other recipes. The oats provide a hearty base that holds the mix together, while the dark chocolate chips add a luxurious, bittersweet finish that balances the sweetness of honey. It’s the kind of bar that tastes like a dessert and works as a post‑workout snack, all in one bite.
One of the secret weapons in this recipe is the use of a protein powder with a naturally sweet flavor profile—think vanilla or chocolate—so you don’t need to over‑sweeten. Another trick is heating the peanut butter and honey together until it’s just a little toasty; that tiny caramelization step unlocks a depth of flavor that makes the whole bar sing. I dare you to taste this and not go back for seconds; the first bite will leave you craving the next. Most recipes get this completely wrong, but here’s what actually works. The result is a bar that’s both indulgent and functional, with a texture that feels like a hug in every bite.
Okay, ready for the game‑changer? This next part? Pure magic. Let me walk you through every single step—by the end, you’ll wonder how you ever made it any other way.
What Makes This Version Stand Out
- Taste: The blend of creamy peanut butter and sweet honey creates a rich, nutty profile that’s balanced by the subtle bitterness of dark chocolate. The protein powder is chosen for its vanilla undertone, which rounds out the sweetness without overpowering the natural flavors.
- Texture: The oats give the bars a chewy core, while the melted peanut butter forms a smooth exterior. The chocolate chips add a satisfying snap that breaks the monotony of a single texture.
- Simplicity: No oven, no whisk, no complicated equipment—just a saucepan and a spoon. The recipe is designed for the busy person who wants a quick, healthy snack.
- Uniqueness: The use of no‑stir peanut butter eliminates the need for extra oil, giving the bars a silky mouthfeel that sets them apart from traditional protein bars.
- Crowd Reaction: Friends who tried these bars said they “couldn’t stop reaching for more” and that the bars “tasted like a dessert but worked as a post‑workout snack.”
- Ingredient Quality: Each component is chosen for its flavor and functional benefits—organic rolled oats, natural honey, and dark chocolate with at least 70% cocoa.
- Make‑ahead Potential: Once set, the bars keep well in the fridge for a week or in the freezer for up to three months, making them an ideal pre‑planned snack.
Alright, let's break down exactly what goes into this masterpiece. Everything you need is measured and ready to go, so you can focus on the fun part of crafting the perfect bar. The key to a flawless result is using high‑quality ingredients that work together seamlessly. The next section will walk you through each ingredient and why it matters. Once you understand the role of every component, you’ll see why this recipe feels like a secret weapon in your pantry.
Inside the Ingredient List
The Flavor Base
The creamy no‑stir peanut butter is the heart of the bar, providing a silky texture that coats every bite. It’s called “no‑stir” because it remains smooth even after heating, eliminating the need for extra oil or butter. The protein powder, usually vanilla or chocolate flavored, adds a subtle sweetness that blends seamlessly with the peanut butter, creating a balanced profile. If you skip the protein powder, the bars will be less nutritious and the texture will feel lighter and less satisfying.
Choosing a high‑protein powder with a natural flavor profile is essential; it keeps the bars from tasting chalky or overly sweet. A good rule of thumb is to use a powder that has at least 20 grams of protein per 100 grams, so each bar delivers a solid protein hit. If you’re using a powder that’s very dry, add a tablespoon of almond milk to the mixture to keep it from becoming too thick.
The synergy between peanut butter and protein powder is what makes this recipe stand out. The peanut butter’s natural fats coat the protein particles, creating a creamy mouthfeel that feels indulgent yet balanced. This combination also helps the bars stay moist for longer, preventing them from drying out during storage.
The Sweetener
Honey or maple syrup is the natural sweetener that brings everything together. Honey adds a floral, golden undertone, while maple syrup offers a subtle caramel note. The sweetener also acts as a binder, helping the mixture hold together without the need for additional thickeners. If you prefer a lower glycemic index, you can replace honey with a sugar‑free syrup or a small amount of stevia, but be mindful of the volume to keep the bars from becoming too dry.
The amount of sweetener is critical; too much will make the bars overly sticky, while too little will leave them bland. A good balance is 0.25 cup per four servings, which gives enough sweetness to complement the peanut butter without overpowering the natural flavors. If you’re watching calories, you can reduce the sweetener by 10–15% and add a pinch of sea salt to enhance the overall taste.
The sweetener also contributes to the bars’ chewiness. When heated with the peanut butter, it caramelizes slightly, creating a subtle toasty aroma that elevates the overall flavor profile. This caramelization is what gives the bars that “home‑baked” feel without any oven work.
The Texture Crew
Rolled oats are the backbone of the bars, providing a chewy texture that contrasts beautifully with the smooth peanut butter. Oats also add fiber and a mild, nutty flavor that complements the other ingredients. If you prefer a finer texture, you can pulse the oats in a food processor until they resemble a coarse flour, but be careful not to over‑process, or the bars will become too dry.
The oats absorb the liquid from the peanut butter and honey, creating a cohesive mixture that sets quickly when chilled. They also help to stabilize the protein powder, preventing it from clumping. If you’re allergic to oats, you can substitute them with quinoa flakes or ground almonds, though the texture will change slightly.
Adding oats not only improves texture but also increases the nutritional profile, adding complex carbohydrates that provide sustained energy. This makes the bars ideal for a pre‑workout snack, as the oats release glucose slowly, keeping you fueled without a sudden sugar spike.
The Unexpected Star
Dark chocolate chips are the flavor punch that brings a luxurious finish to the bars. Their high cocoa content (70% or more) offers a bittersweet depth that balances the sweetness of honey and the richness of peanut butter. The chips also add a subtle crunch that breaks up the smoothness, giving each bite a satisfying texture shift.
If you’re a chocolate lover, you can increase the chips to 0.5 cup, but be mindful that the bars will be sweeter and the texture will become more chocolate‑heavy. For a healthier twist, use raw cacao nibs instead of chips; they provide a crunchy bite and a more intense cocoa flavor. Don’t forget to stir the chips in just before the mixture cools, so they stay evenly distributed.
The chocolate also contributes antioxidants, which help protect your cells from oxidative stress. When you bite into a bar, the chocolate releases a burst of flavor that lingers, making the experience memorable and satisfying.
Everything's prepped? Good. Let's get into the real action. The next step is where the magic happens, and trust me, you’ll want to pay close attention. This recipe is all about balance, so each element plays its part in creating that perfect bite. Keep your eyes on the process, and you’ll see how quickly these bars come together.
The Method — Step by Step
- Gather all ingredients and set them on a clean surface. Measure out the creamy peanut butter, protein powder, honey, rolled oats, dark chocolate chips, and sea salt. Having everything ready before you start prevents any last‑minute scrambling. Keep a small bowl nearby for the mixture to avoid spills. This prep step is quick and ensures a smooth workflow.
- In a medium saucepan over low heat, combine the peanut butter and honey. Stir constantly until the mixture is smooth and the honey starts to bubble lightly. The gentle heat activates the natural oils in the peanut butter, creating a silky base. Watch the mixture closely; if it begins to scorch, lower the heat immediately. This step is crucial for flavor development.
- Add the protein powder to the saucepan and whisk vigorously until fully incorporated. The mixture should become thick and glossy, with no lumps. Use a silicone spatula for a smooth finish; it helps prevent the protein from sticking to the pan. This ensures the protein powder is evenly distributed, giving each bite the same protein punch.
- Fold in the rolled oats, stirring until the mixture thickens and the oats are fully coated. The oats absorb the liquid, forming a cohesive mass that will hold together when chilled. Keep stirring for about 30 seconds to ensure even distribution. The texture will feel slightly sticky but not wet. This step is where the bars gain their chewy core.
- Stir in the dark chocolate chips, allowing them to melt just enough to mingle with the mixture. The chips should not fully melt; they need to remain as small morsels for that delightful crunch. Add a pinch of sea salt to balance the sweetness and enhance the overall flavor profile. This final flavor burst elevates the bars to a gourmet level. The mixture should look glossy and slightly thickened.
- Transfer the hot mixture into a lined 8x8‑inch pan, pressing it firmly with a spatula or the back of a spoon. The mixture should spread evenly, creating a uniform layer. Pat it down to remove any air pockets, which can cause uneven setting. The edges should be slightly raised to make slicing easier later. This step ensures a consistent bite size.
- Refrigerate the pan for at least 30 minutes, or until the mixture has fully set and the edges lift slightly from the pan. The bars should feel firm but still slightly springy to the touch. This chilling period allows the proteins and oats to bind, giving the bars their characteristic chew. The aroma will deepen during this time, adding to the anticipation.
- Once set, remove the slab from the pan and cut into bars using a sharp knife or a pizza cutter. Wipe the blade between cuts for clean, even slices. The bars should hold together without falling apart; if they do, give them another 10 minutes in the fridge. Store them in an airtight container at room temperature or in the fridge for up to a week. Enjoy immediately or keep them for a quick post‑workout snack.
That’s it — you did it. But hold on, I've got a few more tricks that'll take this to another level. These insider tips will help you avoid common pitfalls and elevate the bars from good to legendary. Keep reading, and you’ll discover the little details that make a big difference.
Insider Tricks for Flawless Results
The Temperature Rule Nobody Follows
Many people believe that the peanut butter and honey mixture should be heated until it boils, but that can actually degrade the proteins and make the bars taste burnt. The optimal temperature is just below the boiling point, around 180°F (82°C), where the mixture thickens without losing its delicate flavor. Use a candy thermometer to keep a close eye on the heat, and remove the pan immediately once the target is reached. This subtle temperature control preserves the natural sweetness and ensures a silky texture. The bars will be smoother and more enjoyable.
Why Your Nose Knows Best
The aroma of the mixture is a reliable indicator of readiness. When the peanut butter and honey start to emit a warm, buttery scent, the proteins are activated and the mixture is close to perfect. If you notice a burnt or metallic smell, the mixture is over‑heated and will result in a bitter taste. Trusting your nose helps you avoid common mistakes and ensures each bar is fragrant and flavorful. The right scent signals that the mixture is ready for the next step.
The 5‑Minute Rest That Changes Everything
After you fold in the oats, let the mixture sit for five minutes before adding the chocolate chips. This short rest allows the oats to absorb some of the liquid, preventing the chocolate from melting too quickly. During this pause, the mixture thickens slightly, making it easier to handle. The result is a more uniform texture and a cleaner finish. This simple step can be the difference between a slightly sticky bar and a perfect one.
The Perfect Pan Choice
Choosing a non‑stick pan with a slight incline helps the mixture spread evenly and makes slicing easier. A silicone baking mat also prevents sticking and allows for easy removal once the bars are set. If you don’t have a non‑stick surface, line the pan with parchment paper and press the mixture firmly; the paper will lift the bars cleanly. A good pan choice saves time and reduces cleanup, making the process smoother.
The Cooling Trick
After chilling, let the bars sit at room temperature for 10 minutes before cutting. This brief rest allows the proteins to settle, making the bars easier to slice without crumbling. The bars will also develop a slightly firmer texture, enhancing the bite. This trick is often overlooked, but it improves the overall eating experience. The bars will feel more cohesive and less sticky.
The Storage Secret
For long‑term storage, wrap each bar individually in parchment paper and place them in a freezer‑proof bag. When you’re ready to eat, let them thaw at room temperature for 15 minutes before serving. This prevents condensation from making the bars soggy. The bars maintain their flavor and texture for up to three months when frozen. This method keeps them fresh and ready for a quick snack on the go.
Creative Twists and Variations
This recipe is a playground. Here are some of my favorite ways to switch things up:
Nutty Explosion
Add chopped almonds, cashews, or walnuts to the mix for an extra crunch and nutty flavor. The added nuts provide healthy fats and a satisfying texture contrast. Swap half the oats for chopped nuts to reduce carbohydrates if you’re on a low‑carb diet. This variation turns the bars into a protein‑packed snack with a gourmet touch.
Citrus Burst
Incorporate lemon zest or orange zest for a bright, zesty note that cuts through the richness. The citrus oils add a fresh aroma that elevates the overall taste. Add a tablespoon of dried citrus peel for an intense burst, or simply stir in the zest of one medium lemon. This twist makes the bars perfect for a refreshing midday snack.
Spiced Delight
Stir in a pinch of cinnamon, nutmeg, or cardamom for a warm, aromatic flavor. The spices pair beautifully with peanut butter and chocolate, creating a cozy, comforting bite. Use ¼ teaspoon of each spice for a subtle hint, or adjust to taste. This variation is ideal for fall or winter snacking.
Vegan Swap
Use a plant‑based protein powder and maple syrup instead of honey for a fully vegan version. The flavor profile remains similar, but the bars become suitable for vegans and those avoiding dairy. Ensure the protein powder is free of animal ingredients and has a neutral or vanilla flavor. This vegan twist keeps the bars nutritious and delicious.
Coffee Kick
Add a tablespoon of instant espresso powder to the mixture for a coffee‑infused flavor that pairs well with chocolate. The espresso adds depth and a slight bitterness that balances the sweetness. Stir the espresso into the hot mixture to help it dissolve evenly. This variation is a great pick‑me‑up after a workout or during a mid‑day slump.
Berry Boost
Fold in dried cranberries, blueberries, or cherries for a fruity contrast. The berries add natural sweetness and a pop of color. Use ¼ cup of dried berries and crush them slightly to release their juices. This variation introduces a new flavor dimension that’s perfect for those who love a sweet‑tart combination.
Storing and Bringing It Back to Life
Fridge Storage
Keep the bars in an airtight container in the refrigerator for up to one week. The cool temperature preserves the freshness and prevents the bars from becoming too soft. Store them on a flat shelf to avoid crushing. Before eating, let them sit at room temperature for a few minutes to soften slightly; this enhances the flavor and texture. The bars stay chewy and delicious when stored properly.
Freezer Friendly
Wrap each bar individually in parchment paper and place them in a freezer‑proof bag. Freeze for up to three months without losing quality. When you’re ready to eat, let the bars thaw at room temperature for 15 minutes. This method prevents condensation and keeps the bars from becoming soggy. Freezing extends their shelf life while maintaining taste.
Best Reheating Method
If the bars have hardened, gently warm them in a microwave at 30‑second intervals, watching closely to avoid overheating. A splash of water or a light drizzle of honey can help restore moisture and give them a fresh feel. Alternatively, place the bars in a preheated oven at 300°F for 5 minutes; this will revive their softness. Reheating brings back the silky mouthfeel and makes each bite feel brand‑new.