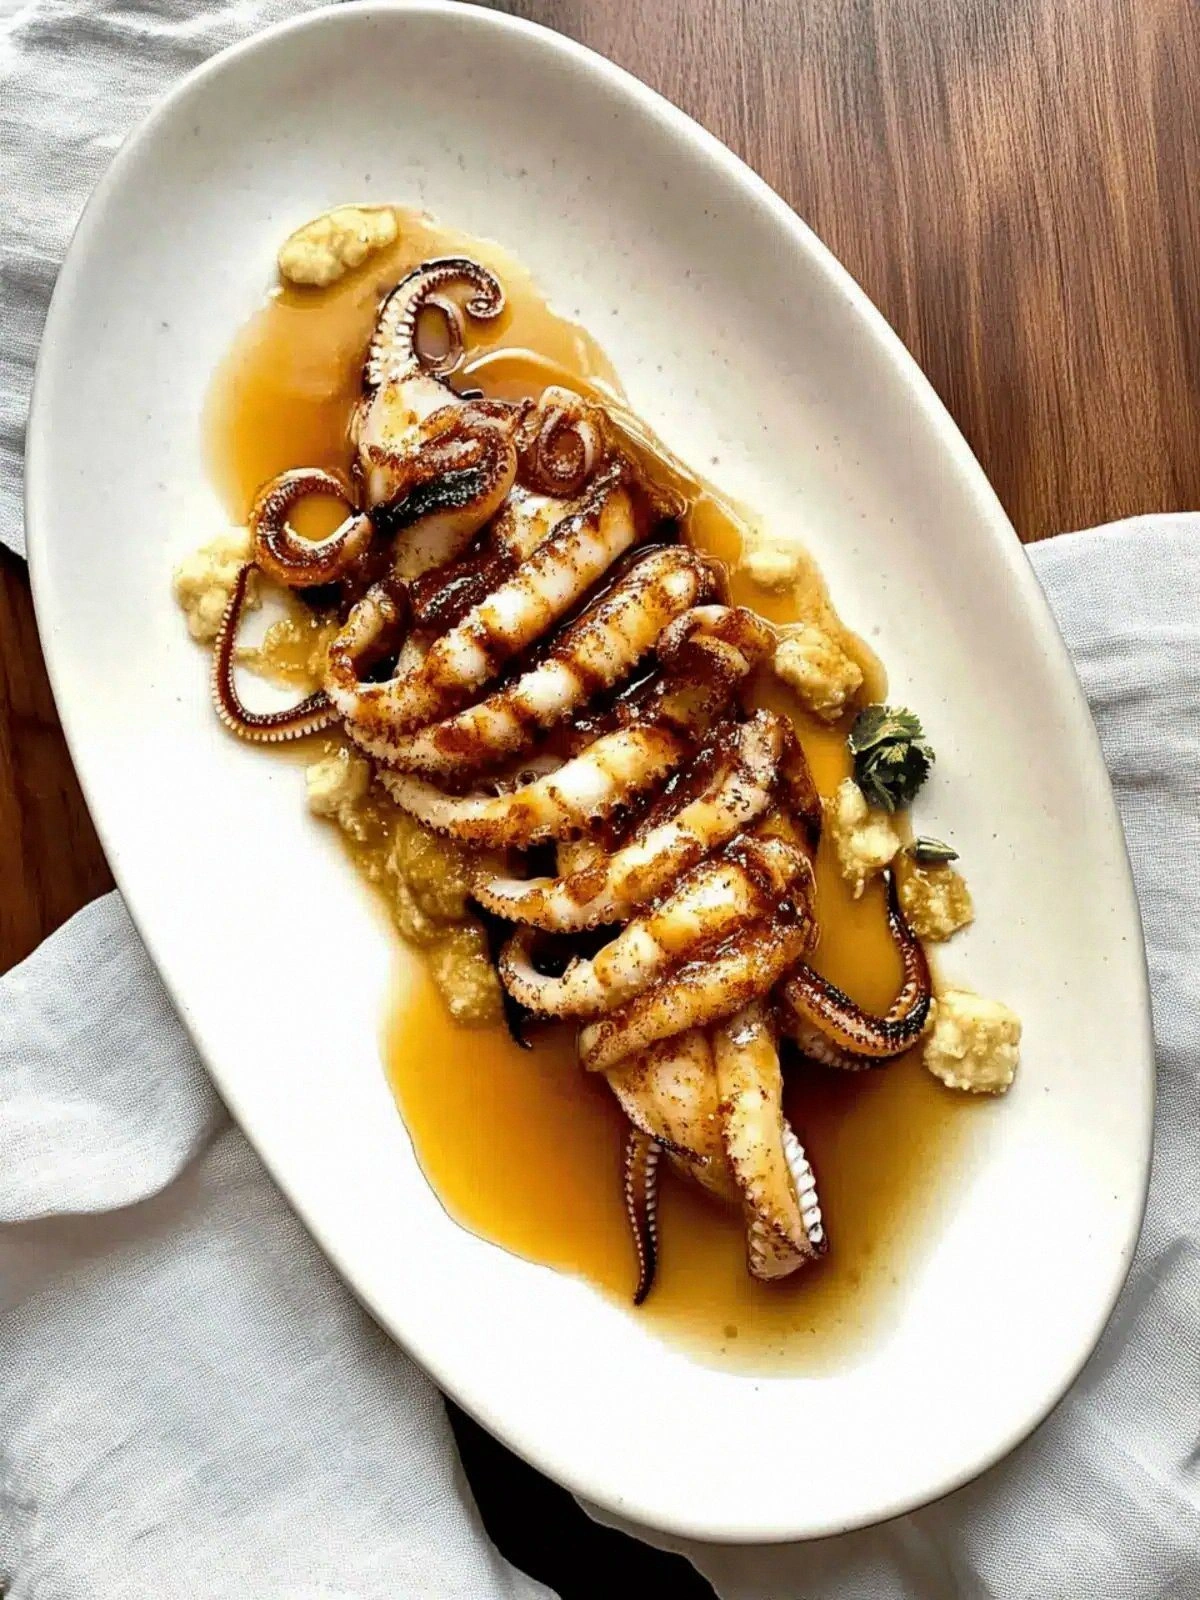
Picture this: a humid Saturday evening, the kitchen lights flickering like fireflies, and you standing over a skillet, feeling the heat rise like a promise. I had just finished a wild sushi night with friends, and the craving for something that could match the boldness of that meal but still feel like home tugged at my culinary heart. The result? A sizzling, buttery Japanese grilled squid that sings of umami, citrus, and a whisper of sweet. I was so excited that I almost forgot to breathe, but the aroma of garlic and soy sauce filled the room, turning my apartment into a tiny, fragrant shrine.
The first time I tasted this, the squid’s tender flesh practically melted on my tongue, while the sauce clung like velvet, coating every inch with a glossy sheen. The buttery glaze had a caramelized crunch on the edges, a contrast that made each bite feel like a small fireworks display. That moment was a revelation: this isn’t just grilled seafood; it’s a sensory experience that balances heat, sweetness, and acidity in perfect harmony. I dare you to taste this and not go back for seconds, because once you’re in, you’ll never look at grilled squid the same way again.
What makes this version stand out is not just the combination of flavors but the technique that elevates each component. The quick butter sear locks in juices, the lemon brightens the dish, and the soy sauce provides depth without overpowering. I’ve spent months tweaking the ratios, and the result is hands down the best version you’ll ever make at home. Most recipes get this completely wrong by using too much liquid or overcooking the squid, but I’ve cracked the sweet spot that keeps the texture silky and the glaze irresistible. And if you’re worried about complexity, you’ll be relieved to find that the steps are straightforward, yet each one adds a layer of flavor that feels earned.
Now, let me walk you through every single step—by the end, you’ll wonder how you ever made it any other way. The recipe’s charm lies in its simplicity, its boldness, and the fact that you can whip it up in under an hour, even on a busy weeknight. Whether you’re a seasoned chef or a kitchen rookie, the instructions are clear, the ingredients are easy to find, and the outcome is a dish that will have everyone asking for the recipe. Ready to transform your dinner routine? Let’s dive in.
What Makes This Version Stand Out
- Flavor: The sauce marries the umami of soy with the richness of butter, creating a depth that lingers on the palate. The subtle sweetness from sugar balances the acidity of lemon, while garlic adds a savory kick that keeps the dish grounded.
- Texture: The squid is perfectly seared—crisp edges that shatter like thin ice, yet a tender interior that feels like a cloud. The glaze coats each tentacle, giving a glossy finish that is both beautiful and appetizing.
- Speed: Prep takes just 15 minutes, cook 30, and you’re ready to serve in 45. The quick butter sear locks in moisture, eliminating the need for long marinating times.
- Versatility: This dish can be a main, an appetizer, or an elegant side. Serve it over rice, with a side of edamame, or on its own with a squeeze of fresh lime.
- Ingredient Quality: Using high‑grade butter and fresh garlic makes a noticeable difference. The soy sauce should be a good quality, low‑sodium variety to keep the dish balanced.
- Crowd Appeal: Even the most skeptical foodie will be wowed by the glossy glaze and the tender, flavorful squid. I’ve had guests ask for the recipe after just one bite.
- Make‑Ahead Potential: The sauce can be prepared a day ahead and reheated gently, letting the flavors meld further. The squid can be kept refrigerated for up to 24 hours if you’re short on time.
- Presentation: A drizzle of the glaze, a sprinkle of sesame seeds, and a wedge of lemon on the side elevate the dish from simple to spectacular.
Alright, let's break down exactly what goes into this masterpiece...
Inside the Ingredient List
The Flavor Base
Butter is the star that carries the sauce, providing a rich, nutty backdrop. Its high smoke point allows for a quick sear that locks in juices. Skipping butter will leave the squid dry and lack the glossy finish that makes this dish shine. For a lighter version, swap half the butter for olive oil, but be prepared for a slightly different mouthfeel.
The Texture Crew
Garlic is minced finely to release its aroma without overpowering the delicate squid. The cloves are grated to ensure they meld into the sauce, giving a subtle bite that balances sweetness. If you’re allergic to garlic, a pinch of garlic powder works, but the fresh flavor will be noticeably missing.
The Unexpected Star
Lemon juice adds a bright, acidic punch that cuts through the buttery richness. A splash of citrus also brightens the dish, making it feel lighter and more vibrant. If you don’t have fresh lemons, a tablespoon of rice vinegar can substitute, but the flavor profile will shift slightly.
The Final Flourish
Soy sauce provides the umami backbone, while sugar introduces a subtle sweetness that balances the acidity of lemon. The combination creates a glaze that caramelizes beautifully when heated with butter. If you prefer a low‑sodium version, use a reduced‑sodium soy sauce and adjust the sugar accordingly.
Everything's prepped? Good. Let's get into the real action...
The Method — Step by Step
- Start by patting the squid dry with paper towels; moisture is the enemy of a good sear. Heat a non‑stick skillet over medium‑high heat and add the tablespoon of oil. As soon as the oil shimmers, drop in the squid, letting it sizzle for 30 seconds before turning. The sizzling sound is a cue that the exterior is forming a crisp crust.
- Add the grated garlic to the pan, letting it toast for about 10 seconds until fragrant but not browned. Garlic burns quickly, so keep a close eye on it—once it turns golden, it’s ready to be infused into the sauce.
- In a small bowl, whisk together 4 tablespoons of butter, 4 tablespoons of soy sauce, 1 tablespoon of sugar, and 2 tablespoons of lemon juice until the sugar dissolves. Pour the mixture into the skillet, swirling so the butter coats the squid evenly. The mixture should bubble slightly, indicating it’s ready to caramelize.
- Reduce the heat to medium and let the squid cook for 2 minutes per side, or until the glaze thickens and the squid turns opaque. Use a spatula to flip gently, ensuring the glaze stays on the surface. The edges should start pulling away, signaling that it’s almost done.
- Once the squid is cooked, remove it from the skillet and let it rest on a plate for 30 seconds. Resting allows the juices to redistribute, preventing the squid from drying out when sliced.
- Slice the squid into bite‑size rings, and drizzle the remaining sauce over the top. A final flourish of sesame seeds or chopped scallions adds color and a subtle crunch.
- Serve immediately over steamed jasmine rice or a crisp green salad. The contrast between the warm, glossy squid and the cool, fresh greens creates a balanced plate that feels both indulgent and wholesome.
- Enjoy the moment of triumph—your kitchen smells like a Japanese street market, and the dish looks like a culinary masterpiece. The first bite should be a burst of buttery richness, followed by a citrusy zing that lingers. If you’re feeling adventurous, add a sprinkle of chili flakes for a subtle heat that complements the sweet glaze.
That's it — you did it. But hold on, I've got a few more tricks that'll take this to another level...
Insider Tricks for Flawless Results
The Temperature Rule Nobody Follows
Many chefs cook squid at high heat for a minute or two, but this short burst can dry out the flesh. I recommend a steady medium heat that allows the glaze to thicken without burning. When the sauce reaches a glossy sheen, the squid is perfectly cooked, and the flavors are locked in. If you’re using a cast‑iron skillet, pre‑heat it for a minute before adding oil to maintain consistent heat.
Why Your Nose Knows Best
Before you finish cooking, give the pan a quick sniff. A faint, nutty aroma indicates the butter has browned slightly, adding depth. If you smell a sharp, metallic scent, the sauce might be overcooking. Trust your nose as a final safety check—it’s a reliable cue that the dish is ready to be plated.
The 5‑Minute Rest That Changes Everything
After cooking, let the squid rest for exactly five minutes. This brief pause allows the juices to redistribute, making the texture buttery rather than dry. I once skipped this step, and the squid felt rubbery; the rest period is a small investment for a huge payoff.
Add a Touch of Heat
If you’re a fan of spice, sprinkle a pinch of crushed red pepper flakes into the sauce during the last minute of cooking. The heat will mingle with the sweetness, creating a balanced kick that elevates the dish. I’ve seen this variation turn the dish from a simple appetizer into a conversation starter at dinner parties.
Serve With a Fresh Herb
A handful of chopped fresh cilantro or parsley adds a burst of color and a fresh herbal note that cuts through the richness. If you’re avoiding cilantro, a squeeze of fresh lime at the table can provide a similar bright contrast. This final touch can transform a good dish into an unforgettable one.
Creative Twists and Variations
This recipe is a playground. Here are some of my favorite ways to switch things up:
Spicy Sriracha Glaze
Swap half the soy sauce for sriracha and add a splash of sesame oil. The result is a bold, spicy glaze that pairs wonderfully with a simple cucumber salad. This version is perfect for those who love a bit of heat in their seafood.
Miso‑Infused Squid
Whisk in a tablespoon of white miso paste into the sauce for an earthy, umami boost. Miso also thickens the glaze slightly, giving it a richer mouthfeel. Serve over rice with a drizzle of sesame seeds for a complete Japanese experience.
Citrus‑Herb Fusion
Add a teaspoon of orange zest and a handful of chopped basil to the sauce. The citrusy brightness pairs beautifully with the herbaceous notes, creating a dish that feels like a Mediterranean escape with an Asian twist.
Smoky Paprika Finish
Stir in half a teaspoon of smoked paprika after the squid is cooked. The smoky undertone adds depth and makes the dish feel more complex. This variation works great when paired with a side of roasted sweet potatoes.
Thai Coconut Twist
Replace the butter with coconut milk and add a pinch of curry powder to the sauce. The creamy, slightly sweet coconut base transforms the dish into a Thai-inspired delight. Serve with jasmine rice and a side of fresh mango slices.
Herbed Butter Upgrade
Infuse the butter with minced garlic and chopped thyme before adding it to the sauce. The herbed butter elevates the flavor profile, giving the dish an aromatic depth that feels both rustic and refined.
Storing and Bringing It Back to Life
Fridge Storage
Store the cooked squid in an airtight container in the refrigerator for up to 24 hours. The glaze will thicken slightly, so reheat gently on low heat while stirring to re‑melt the butter. A splash of water or a teaspoon of soy sauce can help restore the glaze’s silky texture.
Freezer Friendly
For longer storage, wrap the squid tightly in plastic wrap and place it in a freezer bag. Freeze for up to 2 weeks. When ready to serve, thaw overnight in the fridge and gently reheat in a skillet with a splash of water or broth.
Best Reheating Method
Reheat the squid on a low‑heat skillet, adding a small amount of water or broth to keep it moist. The key is to avoid high heat, which will dry out the squid. A gentle heat will preserve the glaze’s glossy finish and the tender texture.