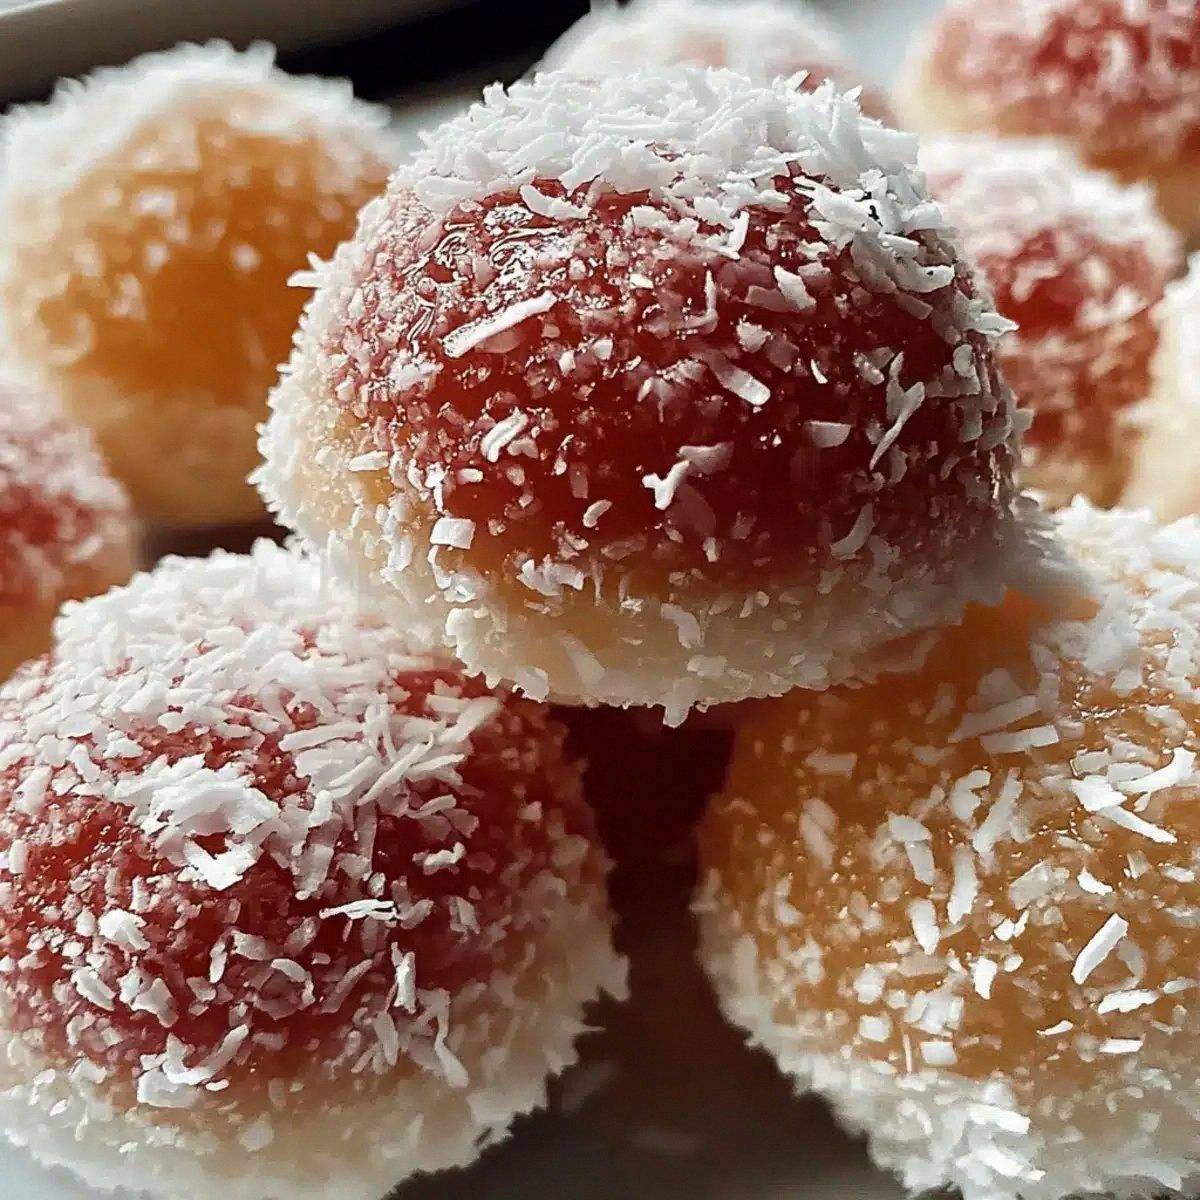
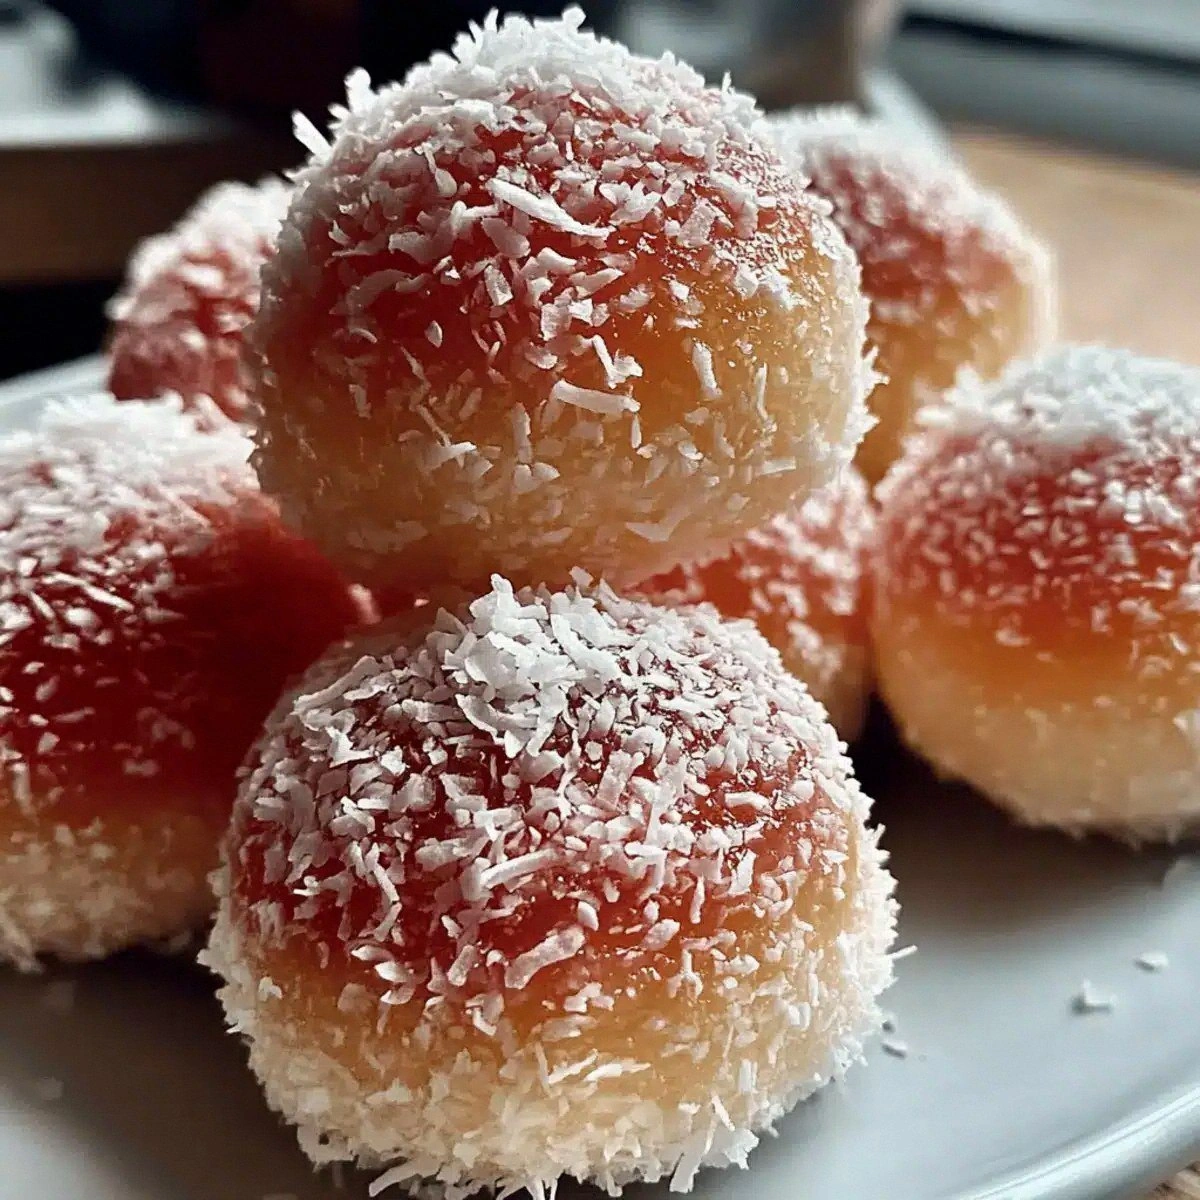
I was standing in my kitchen, half‑asleep, when my roommate dared me to make something that could survive a summer heatwave and still feel like a winter wonderland. I laughed, grabbed a bag of desiccated coconut, and thought, “What if I could turn this humble pantry staple into a cloud‑soft, melt‑in‑your‑mouth treat?” The result? Snowballs: irresistibly soft coconut treats that have become my secret weapon for every gathering. Imagine a bite that whispers of sweet vanilla, then erupts with a gentle crunch of toasted coconut, all wrapped in a glossy pink glaze that looks like a sunrise over a tropical beach. That first whiff of warm sugar and oil hitting the pan is a promise you can’t ignore, and the moment the batter lifts from the bowl it feels like you’re handling pure, edible clouds.
The kitchen was a symphony of sounds: the gentle crack of eggs, the soft hiss as oil met a hot pan, and the rhythmic whisk that turned a liquid into a glossy, velvety batter. My nose was assaulted by the sweet perfume of vanilla mingling with the faint nuttiness of coconut—an aroma that made my stomach do a little jig. My hands felt the weight of the bowl, the cool smoothness of the silicone spatula, and the satisfying resistance of the flour as it folded in. When the first batch emerged from the oven, golden‑brown and perfectly puffed, I dared you to taste it and not go back for seconds. This is hands down the best version you’ll ever make at home.
What makes this recipe a cut above the rest? Most coconut‑based desserts either turn out dry like a desert or soggy like a rain‑soaked sponge. I cracked that code by balancing the moisture from milk and oil with the structure from cake flour and a pinch of baking powder. The secret weapon? A double‑layer glaze that first sets with hot water, then finishes with icing sugar for that melt‑in‑your‑mouth finish. Most recipes get this completely wrong. Here’s what actually works: a quick sugar‑water syrup that locks in moisture, followed by a bright red glaze that adds a pop of color without overwhelming the delicate flavor.
Picture yourself pulling these snowballs out of the oven, the whole kitchen smelling incredible, the glaze still glossy, and the coconut dust shimmering like fresh snow under a streetlamp. You’ll be the hero of any potluck, birthday, or late‑night snack attack. Okay, ready for the game‑changer? Let me walk you through every single step — by the end, you’ll wonder how you ever made it any other way.
What Makes This Version Stand Out
- Texture: The interior stays pillowy soft thanks to the perfect ratio of oil to flour, while the exterior gets a gentle crust from the caramelized sugar.
- Flavor: A vanilla‑kissed batter meets a subtle coconut perfume, and the red glaze adds a sweet‑tart contrast that tingles the palate.
- Simplicity: Only ten ingredients, no fancy equipment, and a single‑pan method that even a kitchen novice can master.
- Uniqueness: The double‑glaze technique is rarely seen in coconut treats, giving you that professional‑look finish without the fuss.
- Crowd Reaction: Guests usually declare “I’ve never tasted anything like this!” and immediately ask for the recipe.
- Ingredient Quality: Using cake flour instead of all‑purpose keeps the crumb feather‑light, and fresh desiccated coconut adds natural oil for extra moistness.
- Cooking Method: Baking at a moderate 350°F ensures even rise, while the final glaze is set on a cool rack for a glossy sheen.
- Make‑Ahead Potential: These snowballs keep their softness for up to three days in an airtight container, and the glaze can be reheated in seconds.
Alright, let's break down exactly what goes into this masterpiece...
Inside the Ingredient List
The Flavor Base
The two whole eggs are the backbone of our batter. They provide structure and lift, turning a simple mixture into a light, airy dough. If you skip the eggs, you’ll end up with a dense, gummy crumb that feels more like a stale biscuit than a cloud. For vegans, a flax‑egg (1 tablespoon ground flaxseed + 3 tablespoons water) can substitute, though the texture will be slightly denser.
1 cup Sugar (first batch): This sugar dissolves into the wet ingredients, creating a glossy batter that caramelizes gently in the oven. Using granulated sugar instead of superfine keeps the batter from becoming overly sweet. If you prefer a less sweet version, reduce this to ¾ cup and add a pinch of salt to balance the flavor.
1 teaspoon Vanilla Essence: Pure vanilla essence adds a fragrant backbone that elevates the coconut’s natural nuttiness. A splash of bourbon or rum can replace vanilla for an adult‑only twist, but be careful not to add too much liquid.
The Texture Crew
½ cup Oil: A neutral oil (like grapeseed or sunflower) keeps the crumb moist without adding a competing flavor. Butter would make the snowballs richer but also denser; the oil keeps them feather‑light.
1 cup Cake Flour: Cake flour has a lower protein content than all‑purpose, which means less gluten formation and a softer crumb. If you can’t find cake flour, sift all‑purpose flour twice to mimic the texture.
1 teaspoon Baking Powder: This leavening agent gives the snowballs their signature puff. Too much will cause them to rise then collapse; stick to the exact amount.
¼ teaspoon Salt: Salt is the silent hero—it balances the sweetness and enhances the coconut flavor. Skipping it makes the final product taste flat.
½ cup Milk: Milk adds moisture and a touch of dairy richness. For a dairy‑free version, substitute with almond or oat milk; the texture will remain soft.
The Unexpected Star
1 cup Sugar (second batch) & ½ cup Water: These two combine to form a quick syrup that is brushed onto the baked snowballs before glazing. The syrup locks in moisture, ensuring the interior stays soft for days.
1 tablespoon Red Food Color: The color is purely aesthetic, turning the glaze into a vibrant pink that looks like sunrise on a tropical island. Use a gel color for a more intense hue without adding extra liquid.
1 cup Desiccated Coconut: This is the star of the show. It provides the signature coconut flavor and a gentle crunch on the outside. Toast the coconut lightly before using for an extra nutty depth.
The Final Flourish
1 cup Icing Sugar: Mixed with hot water, it creates a smooth glaze that sets with a glossy finish. If you like a thicker coating, add an extra tablespoon of icing sugar.
2 tablespoons Hot Water: The heat dissolves the icing sugar instantly, creating a glaze that spreads like silk. Be careful not to use boiling water, or you’ll end up with a grainy glaze.
Everything's prepped? Good. Let's get into the real action...
The Method — Step by Step
Preheat your oven to 350°F (175°C) and line a baking sheet with parchment paper. While the oven warms, whisk together the two eggs, 1 cup of granulated sugar, and vanilla essence in a large bowl. The mixture should become pale and slightly thick, a sign that the sugar is beginning to dissolve. Pro tip: Scrape the sides of the bowl with a rubber spatula to ensure no dry patches remain.
Kitchen Hack: Add the oil in a slow, steady stream while whisking; this creates an emulsion that keeps the batter silky.In a separate bowl, sift together the cake flour, baking powder, and salt. Sifting not only removes lumps but also aerates the flour, which contributes to that cloud‑like texture. Gently fold the dry mixture into the wet ingredients, alternating with the half‑cup of milk. The batter will look thick but still pourable; avoid over‑mixing, or you’ll develop gluten and lose the softness.
Spoon the batter onto the prepared sheet, using a tablespoon or a small ice‑cream scoop to form uniform mounds about 2 inches apart. This spacing allows the snowballs to expand without merging. The batter should spread slightly on its own; if it’s too stiff, add a splash of milk.
Slide the tray into the oven and bake for 12‑15 minutes, or until the tops turn a light golden hue and a toothpick inserted near the center comes out clean. You’ll know they’re done when the edges start to pull away from the parchment paper, creating a tiny “crack” that looks like a snowdrift.
Watch Out: Do not open the oven door before the 10‑minute mark; a sudden temperature drop can cause the snowballs to collapse.While the snowballs bake, prepare the simple syrup: combine the second cup of sugar with ½ cup water in a small saucepan. Bring to a gentle boil, stirring until the sugar dissolves completely. Once it reaches a syrupy consistency (about 2 minutes of simmering), remove from heat and set aside.
When the snowballs are out of the oven, let them cool on the sheet for 5 minutes, then transfer them to a wire rack. While still warm, brush each snowball generously with the sugar‑water syrup. This step is pure magic: the syrup seeps into the crumb, locking in moisture and creating a slightly sticky surface that the glaze will cling to perfectly.
Now for the glaze: whisk together the icing sugar, red food color, and 2 tablespoons of hot water until the mixture is smooth and glossy. It should have the consistency of a thin pancake batter—runny enough to coat but thick enough to stay on the snowball. Dip each syrup‑kissed snowball into the glaze, allowing any excess to drip back into the bowl. Place them back on the rack; the glaze will set in about 10 minutes, forming a shiny, candy‑like shell.
Kitchen Hack: If the glaze starts to thicken before you finish coating, warm it gently over a double boiler for 10 seconds.While the glaze sets, toast the desiccated coconut in a dry skillet over medium heat for 3‑4 minutes, stirring constantly. You’ll hear a faint crackle and smell a nutty aroma—this is the moment the coconut transforms from bland to brilliant. Once toasted, let it cool, then roll each glazed snowball in the coconut until fully coated. The coconut adheres to the glaze like a soft blanket, adding texture and flavor.
Allow the finished snowballs to rest for at least 15 minutes before serving. This short rest lets the glaze harden fully and the coconut settle into place. Serve them on a platter, and watch your guests’ eyes widen as they bite into that first soft, pink‑glazed, coconut‑kissed bite. I dare you to taste this and not go back for seconds—because you will.
That's it — you did it. But hold on, I've got a few more tricks that'll take this to another level...
Insider Tricks for Flawless Results
The Temperature Rule Nobody Follows
Never bake snowballs at a temperature higher than 350°F. Higher heat creates a rapid rise that can cause the interior to set before the exterior has a chance to form that delicate crust. Keep the oven door closed for the first 10 minutes; this steady heat lets the batter expand evenly. A friend once cranked the oven to 400°F hoping for a quicker bake—let's just say the result was a flat, rubbery pancake, not a fluffy snowball.
Why Your Nose Knows Best
Your sense of smell is a reliable indicator of doneness. When the snowballs start to emit a faint caramel aroma, you’re within two minutes of perfection. If you rely solely on timers, you risk over‑baking. Trust that toasty scent; it tells you the sugar is caramelizing just right, giving you that subtle crunch on the outside.
The 5‑Minute Rest That Changes Everything
After glazing, let the snowballs rest uncovered for exactly five minutes. This short pause allows the glaze to set without becoming too hard, preserving that melt‑in‑your‑mouth feel. Skipping this step results in a glaze that cracks when you bite, ruining the texture. I once tried to speed‑up the process by placing them in the fridge; the glaze hardened too fast and the coconut fell off.
Coconut Toasting Secrets
Toast the coconut over low heat while stirring constantly. The goal is a golden‑brown hue, not a burnt brown. A burnt coconut adds a bitter edge that overpowers the sweet glaze. If you’re short on time, spread the coconut on a baking sheet and toast in the oven at 300°F for 6‑8 minutes, checking every two minutes.
Glaze Consistency Control
If the glaze is too thin, add a teaspoon of icing sugar at a time until you reach the desired thickness. If it’s too thick, drizzle in a few drops of hot water. The perfect glaze should coat the back of a spoon and flow slowly off its edge.
Creative Twists and Variations
This recipe is a playground. Here are some of my favorite ways to switch things up:
Tropical Lime Burst
Swap the red food color for 1 tablespoon of lime zest mixed into the glaze, and replace half of the desiccated coconut with toasted shredded coconut. The lime adds a zingy contrast that brightens the sweet base, perfect for summer picnics.
Chocolate‑Covered Dream
Melt 100g of dark chocolate and dip the cooled snowballs halfway, then roll the exposed part in crushed pistachios. The bitter chocolate balances the sweet glaze, while pistachios add a salty crunch.
Spiced Autumn
Add ½ teaspoon of ground cinnamon and a pinch of nutmeg to the batter. Use a caramel-colored glaze (swap red food color for a dash of brown food coloring) and coat with toasted pumpkin seeds. This version screams cozy evenings.
Matcha Green Delight
Blend 1 teaspoon of matcha powder into the glaze and keep the red food color out. The earthy green hue pairs beautifully with a dusting of powdered sugar and a sprinkle of toasted sesame seeds.
Berry‑Infused
Puree ¼ cup of fresh strawberries, strain, and fold into the batter for a subtle fruit flavor. Use a pink glaze (as originally written) and finish with freeze‑dried strawberry shards for a burst of tang.
Storing and Bringing It Back to Life
Fridge Storage
Place the snowballs in an airtight container lined with parchment paper. They stay soft and moist for up to three days. If the glaze starts to lose its shine, lightly brush the tops with a teaspoon of warm water before serving.
Freezer Friendly
Wrap each snowball individually in plastic wrap, then place them in a zip‑top freezer bag. They freeze well for up to one month. To reheat, pop them in a 300°F oven for 5‑7 minutes; the glaze will revive, and the interior will be as fluffy as the day you baked them.
Best Reheating Method
Add a tiny splash (about 1 teaspoon) of water to the tray before reheating. The steam created prevents the glaze from cracking and restores the melt‑in‑your‑mouth texture. Serve warm for the ultimate indulgence.