I was halfway through a midnight baking spree when the kitchen turned into a chaotic symphony of clattering pans and burnt sugar. I had just pulled a batch of my usual peanut‑butter cookies from the oven, only to realize the sugar had caramelized into a sticky, bitter mess that tasted more like burnt toast than dessert. The smell was a bitter reminder of my culinary misstep, and I could almost hear the faint hiss of my own disappointment echoing off the walls.
That night, my friend dared me to turn that disaster into a triumph. “Make something that will make everyone forget your cookie fiasco,” she challenged, her eyes sparkling with mischief. I rolled up my sleeves, grabbed a jar of creamy peanut butter, a spoonful of honey, and a handful of rolled oats, and set out to create a treat that would be both comforting and unforgettable. I was determined to prove that a simple handful of pantry staples could be transformed into something that would have people begging for seconds.
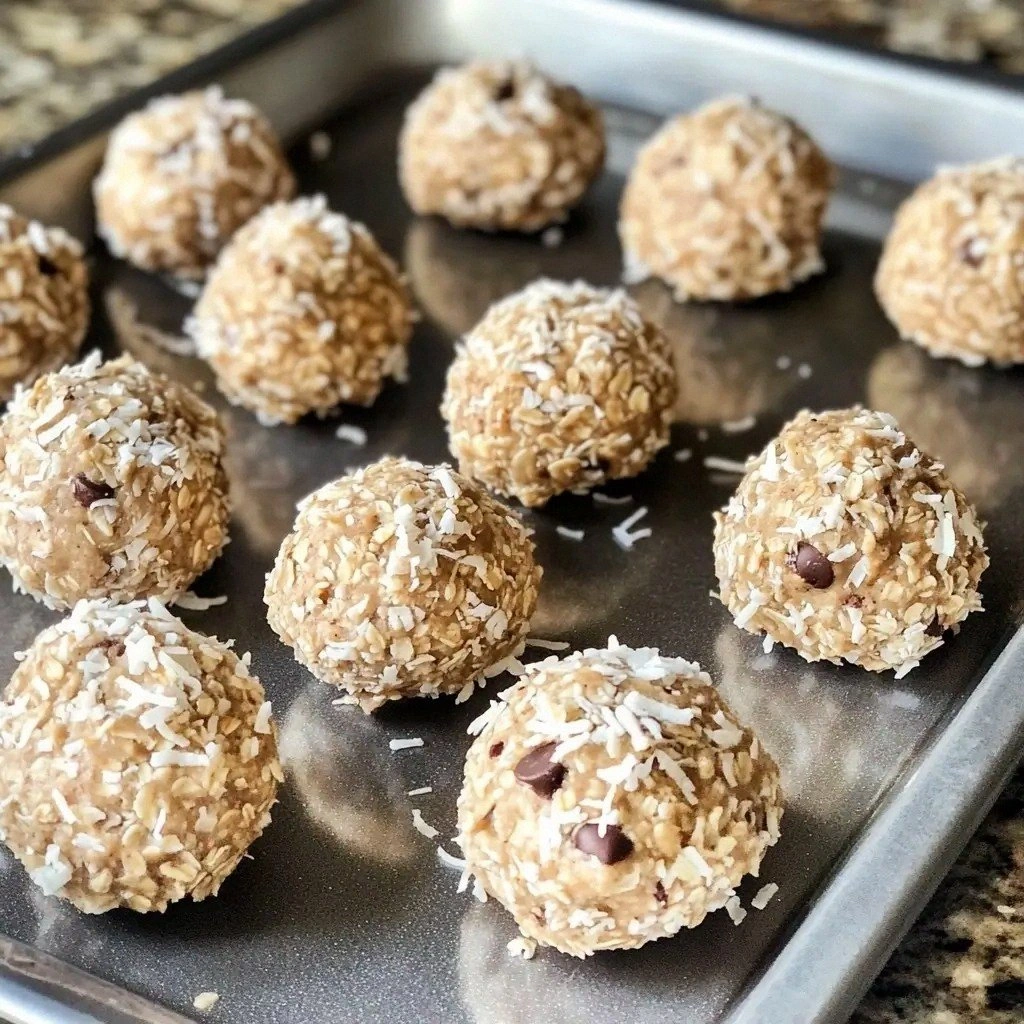
What makes this version stand out is that it is not just a peanut‑butter snack; it is a chewy, melt‑in‑your‑mouth snowball that balances sweetness, nuttiness, and a hint of tropical coconut. I dared you to taste this and not go back for seconds. The texture is like a soft, buttery snowflake, the flavor is a rich, nutty cascade that lingers on the tongue, and the aroma is a warm, comforting hug that instantly transports you to a childhood kitchen. I’ve never seen anyone make a snack that feels both indulgent and wholesome in one bite.
Most recipes get this completely wrong. Here’s what actually works: the secret is in the ratio of peanut butter to honey and the way the oats and coconut bind the mixture together. The honey acts as a natural sweetener and binding agent, while the oats provide the structure and texture that prevent the mixture from becoming a sticky mess. The shredded coconut adds a subtle tropical flavor and a chewy texture that elevates the snack from simple to spectacular.
Picture yourself pulling this out of the refrigerator, the whole kitchen smelling incredible, and the first bite melting into a velvety, nutty experience that makes you wonder why you ever made the cookies in the first place. Let me walk you through every single step — by the end, you'll wonder how you ever made it any other way.
What Makes This Version Stand Out
- Flavor: The creamy peanut butter provides a deep, nutty base that is perfectly balanced by the natural sweetness of honey or maple syrup. The chocolate chips add a hint of indulgence that complements the peanut butter without overpowering it.
- Texture: The rolled oats give the snowballs a satisfying chew, while the shredded coconut adds a subtle crunch. The mixture holds together like a soft snowflake, making each bite a delightful experience.
- Ease: No baking required—just mix, shape, and chill. This recipe is a breeze for beginners and a quick treat for anyone on the go.
- Uniqueness: The combination of coconut and chocolate chips creates a flavor profile that is both tropical and chocolatey, a rare pairing in snack recipes.
- Portability: These snowballs travel well, making them perfect for picnics, school lunches, or a mid‑day pick‑me‑up.
- Nutrition: Packed with protein from peanut butter and fiber from oats, this snack is a healthy choice that satisfies sweet cravings without the guilt.
Inside the Ingredient List
The Flavor Base
At the heart of this snack is creamy peanut butter. It’s the star that delivers a rich, nutty flavor that’s both comforting and indulgent. The smoothness of the peanut butter is essential; if it’s too chunky, the snowballs will be uneven and difficult to shape. Using a high‑quality, natural peanut butter without added oils or sugars ensures a pure, authentic taste that stands up to the sweetness of honey or maple syrup.
The Sweetener
Honey or maple syrup is the sweetener that binds everything together. It not only sweetens the mixture but also helps to keep the snowballs cohesive. The choice between honey and maple syrup can subtly alter the flavor profile: honey lends a floral, golden note, while maple syrup provides a deeper, caramelized sweetness. If you’re looking for a vegan option, maple syrup is the obvious choice, but honey gives a richer, more complex flavor.
The Texture Crew
Rolled oats are the backbone of the texture. They absorb the liquid, give the mixture body, and provide a chewy, satisfying bite. The oats also help the snowballs hold together when you roll them in your hands. Shredded coconut adds a tropical twist and a subtle chewiness that complements the oats, creating a multi‑dimensional mouthfeel.
The Unexpected Star
Chocolate chips are the final flourish that turns a simple snack into a decadent treat. They melt slightly when you bite into them, releasing a burst of chocolate that pairs wonderfully with the peanut butter. For a dairy‑free version, choose chocolate chips that are labeled “dairy‑free” or “vegan.” The chocolate adds a glossy sheen to the snowballs, making them visually appealing as well as delicious.
Everything’s prepped? Good. Let’s get into the real action.
The Method — Step by Step
- Step 1: Prepare the Bowl. Take a large mixing bowl and add the 1 cup of creamy peanut butter. The bowl should be large enough to hold the mixture as it expands when you add the sweetener. This is the foundation, so make sure it’s clean and dry.
- Step 2: Sweeten It. Add 1/2 cup of honey or maple syrup to the peanut butter. Stir vigorously for 30 seconds until the mixture becomes a smooth, glossy paste. If it’s too thick, add a splash of warm water to help it blend.
- Step 3: Add Oats. Sprinkle in the 2 cups of rolled oats. Fold the oats into the mixture until they’re fully coated. The oats should absorb the liquid and create a thick, doughy texture. This is the moment when the mixture starts to feel like a soft, edible snow.
- Step 4: Fold in Coconut. Stir in 1/2 cup of shredded coconut. The coconut should be evenly distributed, giving the snowballs a subtle tropical aroma. The coconut also adds a pleasant chewiness that balances the softness of the oats.
- Step 5: Mix in Chocolate Chips. Gently fold in 1/2 cup of chocolate chips. Be careful not to overmix; you want the chocolate to stay in small pockets for that delightful burst of flavor with each bite.
- Step 6: Shape the Snowballs. Scoop out spoonfuls of the mixture and roll them between your palms to form bite‑size balls. The mixture should be firm enough to hold its shape without crumbling. If it’s too soft, place it in the refrigerator for 10 minutes before shaping.
- Step 7: Chill. Place the snowballs on a parchment‑lined tray and refrigerate for at least 30 minutes. The chilling process firms them up and allows the flavors to meld together. The longer they chill, the more pronounced the peanut butter and chocolate notes become.
- Step 8: Serve and Enjoy. Once chilled, transfer the snowballs to an airtight container. Serve immediately or keep them in the fridge for up to a week. Each bite is a burst of nutty sweetness that melts in your mouth like a soft snowflake.
That’s it—you did it. But hold on, I’ve got a few more tricks that will take this to another level. These insider tips will help you perfect the texture, flavor, and presentation of your snowballs.
Insider Tricks for Flawless Results
The Temperature Rule Nobody Follows
Peanut butter is temperature sensitive. If it’s too cold, it’s hard to mix; if it’s too warm, it becomes too runny. The ideal temperature is just below room temperature, which allows the mixture to be pliable without being sticky. I keep a small bowl of warm water in the fridge and let the peanut butter sit for a few minutes before use.
Why Your Nose Knows Best
Smell is a powerful indicator of flavor balance. As the snowballs chill, the aroma of honey, peanut butter, and chocolate will mingle. If the mixture smells too sweet or too nutty, adjust the ratio by adding a pinch more oats or a splash of honey. Your nose can guide you to the perfect balance before you taste.
The 5‑Minute Rest That Changes Everything
After you’ve shaped the snowballs, let them rest at room temperature for 5 minutes before refrigerating. This brief pause allows the mixture to settle and the flavors to integrate. It also prevents the snowballs from becoming too hard when you first bite into them.
Keep the Coconut Fresh
Shredded coconut can lose its aroma quickly. Store it in an airtight container and use it within a month for the freshest flavor. If you’re using dried coconut, give it a quick rinse in warm water and dry it on a paper towel before adding it to the mixture.
The Final Coat
For a glossy finish, lightly dust the snowballs with cocoa powder or powdered sugar after chilling. This not only adds a decorative touch but also creates a slight barrier that keeps them from sticking together. It’s a simple step that elevates the presentation.
Creative Twists and Variations
This recipe is a playground. Here are some of my favorite ways to switch things up:
Almond Butter Avalanche
Swap the peanut butter for almond butter to create a nutty, slightly sweeter flavor. Almond butter pairs beautifully with dark chocolate chips for a sophisticated twist.
Spiced Chai Delight
Add a pinch of ground cinnamon, cardamom, and ginger to the mixture. The spices bring warmth and depth, turning the snowballs into a comforting, spiced treat.
Matcha Magic
Stir in 1 tablespoon of matcha powder for a vibrant green hue and a subtle, earthy flavor. The matcha also adds antioxidants, making the snack a healthful indulgence.
Coconut‑Lemon Zest
Add the zest of one lemon to the mixture for a bright, citrusy kick. The lemon zest cuts through the richness of the peanut butter and chocolate, creating a fresh contrast.
Chocolate‑Covered Snowballs
After chilling, dip the snowballs in melted dark chocolate and let them set. The chocolate coating adds a glossy finish and a richer chocolate experience.
Storing and Bringing It Back to Life
Fridge Storage
Store the snowballs in an airtight container in the refrigerator for up to one week. The cold environment keeps them firm and prevents the peanut butter from melting. If they become too hard, let them sit at room temperature for a few minutes before serving.
Freezer Friendly
For longer storage, place the snowballs on a parchment‑lined tray and freeze for up to 3 months. Once frozen, transfer them to a freezer‑safe bag. To enjoy, thaw in the refrigerator overnight or at room temperature for about 30 minutes.
Best Reheating Method
If you prefer a warm snack, gently reheat the snowballs in a microwave at 30‑second intervals, stirring in between. Add a tiny splash of water before reheating to create steam, which keeps the mixture moist and prevents it from drying out.