Picture this: it’s a crisp October afternoon, the leaves are a riot of amber, and you’re standing in your kitchen with a bag of pumpkin puree and a jar of maple syrup that smells like the first snow. I was halfway through a batch of pumpkin bread when a neighbor’s birthday party knocked on my door, demanding something sweet and comforting. The result? A kitchen disaster where the batter turned into a sticky, unrecognizable mess and the oven temperature was off by a degree. I stared at the ruined loaf, then at the pumpkin puree, and thought, “What if I could turn this into something that actually works?”
That night, I set my phone on the counter and started scrolling through endless pumpkin pie recipes. Each one seemed to promise a buttery crust, a silky filling, and a dash of cinnamon, but none felt truly authentic. I was craving a pie that felt like a hug, not a processed dessert. I wanted something that would make the whole kitchen smell like a pumpkin patch in the fall, with a crust that crackles like fresh snow, and a filling that swirls with spice like a warm hearth. I was determined to find the perfect balance of flavors, textures, and simplicity.
Fast forward to today, and I’ve cracked the code. This is hands down the best version of pumpkin pie you’ll ever make at home. The crust is buttery and tender, the filling is silky without being clumpy, and the spices sing in harmony. It’s a recipe that transforms ordinary pantry staples into a showstopper that even the most skeptical family members will beg for seconds. I dare you to taste this and not go back for seconds.
What sets this recipe apart isn’t just the ingredients; it’s the approach. I use a paleo-friendly crust that melts in your mouth, a filling that’s thickened naturally with flaxseed and arrowroot, and a touch of coconut milk to keep it creamy without dairy. The secret? A slow, low‑heat bake that caramelizes the sugars without burning the edges, and a final touch of vanilla to lift the whole thing. It’s a game‑changer for anyone who thinks pumpkin pie has to be complicated.
If you’ve ever struggled with pumpkin pie, you’re not alone. I’ve been there, watching the crust burn and the filling freeze. That’s why I’m excited to walk you through every single step. By the end, you’ll wonder how you ever made it any other way.
Picture yourself pulling this out of the oven, the whole kitchen smelling incredible, and the first slice sliding off the crust with a satisfying crack. The filling glistens with a golden sheen, and the spices dance in the air. Your friends will ask for the recipe, and you’ll grin, knowing you’re the hero of the gathering. Stay with me here — this is worth it.
So grab your apron, and let’s dive into the ultimate paleo pumpkin pie that will redefine your dessert game.
What Makes This Version Stand Out
- Flavor: The blend of pumpkin, maple syrup, and a quartet of spices creates a depth that feels both comforting and adventurous, like a cozy campfire in a glass bowl.
- Texture: The flaxseed “egg” and arrowroot powder give the filling a silk‑smooth consistency without any dairy, while the crust stays buttery and flaky.
- Simplicity: With only a handful of pantry staples, you can whip up this pie in under an hour, making it a stress‑free option for busy weeknights.
- Uniqueness: The use of coconut milk instead of heavy cream adds a tropical note that balances the earthiness of the pumpkin.
- Crowd Reaction: Once you serve it, expect compliments that last longer than the dessert itself—people will be asking for the recipe after the last bite.
- Ingredient Quality: Every component is sourced from high‑quality, minimally processed options, ensuring you’re not just eating dessert but nourishing yourself.
- Cooking Method: The low‑temperature bake allows the flavors to meld without scorching, giving you a golden, caramelized top.
- Make‑ahead Potential: The pie can be prepared the day before, refrigerated, and baked fresh, making it ideal for holiday gatherings.
Inside the Ingredient List
The Flavor Base
Pumpkin puree is the heart of this pie, offering a sweet, earthy foundation that carries the spices. Use a fresh, pure pumpkin puree for the most vibrant flavor—store‑bought varieties often contain added sugars and preservatives that can throw off the balance. If you can’t find fresh pumpkin, a high‑quality canned puree works fine, but be sure to drain it well to avoid excess liquid. Skipping the pumpkin will turn this into a plain custard, so keep it front and center.
Maple syrup is the natural sweetener that brings a subtle caramel undertone. It also adds a touch of depth that honey or agave can’t match. A light golden syrup is preferable; dark syrup will overpower the delicate pumpkin notes. If you’re allergic to maple or prefer a different sweetener, try pure cane sugar or a small amount of coconut sugar, but adjust the quantity to taste.
Coconut milk provides a creamy, slightly nutty backdrop that replaces dairy without the heaviness. The fat content gives the filling a luscious mouthfeel, while the coconut flavor subtly complements the spices. If you’re lactose‑free but not vegan, a splash of almond milk can work, though it won’t give the same richness. Remember, the coconut milk should be full‑fat; skim or light versions will leave the filling too thin.
The Texture Crew
Ground flaxseed is the secret binder that replaces the traditional egg, giving the pie a stable structure while keeping it paleo‑friendly. Mix one tablespoon of ground flaxseed with three tablespoons of water, let it sit for five minutes, and it will thicken into a gel-like consistency. This “flax egg” sets the filling without adding any animal products, making the pie both vegan and gluten‑free. If you’re not vegan, you can still use a regular egg for extra richness, but the flaxseed is the star here.
Arrowroot powder acts as a natural thickener, ensuring the filling remains silky and doesn’t run off the crust. It’s a neutral‑flavored starch that thickens quickly at low temperatures, preventing the pie from becoming too custard‑like. Use just one tablespoon; too much will give a gummy texture. If you’re allergic to arrowroot, tapioca starch is a suitable alternative.
Eggs, when used, add protein and help bind the filling together. In this recipe, I use two eggs for a richer mouthfeel, but you can reduce them to one if you want a lighter texture. Eggs also help the crust set properly, giving it a golden, slightly crisp finish. Skipping eggs entirely will result in a more custard‑like filling that may not hold its shape as well.
The Unexpected Star
Almond flour forms the base of the crust, offering a nutty flavor that pairs beautifully with the sweet filling. It’s also gluten‑free and provides a good dose of healthy fats. Use a fine almond flour for a smoother crust; whole‑meal almond flour can be a bit gritty. If you’re allergic to nuts, you can substitute with sunflower seed flour, though the flavor will change slightly.
Coconut oil is the fat that melts into the crust, creating a flaky, buttery texture. It also adds a subtle coconut aroma that complements the rest of the pie. Melt it just before mixing to ensure it’s liquid but not hot, which can affect the crust’s rise. If you prefer a more neutral flavor, use avocado oil; it will still provide the necessary fat content.
The Final Flourish
Ground cinnamon, ginger, nutmeg, and cloves are the spice quartet that give pumpkin pie its signature warmth. Each spice contributes a different note: cinnamon for sweetness, ginger for a bite, nutmeg for earthiness, and cloves for a hint of sweetness and depth. Use fresh ground spices for the best aroma, and don’t be afraid to adjust the amounts to suit your taste. Skipping any of these spices will result in a less complex flavor profile.
A pinch of sea salt is essential to balance the sweetness and enhance the overall flavor. Salt is the unsung hero of desserts; it brings out the natural flavors of every ingredient. If you’re watching sodium, use a low‑sodium sea salt, but remember that a small amount makes a big difference. Skipping salt will leave the pie tasting flat.
Vanilla extract adds a subtle, sweet depth that ties the spices together. Use a high‑quality vanilla bean paste or pure vanilla extract for the most authentic flavor. A little goes a long way—one teaspoon is enough to lift the entire pie. If you’re vegan, you can use a non‑dairy vanilla flavoring, but the aroma may not be as robust.
Everything’s prepped? Good. Let’s get into the real action.
The Method — Step by Step
- Preheat your oven to 325°F (163°C). Line a 9‑inch pie dish with parchment paper to prevent sticking. The low temperature is key for even baking and caramelization.
- In a medium bowl, whisk the pumpkin puree, coconut milk, maple syrup, vanilla extract, and flaxseed “egg” until smooth. This mixture should be silky, with no lumps. The flaxseed gel will thicken the filling as it bakes.
- Add the spices—cinnamon, ginger, nutmeg, cloves—and sea salt to the pumpkin mixture. Stir until the spices are evenly distributed. The aroma should be warm and inviting. Kitchen Hack: If you’re short on time, use a spice grinder to blend all spices together before adding them to the mixture. This ensures even flavor distribution.
- In a separate bowl, combine almond flour, coconut oil, and arrowroot powder. Mix until the mixture resembles coarse crumbs. The coconut oil should be melted but not hot; it helps the crust bind together.
- Press the crust mixture into the bottom and up the sides of the lined pie dish. Use a flat-bottomed glass to press it evenly. The crust should be firm but not too dense. Let it chill in the fridge for 10 minutes to firm up before filling.
- Pour the pumpkin filling into the chilled crust. Smooth the top with a spatula. The filling should be level, with no air pockets. If you see any bubbles, press them gently with a spoon.
- Place the pie in the preheated oven. Bake for 45 minutes, then reduce the temperature to 300°F (149°C) and bake for an additional 10 minutes. The top should be golden brown and the edges slightly pulled away from the dish. Watch Out: Do not open the oven door early; the sudden temperature change can cause the filling to collapse.
- Remove the pie from the oven and let it cool on a wire rack for at least 30 minutes. The cooling time allows the filling to set and makes slicing easier. If you cut too early, the filling will be runny.
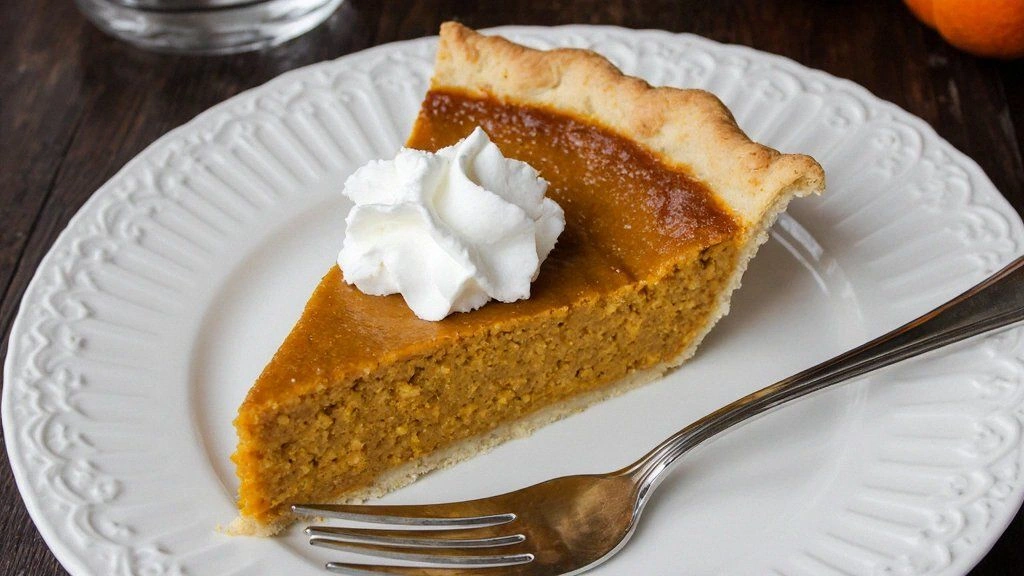
- Serve the pie with a dollop of coconut whipped cream or a drizzle of maple syrup if desired. The contrast of the warm pie with the cool cream is irresistible. Enjoy!
That's it—you did it. But hold on, I've got a few more tricks that will take this to another level.
Insider Tricks for Flawless Results
The Temperature Rule Nobody Follows
Many bakers instinctively bake at 350°F, but that can scorch the edges of a pumpkin pie. Lowering the temperature to 325°F and then to 300°F after the initial bake ensures a gentle rise and a caramelized top without burning. The trick is to let the pie bake at a steady low heat; this slow process allows the sugars to develop deep, complex flavors. If you’re using a convection oven, reduce the temperature by 25°F to avoid over‑browning.
Why Your Nose Knows Best
As the pie bakes, the spices release their aromas, giving you a clue about the internal temperature. When the scent of cinnamon and nutmeg becomes fragrant, the filling is close to done. Trust your nose; it’s a reliable indicator that the pie is ready to come out of the oven. This sensory checkpoint helps prevent under‑baking and ensures a perfectly set filling.
The 5‑Minute Rest That Changes Everything
After removing the pie from the oven, let it rest on a wire rack for at least five minutes before cutting. This brief rest allows the filling to set, making it easier to slice cleanly. Cutting too early can cause the pie to crumble and spill. If you’re serving immediately, let it cool for a full 30 minutes to achieve the best texture.
Avoiding Crumbly Crusts
If the crust feels crumbly after baking, it’s likely because the coconut oil was too hot or the almond flour was too coarse. To fix this, chill the crust mixture for at least 15 minutes before pressing it into the dish. This step helps the fat solidify, resulting in a more cohesive crust that holds together during baking.
Enhancing the Sweetness
If you prefer a sweeter pie, add a tablespoon of maple syrup to the filling or drizzle a light maple glaze on top after baking. The glaze will caramelize slightly in the oven, adding a glossy finish. Just remember that too much sweetness can overpower the spices, so add sparingly.
Creative Twists and Variations
This recipe is a playground. Here are some of my favorite ways to switch things up:
Spiced Apple Pumpkin Pie
Add half a cup of diced apples to the filling for a fruity twist. The apples complement the pumpkin’s sweetness and add a pleasant chew. Use tart apples like Granny Smith for a balanced flavor.
Chocolate Pumpkin Swirl
Fold a few tablespoons of cocoa powder into the filling for a chocolatey undertone. The cocoa should be unsweetened to maintain the natural sweetness of the pumpkin. This variation is perfect for chocolate lovers.
Citrus Kick
Add a tablespoon of lemon zest and a splash of lemon juice to the filling. The citrus brightens the spices and adds a refreshing contrast. It’s a great way to lighten the dessert for hot summer days.
Nutty Crunch
Top the pie with chopped toasted walnuts or pecans before baking. The nuts add crunch and a buttery flavor that pairs well with the creamy filling. Sprinkle a pinch of sea salt on top for a sweet‑salty finish.
Vanilla Bean Dream
Use a vanilla bean instead of extract for an intense vanilla flavor. Split the bean, scrape the seeds, and add them to the filling. The result is a silky, fragrant pie that feels luxurious.
Coconut Cream Finish
Serve the pie with a swirl of coconut whipped cream for a tropical touch. Whip coconut cream with a touch of maple syrup until soft peaks form. The cool cream balances the warm spices and adds a light, airy texture.
Storing and Bringing It Back to Life
Fridge Storage
Store the pie in an airtight container in the refrigerator for up to four days. The filling stays moist, and the crust retains its texture. Keep it on a cool shelf, not near the fridge door, to avoid temperature fluctuations.
Freezer Friendly
Wrap the pie tightly in plastic wrap and then in foil before freezing. It can be kept in the freezer for up to two months. When ready, thaw in the refrigerator overnight. The pie will still taste fresh and the crust will stay flaky.
Best Reheating Method
To reheat, preheat your oven to 300°F (149°C). Place the pie on a baking sheet and heat for 10–12 minutes, or until warmed through. Add a splash of water to the bottom of the pan to create steam, which will keep the filling moist and prevent it from drying out. The crust will stay crisp, and the filling will regain its silky texture.