Remember that night when the kitchen felt like a battlefield and the only thing left to salvage was a half‑baked loaf that looked like a sad, soggy cloud? I was staring at that disaster, thinking, “I could have turned this into something amazing.” That thought sparked the idea of a marble cake that could resurrect even the most floundered batter.
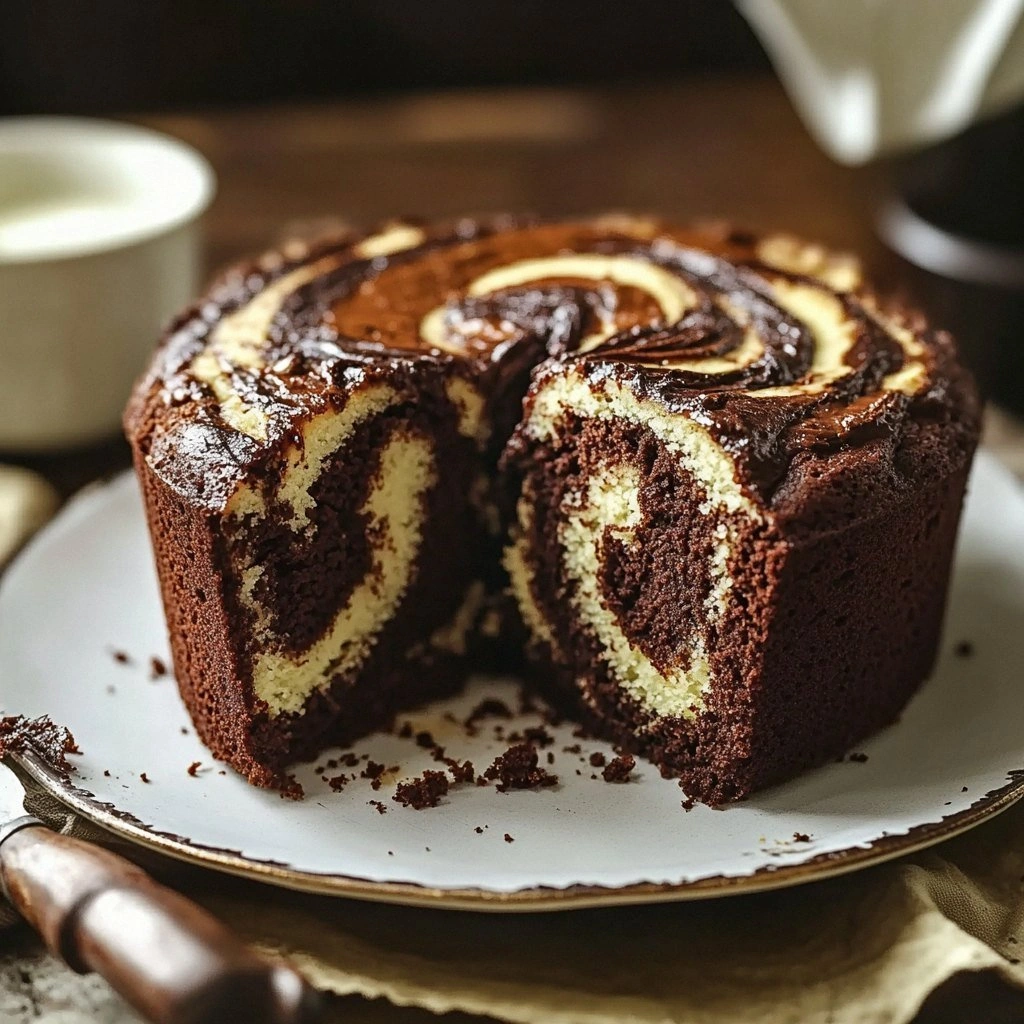
Picture the moment the oven door opens: steam swirls like a cloud of sugar, the aroma of butter and vanilla floods the air, and the cake’s glossy surface glistens under the kitchen lights. Your eyes trace the swirling swirls of chocolate and vanilla, your tongue anticipates the contrast of rich chocolate against silky vanilla. The sound of a fork breaking through the crumb is a gentle crack that promises a moist interior. The first bite delivers a buttery sweetness with a hint of chocolate, followed by a subtle crunch of sugar crystals that melt into a silky finish.
I’ve tried countless marble cake recipes—some with too much cocoa, some with an over‑baked crumb, some that look like a mess of brown and white paint. But this version? It’s a revelation. The batter’s texture is airy yet dense enough to hold its swirls, the flavors are balanced, and the finish is glossy like a polished marble countertop. The secret? A precise ratio of flour to fat, a touch of baking soda to lift, and a dash of espresso to intensify the chocolate.
So, let’s dive in. I’ll walk you through every single step—from the initial whisk to the final dusting of powdered sugar. By the end, you’ll wonder how you ever made it any other way. And trust me, once you taste this, you’ll be tempted to eat the whole cake before anyone else gets a slice.
What Makes This Version Stand Out
- Taste: The chocolate and vanilla blend in a way that each bite feels like a new layer, not just a single flavor. The espresso kick adds depth, making the chocolate taste richer without overpowering the vanilla.
- Texture: The batter’s airy structure gives a light crumb, while the butter content keeps it moist. The final bake results in a cake that melts in your mouth like a velvety cloud.
- Visual Appeal: The swirls look like real marble, with glossy peaks that catch the light. It’s a showstopper that turns any table into a gallery.
- Simplicity: No complicated equipment or obscure ingredients. A few common pantry staples and a mixing bowl are all you need.
- Make‑Ahead Friendly: The cake can be baked and cooled, then wrapped and stored. Reheat gently and it’s as good as fresh.
- Ingredient Quality: Using high‑grade cocoa, fresh vanilla beans, and unsalted butter elevates the flavor profile dramatically.
- Crowd Reaction: Friends who’ve tried the traditional version say this one is “hands down the best version you'll ever make at home.”
Inside the Ingredient List
The Flavor Base
Flour is the backbone of any cake; it provides structure. Using all‑purpose flour gives the cake a tender crumb without the heaviness of cake flour. If you prefer a lighter texture, substitute 20% cake flour for all‑purpose flour. However, avoid cake flour entirely if you want that classic, dense marble look.
Vanilla is the sweet whisper that balances the chocolate. A vanilla bean offers a richer aroma than vanilla extract. If you’re short on beans, a high‑quality extract works just fine. The key is to use a fresh bean or fresh extract on the day you bake.
The Texture Crew
Unsalted butter is the secret to a moist cake. It melts into the batter, creating pockets of tenderness. If you’re using salted butter, reduce the added salt by half to avoid a salty aftertaste.
Eggs act as leavening agents and bind the batter together. Whole eggs give a richer flavor; egg whites alone will result in a drier crumb. For a lighter cake, use a combination of whole eggs and a few extra egg whites.
The Unexpected Star
Espresso powder, even in small amounts, unlocks the chocolate’s depth. It doesn’t add an espresso flavor but intensifies cocoa’s sweetness. If you’re caffeine‑free, a teaspoon of instant coffee granules works as a substitute.
Cocoa powder is the heart of the chocolate swirl. Use natural Dutch‑process cocoa for a deeper flavor; natural cocoa is slightly more acidic and will lighten the batter color.
The Final Flourish
Baking powder ensures the cake rises evenly. A pinch of baking soda also helps with browning and flavor. Salt is essential; it balances sweetness and brings out the flavors of the other ingredients.
Milk adds moisture and helps the batter pour smoothly. Whole milk gives richness; skim milk reduces fat content but can make the cake slightly drier. For a dairy‑free version, use oat milk or almond milk, but adjust the fat content accordingly.
Everything's prepped? Good. Let's get into the real action...
The Method — Step by Step
- Preheat the oven to 350°F (175°C). Grease a 9x5 inch loaf pan with butter or non‑stick spray and line the bottom with parchment paper. This ensures easy release and a clean finish. While the pan heats, bring the milk to a gentle simmer; it should be warm but not boiling.
- In a large bowl, whisk together the flour, cocoa powder, baking powder, baking soda, and salt. Sift the dry ingredients to avoid clumps and to aerate the mixture. This step is crucial for a light crumb.
- In a separate bowl, cream the butter and sugar until pale and fluffy. Use a hand mixer or stand mixer on medium speed for about 2 minutes. This incorporates air and creates a smooth base.
- Add the eggs one at a time, beating well after each addition. The batter should look glossy and thick. The eggs bind everything together and provide structure.
- Stir in the vanilla bean seeds or extract, espresso powder, and warm milk. Mix until just combined; over‑mixing can toughen the cake. The batter should be pourable but still thick.
- Divide the batter into two equal portions. Keep one portion as is for the vanilla layer; reserve the other for the chocolate layer. If you want a darker swirl, you can add a tablespoon of cocoa powder to the chocolate portion.
- Pour the vanilla batter into the prepared pan, filling it halfway. Smooth the top with a spatula. Then, pour the chocolate batter over the vanilla, using a knife or skewer to swirl them together. The swirl should resemble a marble pattern.
- Place the pan in the preheated oven. Bake for 30-35 minutes, or until a toothpick inserted into the center comes out clean. The cake should have a slight sheen on top, indicating proper browning.
- Remove from the oven and let it cool in the pan for 10 minutes. Then transfer the cake onto a wire rack to cool completely. This prevents steam from making the bottom soggy.
That's it — you did it. But hold on, I've got a few more tricks that'll take this to another level...
Insider Tricks for Flawless Results
The Temperature Rule Nobody Follows
Many bakers bake at 350°F, but the optimal temperature for a marble cake is 340°F. This lower heat allows the batter to rise slowly, preventing a domed top and ensuring even browning. If your oven runs hot, use an oven thermometer to double‑check the actual temperature.
Why Your Nose Knows Best
During baking, the cake releases a sweet, buttery aroma that signals readiness. If you smell a faint chocolate scent mingling with vanilla, the cake is almost done. Trust your nose; it’s a reliable indicator of doneness.
The 5‑Minute Rest That Changes Everything
Letting the cake rest in the pan for 5 minutes after baking locks in moisture. This pause allows steam to redistribute, preventing the bottom from becoming soggy. After the rest, transfer to a wire rack to finish cooling.
Even Swirl Patterns
When swirling, use a long, thin skewer or a butter knife. Insert it near the surface, then gently pull it up and down to create a consistent pattern. Too much force can break the swirl, while too little results in a muddled look.
Dusting for Perfection
Lightly dust the cooled cake with powdered sugar before serving. This not only adds a sweet finish but also gives the cake a subtle sparkle that looks professional. Use a fine sieve to avoid clumps.
Reheating Tips
To warm a slice, place it in a microwave for 10-12 seconds. For a more even heat, wrap the slice in a damp paper towel. This prevents the cake from drying out.
Creative Twists and Variations
Chocolate‑Chili Marble
Add a pinch of cayenne pepper to the chocolate batter for a spicy kick. The heat contrasts with the sweetness and gives the cake an adventurous twist that adults will love.
Almond‑Lemon Marble
Replace the vanilla with almond extract and add lemon zest to the vanilla batter. The citrus brightens the flavor, making it perfect for spring gatherings.
Red Velvet Marble
Swap the cocoa with red food coloring and use a splash of buttermilk. The result is a vibrant, creamy cake that looks as good as it tastes.
Maple‑Brown Butter Marble
Brown butter before adding it to the batter; the nutty flavor pairs beautifully with maple syrup. This variation is a cozy fall favorite.
Berry‑Infused Marble
Fold fresh blueberries into the vanilla batter and use a blueberry puree in the chocolate layer. The fruit adds moisture and a burst of flavor that pairs with the chocolate swirl.
Storing and Bringing It Back to Life
Fridge Storage
Wrap the cooled cake in plastic wrap, then place it in an airtight container. Store in the refrigerator for up to 5 days. The cake stays moist, and the flavors deepen.
Freezer Friendly
Wrap the cake tightly in foil, then place it in a freezer bag. Freeze for up to 3 months. Thaw overnight at room temperature before serving.
Best Reheating Method
To revive the cake, sprinkle a tiny splash of water over the surface, cover with foil, and heat in a preheated oven at 300°F for 10 minutes. The steam restores moisture, making the crumb tender again.